Thursday, July 29, 2010

Summer Squash Casserole


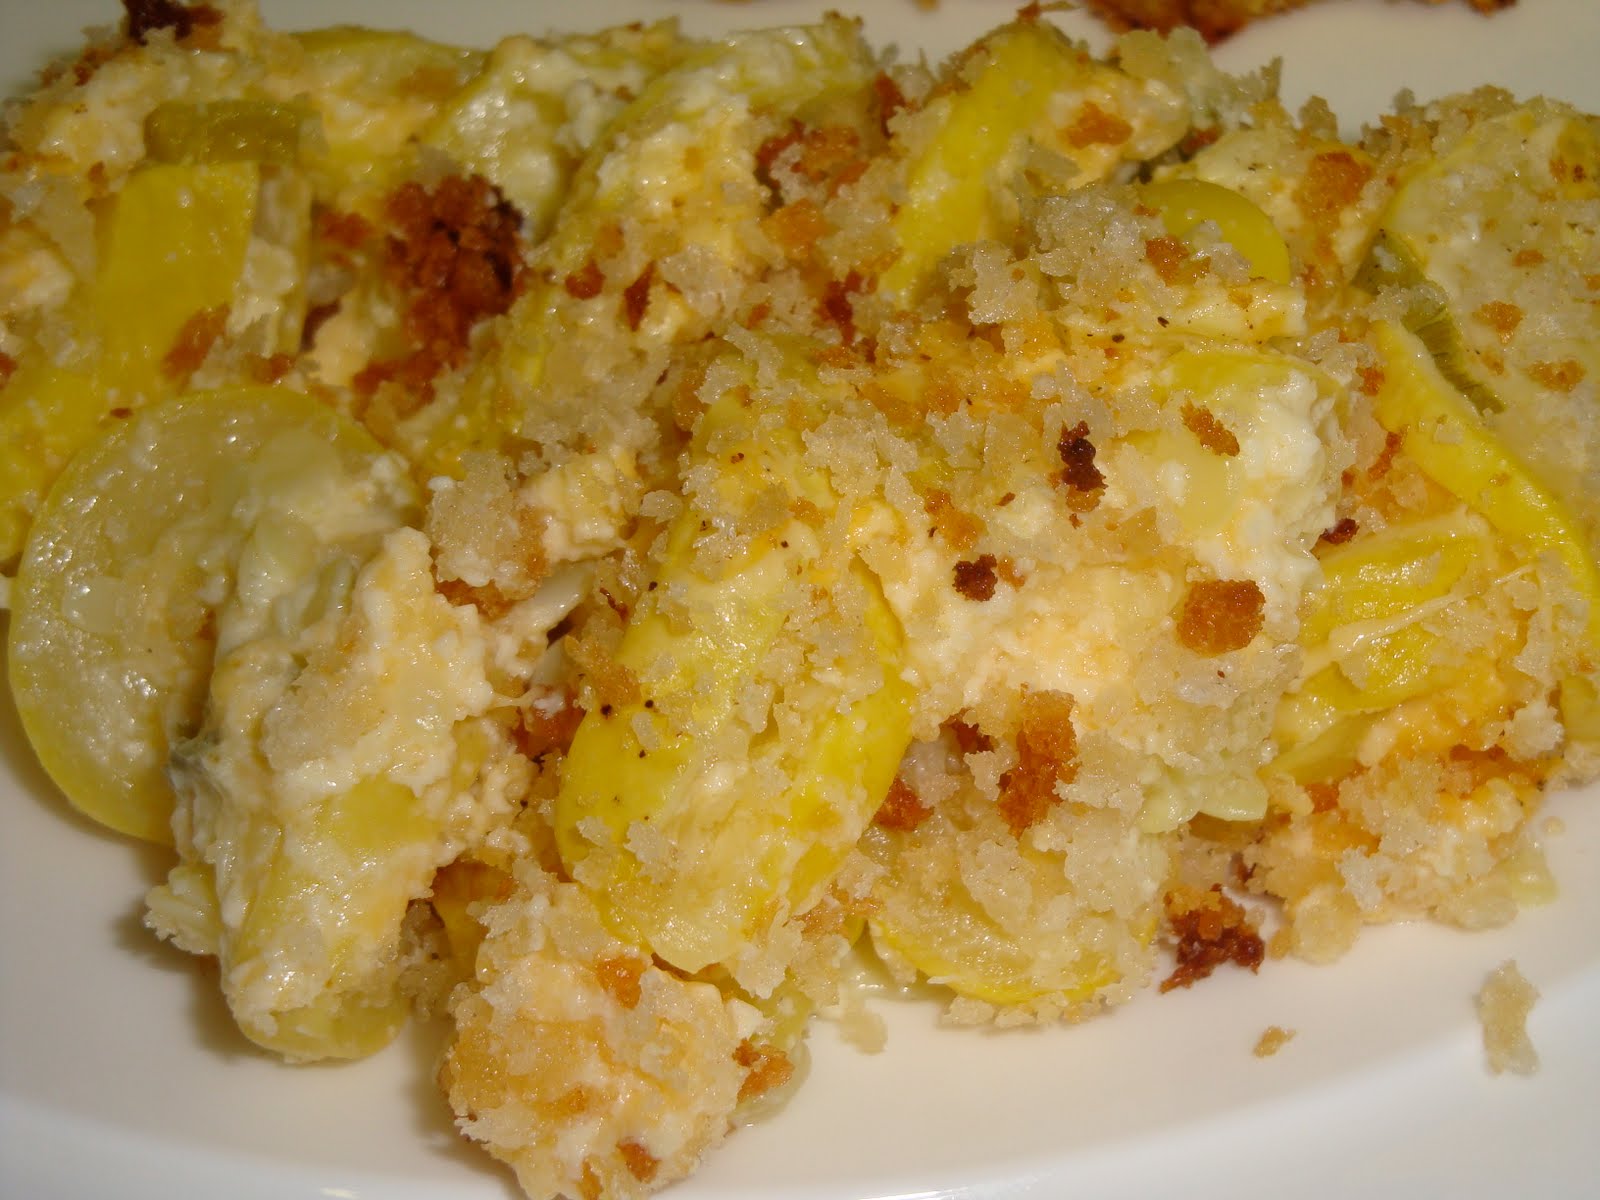
This fabulous recipe came from Southern Living magazine. This summer I've been on a squash and zucchini kick (it's always on sale at Publix). I couldn't wait to try this after I found it and it was just as good as I imagined. I cut the recipe in half, since it was just the two of us. There isn't anything I changed in the recipe, but I used egg beaters, margarine, reduced fat cheese, light mayo and Panko crumbs to make it a bit healthier. I'm eating the leftovers as I type, it was that good!

Prep Time: 10 minutes
Other: 30 minutes
Yield: Makes 6 to 8 servings
Ingredients
2 1/2 pounds yellow squash, sliced
3/4 cup chopped green onions
1 cup reduced-fat mayonnaise
2 large eggs, lightly beaten
1 tablespoon all-purpose flour
1/2 teaspoon salt
1 (10-oz.) block sharp Cheddar cheese, shredded
1 cup soft, fresh breadcrumbs
2 tablespoons butter, melted
Preparation
1. Combine squash and green onions in a large microwave-safe bowl. Cover tightly with plastic wrap, folding back a small edge to allow steam to escape. Microwave at HIGH 8 minutes or until squash is tender. (Do not drain.)

2. Whisk together mayonnaise and next 3 ingredients in a large bowl; stir in squash mixture and cheese. Spoon mixture into a lightly greased 11- x 7-inch baking dish; cover tightly with plastic wrap, folding back a small edge to allow steam to escape. Microwave at HIGH 10 minutes or until casserole is set; remove from microwave, and let stand 10 minutes.

3. Stir together breadcrumbs and melted butter; microwave 2 minutes. Sprinkle over casserole.

Wednesday, July 28, 2010

Tuesday, July 27, 2010

Ribbon Bookmarks

These bookmarks are simple & cheap. All you need are some cute buttons, matching ribbon and a glue gun. Measure the ribbon about an inch longer than the book. Glue the buttons to the top of the ribbon. Trim the edges and to keep your ribbon from fraying, you can burn the edges or use clear nail-polish.


Sunday, July 25, 2010

Tilapia and Asparagus with Capers


I fell in love with capers on our honeymoon in St. Lucia. I bought some a few weeks ago and found a few recpipes with capers in them. For this dinner, I decided to start with the asparagus side from Cooking Light. Then, I made my own lemon butter sauce with capers to go on top of the tilapia we grilled with the asparagus. I served it all with some jasmine rice. I loved this dinner. I wish I wasn't afraid knew how to use the grill so that I could make it on my own. But, thankfully I have an AMAZING husband who is willing to grill any recipe I throw in front of him!

Grilled Asparagus with Caper Vinaigrette

Yield: 6 servings (serving size: about 4 asparagus spears and about 2 teaspoons vinaigrette)
Ingredients
1 1/2 pounds asparagus spears, trimmed
3 tablespoons extra-virgin olive oil, divided
1/2 teaspoon kosher salt, divided
Cooking spray
1 tablespoon red wine vinegar
1/2 teaspoon Dijon mustard
1/4 teaspoon freshly ground black pepper
1 garlic clove, minced
2 teaspoons capers, coarsely chopped
1/4 cup small basil leaves
Preparation
1. Preheat grill to medium-high heat.

2. Place asparagus in a shallow dish. Add 1 tablespoon oil and 1/4 teaspoon salt, tossing well to coat. Place asparagus on grill rack coated with cooking spray; grill 4 minutes or until crisp-tender, turning after 2 minutes.

3. Combine remaining 1/4 teaspoon salt, vinegar, and next 3 ingredients (through garlic); stir with a whisk. Slowly pour remaining 2 tablespoons oil into vinegar mixture, stirring constantly with a whisk. Stir in capers. Arrange asparagus on a serving platter; drizzle with vinaigrette, and sprinkle with basil.

Lemon Butter Caper Sauce:
Ingredients:
3 tbs. butter
2 tbs. capers (chopped in small pieces)
1 lemon (for juice and zest)
1/2 clove and garlic

Directions:
1. In a small saucepan, melt butter with garlic on med-low heat.
2. Once butter is melted, add in capers.
3. Cook for 2-3 minutes.
4. Add lemon juice and stir.
5. Just before serving, add lemon zest.

DIY Valance


I wanted to put valances up in our house, but didn't want to go out and buy them. A friend of mine made them for her house, so I decided to do some research to see how hard it would be. To my surprise, it seemed pretty easy. I used this site as a DIY guide. My dad and mister made the valance, with my supervision of course. It took longer to hang them up then to actually make them. My only advice would be to triple check the measurements and make sure you have a level for hanging it.

Friday, July 23, 2010

Pesto-Chicken Italiano


This is a new HOT OFF THE BOX (bag) recipe! I found this recipe on the back of the bag of shredded cheese. It looked delicious, didn't have lots of ingredients and the directions were simple. Therefore, a perfect recipe for me to make! Enjoy!!

what you need
1 Tbsp. Oil
1 lb. Boneless skinless chicken breasts, sliced
1 clove Garlic, minced
1 large Red pepper, cut into thin strips
1/4 cup Pesto
1 Lemon, cut in half, divided
1 cup KRAFT Finely Shredded Italian* Five Cheese Blend
2 cups hot cooked angel hair pasta

make it
HEAT oil in large nonstick skillet on medium heat. Add chicken and garlic; cook and stir 4 to 5 min. or until chicken is evenly browned. Stir in peppers; cook 3 to 4 min. or until chicken is done, stirring frequently.

STIR in pesto and juice from 1 lemon half; top with cheese. Cover; cook on low heat 2 to 3 min. or until cheese is melted. Spoon over pasta.

SERVE with remaining lemon half, cut into wedges

This week at Target, Estancia wine is $7.00 off!!!

Peanut Butter Coconut Balls


This recipe came from the Taste of Home FUN FOOD magazine. If you haven't bought this one yet, it's totally worth the $5.99. There are all kinds of recipes from desserts to pizzas to burgers to munchies. I usually rip the recipes I'm interested in out of magazines and throw them away, but this one had so many I saved the entire magazine. These were made for my jewelry party last weekend. I wanted a chocolate dessert along with my lemon blossoms. They were very messy to make, but turned out very good. They were very similar to the Buckeye's I make with my mom around the holidays. There was something that I didn't LOVE about this recipe, but I couldn't pin point what it was or what I would change. But, I didn't have any complaints! Enjoy!!

**I cut the recipe in half because I didn't want to spend my weekend in the kitchen making 7 dozen.
82 ServingsPrep: 45 min. + chilling

Ingredients
1 cup butter, softened
1 cup crunchy peanut butter
2 tablespoons vanilla extract
3-1/2 cups confectioners' sugar
2 cups graham cracker crumbs
2 cups chopped walnuts
1-1/3 cups flaked coconut
2-1/2 cups (15 ounces) semisweet chocolate chips
4 teaspoons shortening
Chopped nuts or sprinkles
Directions
In a large bowl, cream the butter, peanut butter until light and fluffy Beat in vanilla. Gradually add confectioners' sugar and mix well. Stir in the cracker crumbs, walnuts and coconut. Shape into 1-in. balls. Place on baking sheets; cover and refrigerate for at least 1 hour.
In a microwave, melt chocolate chips and shortening; stir until smooth.
Dip balls into melted chocolate; allow excess to drip off. Roll in nuts or sprinkles. Place on waxed paper until set. Store in an airtight container in the refrigerator. Yield: about 7 dozen.

Wednesday, July 21, 2010

Lemon Blossoms


This past weekend, I hosted a jewelry party at my house. I was so excited about this party for two reasons. 1. It was another reason to find some fabulous recipes to make and share with you! 2. People were going to be able to see our house!!! At the beginning of the week I started searching for recipes and making my list. I decided on 3 dips, 2 sandwiches, 2 desserts, and 2 drinks for about 15 people. This is one of the dessert recipes I made. It was given to me at my bridal shower and I thought it would be a light and fresh summer dessert. Also, I'm not a huge lemon fan, which meant I wouldn't eat all the leftovers!! I found these pretty easy to make and they were enjoyed by all! Now, I'm thinking about all the variations of blossoms I can make!

Lemon Blossoms

Ingredients:
1 pkg yellow cake mix
1 pkg instant lemon pudding mix
4 eggs
3/4 cup of vegetable oil

Glaze:
4 cups of powdered sugar
1/3 cup of fresh lemon juice
1 lemon (zest)
3 tbsp. vegetable oil
3 tbsp. water

Directions:
1. Preheat over to 350.
2. Spray mini muffin tins with cooking spray.
3. Combine first 4 ingredients with an electric mixer until smooth (about 2 min)
4. Fill each tin about 1/2 way.
5. Bake for 12 minutes. Turn out onto teal towel.

Glaze:
1. Sift sugar. Add juice, zest, oil & water.
2. mix with spoon until smooth.
3. With fingers or a fork in bottom of muffin, dip the glaze covering as much of cake as possible.
4. Dry on wire rack with waxed paper underneath to catch drips.
5. Dry for an hour.

Monday, July 19, 2010

Corn Salsa


This past weekend was my friend Christina's 30th birthday party. Everyone was asked to bring a dish to share to the party and I couldn't wait to find a new recipe to bring! I have seen a lot of corn salsa recipes on websites and blogs recently, but I've never eaten it or made it. I love tortilla chips and anything that goes with them, so I decided to give it a try. I did a lot of online searching for a recipe I wanted to try. Here is where I found "the one". It came out perfect. The ingredients were so fresh, it is my new favorite recipe. I took 1/2 of the salsa to the party and kept the other 1/2 for the next day, for another party I was hosting. It was just as great the next day, not a drop left over. So, if you're searching for a light and delicious summer dip, look no further!!

Preparation time: 15 minutes. Servings 12-15.

Ingredients:

2 jalapenos, seeded and finely chopped (remember the gloves please)
2 tomatoes, cored and diced
2 tablespoons cilantro, chopped
1/2 cup lime juice, freshly squeezed
2 cloves garlic, finely minced
4 cups fresh or frozen corn (preferably not canned)
Kosher salt and fresh black pepper
Instructions:

Mix all ingredients in a bowl and season with salt and pepper
Allow to sit for one hour before serving, stir occasionally
Taste and adjust seasoning

Tuesday, July 13, 2010

Lemon Chicken


This recipe comes from Southern Living magazine. I had a subscription this past year and decided not to renew it because I wasn't finding many recipes that I was interested in. Of course, as soon as I make that decision, I get my last magazine in the mail and it is packed full of fab-u-lous recipes. Even though I didn't run and renew, I finally felt I got my $23 worth of the subscription. I think this is the first dinner I've made on the stove top since we moved because WE HAVE OUR NEW STOVE!! I love it and especially love that all 4 burners work!!! Enjoy!

Ingredients
4 skinned and boned chicken breasts (about 1 1/2 lb.)
1 teaspoon salt
1/2 teaspoon pepper
1/3 cup all-purpose flour
4 tablespoons butter, divided
2 tablespoons olive oil, divided
1/4 cup chicken broth
1/4 cup lemon juice
8 lemon slices
1/4 cup chopped fresh flat-leaf parsley
Garnish: lemon slices
Preparation
1. Cut each chicken breast in half lengthwise. Place chicken between 2 sheets of heavy-duty plastic wrap; flatten to 1/4-inch thickness, using a rolling pin or flat side of a meat mallet. Sprinkle chicken with salt and pepper. Lightly dredge chicken in flour, shaking off excess.

2. Melt 1 Tbsp. butter with 1 Tbsp. olive oil in a large nonstick skillet over medium-high heat. Cook half of chicken in skillet 2 to 3 minutes on each side or until golden brown and done. Transfer chicken to a serving platter, and keep warm. Repeat procedure with 1 Tbsp. butter and remaining olive oil and chicken.

3. Add broth and lemon juice to skillet, and cook 1 to 2 minutes or until sauce is slightly thickened, stirring to loosen particles from bottom of skillet. Add 8 lemon slices.

4. Remove skillet from heat; add parsley and remaining 2 Tbsp. butter, and stir until butter melts. Pour sauce over chicken. Serve immediately. Garnish, if desired.

Monday, July 12, 2010

Blondie Cups


This brownie peanut butter cups were my inspiration for this creation. I loved the way the brownie cups turned out and needed a quick and easy for a World Cup party this past weekend. I didn't want to make brownies again, but wanted to use my leftover peanut butter cups and foil wrappers. I found the blondie recipe from Martha Stewart. I prepared the recipe exactly as directed, but doubled the amounts. I added the chocolate chips and then divided the batter before adding the walnuts. I only had a few peanut butter cups, so I decided to make 2 variations of the blondies. In one half of the batter I added coconut along with the walnuts and chocolate chips. For the other half of the batter I didn't add anything other than the chocolate chips. I added the peanut butter cups to this mixture about half way through baking. I baked both batches for 22 minutes in mini cupcake pans. As soon as they came out of the oven, I removed the foil wrappers and placed them on a wire rack to cool. Enjoy!!!

Ingredients:
8 tablespoons (1 stick) unsalted butter, melted, plus more for pan
1/2 cup packed light-brown sugar
1/3 cup granulated sugar
1 large egg
1 teaspoon pure vanilla extract
1 cup all-purpose flour (spooned and leveled)
1 teaspoon salt
1 cup semisweet chocolate chips
1 cup chopped walnuts

Directions:
Preheat oven to 350 degrees. Brush an 8-inch square baking pan with butter; line pan with a piece of parchment paper, leaving a 2-inch overhang on two sides. Butter paper.
In a large bowl, whisk butter and sugars until smooth. Whisk in egg and vanilla. Add flour and salt; mix just until moistened (do not overmix). Fold in 1/2 cup each chocolate chips and walnuts. Transfer batter to prepared pan; smooth top. Sprinkle with remaining chocolate chips and walnuts.
Bake until top is golden brown and a toothpick inserted into the center comes out clean, 40 to 45 minutes. Set pan on a wire rack, and let cool completely. Using parchment overhang, lift cake from pan and transfer to a cutting board; cut into 16 squares. Store blondies in an airtight container at room temperature, up to 2 days.

Saturday, July 10, 2010

Peanut Butter Cup Brownies


If you're looking for a semi-homemade dessert, this is the perfect one for you! It's the perfect combination of chocolate and butter in a bite sized cup. I found the recipe on All Recipes.com and found the reader reviews very helpful. I made the brownie batter as directed on the box and added 2 tablespoons of peanut butter into the mix. I used aluminum foil mini cupcake liners and baked them for about 24 minutes. I added the peanut butter cups about half way through the cooking time. I frosted the brownie bites with chocolate frosting and topped them off with cut up peanut butter cups. I have a feeling these are going to become a tailgate favorite in the fall. Happy Baking!

Ingredients:
1 (19.8 ounce) package brownie mix
1/4 cup vegetable oil
3 tablespoons water
1 egg
20 miniature chocolate covered peanut butter cups, unwrapped
Directions:
Preheat oven to 325 degrees F (165 degrees C).
Combine brownie mix, oil, egg and water in a large bowl. Stir 50 strokes with a spoon.
Place batter in a cupcake pan (cupcake wrappers recommended). Once cups are 3/4 of the way full, place an unwrapped miniature peanut butter cup in the middle, then bake for 30-35 minutes keeping an eye on them while they're baking. Let them cool and then they're ready to eat!!

Thursday, July 8, 2010

Walnut Rosemary Oven Fried Chicken


This is one of the best chicken recipes I've made...EVER! And the best part about It's under 300 calories. I prepared this dish exactly as the recipe directed. There is not a thing I would change, it was divine! Enjoy!
Here is the recipe from Cooking Light magazine.
Ingredients
1/4 cup low-fat buttermilk
2 tablespoons Dijon mustard
4 (6-ounce) chicken cutlets
1/3 cup panko (Japanese breadcrumbs)
1/3 cup finely chopped walnuts
2 tablespoons grated fresh Parmigiano-Reggiano cheese
3/4 teaspoon minced fresh rosemary
1/4 teaspoon kosher salt
1/4 teaspoon freshly ground black pepper
Cooking spray
Rosemary leaves (optional)
Preparation
1. Preheat oven to 425°.

2. Combine buttermilk and mustard in a shallow dish, stirring with a whisk. Add chicken to buttermilk mixture, turning to coat.

3. Heat a small skillet over medium-high heat. Add panko to pan; cook 3 minutes or until golden, stirring frequently. Combine panko, nuts, and next 4 ingredients (through pepper) in a shallow dish. Remove chicken from buttermilk mixture; discard buttermilk mixture. Dredge chicken in panko mixture.

4. Arrange a wire rack on a large baking sheet; coat rack with cooking spray. Arrange chicken on rack; coat chicken with cooking spray. Bake at 425° for 13 minutes or until chicken is done. Garnish with rosemary leaves, if desired.

Monday, July 5, 2010

Fixed Roman Shades


We've lived in our new house for about 3 months now and I am happy to say that the master bedroom is FINALLY finished. I had such a hard time finding what I wanted for the bedroom due to a framed picture we purchased for above the bed. It seemed difficult impossible to find the exact blue green that covered the majority of the picture. I was frequenting T.J Maxx, Marshall's, Home Goods, and every other home store with no luck each week. Finally (on week 4 of searching), I found my decorations for the room at Z Gallery, Crate and Barrel and Bed, Bath and Beyond. Since the decorations were taken care of, it was onto the windows. After searching for almost two weeks for window treatments without any luck, I called on my mom for help. She has a knack for sewing and I knew she would be happy to help me figure out what to do with the windows. I decided on the fixed roman shades as the style I wanted and we were off to Jo Ann's to find the fabric. I brought a candlestick with me as a guide and we found a fabric I am in love with. We were especially lucky the day we purchased the fabric because everything we bought was half off!!!
Here is what we used as a guide to make the shades. I am proud to say that I made almost the entire shade for each window, with a good deal of guidance from my mom of course. I would recommend ironing the fabric at each fold to make the sewing easier. We made mine to fit inside the window, instead of hanging over (not intentionally, learning experience =-)) The shades took about 3 hours to make and need lots of measuring and double checking. It was totally worth the time and the total cost of each shade was about $20.00, including the curtain rod. Here are a few photos of the making of the shades and the finished room. Enjoy!


Blog Design by Get Polished