Showing posts with label Christmas. Show all posts

Saturday, December 10, 2011

Peppermint Wreaths


After seeing the peppermint wreaths all over Pinterest, I decided I needed to make one.  Instead of making a wreath, I did an H.  I already had one at home from JoAnn Fabrics.  I painted the H red, after it was al dry, I hot glued the peppermints on the top.  I tried to line them up before hand to make sure they all would fit.  It's not perfect, but I'm happy with how they lined up.  After that, I hot glued ribbon to the back to hang it up.  I tied the ribbon into a bow at the top and hung the center of the bow on the hook of the wreath hanger.  
Love how it looks on the front door.  

But, it couldn't stay there because when a little sun hit it, it started to melt! 

Tuesday, December 6, 2011

Wreath Button Frame

As soon as I came across this creation on Pinterest, which originally came from this blog, I knew I wanted to make it.  I already had an extra frame at home and ended up finding buttons in the dollar section at Target.  This pretty creation is now sitting on my kitchen counter, resting on a plate holder.  Love it! Here's how I did it...

I used a spool of ribbon to trace the center onto white paper.  

I ended up using only 2 of these containers of buttons.  


I didn't glue anything first.  I just lined it all up because I didn't want to glue it down and it not work.  I started with the largest buttons, placing them around the circle I drew.  Then, I went around the outside with medium size buttons and put the smallest ones in the inner center.  Once everything was lined up, I started hot gluing them down. 


Once they were all glued down, I flipped the paper over and secured the frame.  


Last, I made a bow and hot glued it to the top of the wreath.  I also used some extra ribbon on the corners of the frame to add a little more detail.  

Wednesday, December 29, 2010

Cranberry Crock Pot Meatballs

Ever since I can remember my parents have always made crock pot meatballs for our Christmas Eve open house.  Usually, they use grape jelly and chili sauce.  This year we decided to try something new.  And...I have to say that I prefer this variation over the grape jelly. Enjoy!

Ingredients:
2 packages of frozen italian meatballs
1 can of jellied cranberry sauce (14-16 oz)
1 jar of chili sauce (12 oz)

Directions:
Place meatballs in the crock pot. Pour chili sauce and cranberry sauce over meatballs and mix.  Cook for 6-8 hours, stirring once an hour.  When it's time to eat, place crock pot on warm and enjoy!

Monday, December 27, 2010

Cranberry Brie

The Pillsbury Appetizers and Desserts magazine was one of the best purchases this holiday season.  I found so many terrific recipes that I can't wait to share with you! You can't go wrong with bringing brie to any party.  It's easy to make and always delish.  I enjoyed this variation & know you will too!


Cranberry Wrapped Brie 

INGREDIENTS
1
can (8 oz) Pillsbury® refrigerated crescent dinner rolls
1
round (8 oz) Brie cheese (do not use triple crème Brie)
3
tablespoons whole berry cranberry sauce
1
tablespoon apricot preserves
1/2
teaspoon dried rosemary leaves, crushed
2
ripe medium unpeeled pears, thinly sliced
DIRECTIONS
  • 1Heat oven to 350°F. Unroll dough and separate crosswise into 2 sections. Press dough into 2 (7-inch) squares, firmly pressing perforations to seal.
  • 2Cut cheese round horizontally to make 2 rounds. Place 1 cheese round, rind side down, on center of 1 dough square. (Do not remove rind from cheese.) In small bowl, mix cranberry sauce and preserves. Spread over top of cheese; sprinkle with rosemary. Top with remaining cheese round, rind side up.
  • 3With small cookie or canapé cutter or sharp knife, make 1/2- to 1-inch cutouts to look like poinsettia petals from each corner of remaining dough square. Roll 3 small pieces of dough into 3 small balls; set cutouts and dough balls aside. Place remaining dough on top of cheese round. Press dough evenly around cheese, folding top edges over bottom edges; press to seal completely. Place on ungreased cookie sheet.
  • 4On 7-inch square sheet of foil, arrange dough petals to look like a poinsettia. Place balls in center on top of arranged petals. Lift foil square with poinsettia and place on cookie sheet next to wrapped cheese.
  • 5Bake poinsettia 8 to 11 minutes or until light golden brown around edges. Lift with foil from cookie sheet; cool. Continue baking wrapped cheese 25 to 30 minutes longer or until golden brown. Remove from cookie sheet; place on serving plate. Place poinsettia on top of wrapped cheese. Let stand 15 minutes before serving. Serve warm with pears

Thursday, December 23, 2010

Gingersnap Cookies

I made these cookies along with a few others with my mom yesterday.  They were by far my favorite out all we made.  I found this recipe on a cookie blog hop, over at Two Peas and their Pod.  You must make these, they will become a Christmas tradition in your house. 

Soft Gingersnap Cookies with White Chocolate Chips

Ingredients:
1 cup unsalted butter, at room temperature
1 cup granulated sugar
1/2 cup molasses
2 tablespoons canola oil
1 teaspoon vanilla extract
2 1/4 teaspoons baking soda
1 teaspoon salt
1 1/4 teaspoons cinnamon
1 1/4 teaspoons ground cloves
1 teaspoon ground ginger
2 large eggs
3 1/2 cups all-purpose flour
1 1/2 cups white chocolate chunks (I used white chocolate chips)
1 cup granulated sugar-for coating cookie dough balls
Directions:
1. Preheat oven to Preheat the oven to 350°F. Line two large baking sheets with parchment papers or with a silicone baking mat. Set aside.
2. In the bowl of a stand mixer, cream together butter and sugar until smooth and creamy.
3. Beat in the molasses, canola oil, vanilla, baking soda, salt, and spices. Mix until well combined.
4. Add the eggs, one at a time, and beat until smooth. Slowly add in the flour. Next, stir in the white chocolate chunks.
5. Scoop the dough into balls and roll in granulated sugar. Place on lined baking sheets, about two inches apart. Bake for 10 minutes, the cookies will still be soft. Remove from oven and let cookies cool on the baking sheet for five minutes. Transfer to a wire rack and cool completely.
Makes about 50 cookies

Wednesday, December 22, 2010

Candy Trains


I make these every year with my students.  They are always a great hit and yet, so simple to make.  I usually pair it with hot chocolate and The Polar Express movie.


You'll Need:
1 roll of lifesavers
1 pack of gum
1 Hershey's kiss
1 caramel square
4 mint candies


Directions:
Hot glue the roll of lifesavers onto the gum (on top).
Glue the kiss on the "front" of the train and the caramel on the back.
Finish it off with the mint candies as wheels.
That's it!


Here's another variation I've also tried:

The bottom piece is gum, mints as wheels, a Starburst as the front and a chocolate candy directly behind the Starburst. 

Tuesday, December 21, 2010

Ribbon Tree


Ribbons seem to be quite the hype lately in the DIY world.  I've seen ribbon wreaths, ornaments, frames, etc.  A friend of mine brought me a Michael's booklet with an adorable ribbon tree inside.  She said it was right up my alley... she knows me pretty well!  I couldn't wait to get started on this project. There wasn't directions on the booklet, so after one failed attempt- I think I got it right.  


Materials: 
Styrofoam cone (mine was the smallest size that came in a pack of 2 from Michaels)
2 spools of gross-grain ribbon (I used red and green)
Hot glue
Scissors
Additional festive ribbon for bow

Directions: 
1. Cut 4 inch strips of red and green ribbon (I cut the whole spool)
2. Fold ribbon in half. Then move the top piece down a bit, so you can see both ends.  Put hot glue on the top of the ribbon, make sure to get glue on both ends.  
3. Starting from the bottom, hot glue the ribbon to the cone. When you glue your second piece, overlap the ribbon just a bit.  This will prevent the white part of the cone from showing.  You can make a pattern with your ribbon, I chose to alternate the red and green. 
4.  Cover entire cone with ribbon.  
5. Finish it off with a festive bow.  


Happy Crafting!  


This was my first attempt.  I glued the ribbon to a piece of ribbon and wrapped it around the cone.  The ribbon spread when I wrapped it and showed the white cone.  Lesson learned.


Sunday, December 19, 2010

Christmas Ornaments...3 ways

I bought a bunch of clear glass ball ornaments this year (on sale) knowing there was something crafty I could do with them.  I wanted to personalize each of them and put attach them to a bag of cookies or a gift.  I did a lot of playing around and found 3 "designs" I will make again.  I personalized each of them using my Sizzlix to cut small vinyl letters.
1.  Ornaments filled with ribbon


2.  Ornaments filled with curling ribbon *My favorite*


4.  Ornaments filled with red & green ball garland (2$ at Target)


**I apologize about the quality of the pictures, I need to work on my photog skills!

Saturday, December 18, 2010

Chocolate Pretzel Bites

This recipe is one of the easiest to make and most loved holiday creations.  The combinations are endless and they'll be gone before you know it.  You can use any kind of Hershey Kiss or M&M to create different combinations.

Ingredients: 
1 bag of Hershey kisses (milk chocolate)
1 bag of mint M&M's
1 bag of mini round pretzels

Directions: 
*Preheat oven to 200
*Lay pretzels on cookie sheet (ungreased)
*Place Hershey kiss on top of each pretzel
*Bake for about 5 minutes or until kisses are soft but before they start melting (they'll have a shiny look)
*Top immediately with the M&M's.
*Place in the refrigerator for a few minutes to harden.
ENJOY!

Thursday, December 16, 2010

Winter Wonderland Cookies

 
Welcome to my first ever recipe creation!  After many trials without luck, I believe I've finally created a scrumptious cookie recipe, just in time for the holidays.  If you try these, please let me know what you think!


Ingredients:
3/4 cup brown sugar (I used dark)
1 cup white sugar
3/4 cup shortening 
2 lg. eggs
1 tsp vanilla 
2 1/2 cups flour
1 1/2 tsp. baking soda
1/2 tsp salt
1 1/2 cups quick cooking oats 
1 cup white chocolate chips
1/2 cup dried cranberries


Directions: 
1. Mix shortening and sugars together.
2. Add eggs- one at a time, then add the vanilla.  
3. Sift together flour, baking soda and salt.  
4. Add flour mixture to sugar mixture a little at a time.  Mix until blended. 
5. Stir in oats.  Then, stir in white chocolate chips and cranberries.  
6. Chill in the refrigerator for 30 minutes.  
7. Roll 1 -1 1/2 inch balls and place on an ungreased cookie sheet.  (Dough can be crumbly, make sure to pack into a ball, using a cookie scoop will help)
8. Bake at 350 degrees for 8-10 minutes or until edges are brown.  

Yields: 48 cookies


Enjoy!

Wednesday, December 15, 2010

Holiday Surprise Sugar Cookies

This semi-homemade recipe is sure to please!  I am not a fan of cookie cutter cookies because of the amount of time they take, but this recipe was worth it.  Of course, my cookies didn't come out as pretty as the ones on the Betty Crocker website, but they sure were tasty! Enjoy!
Ingredients: 
1pouch (1 lb 1.5 oz) Betty Crocker® sugar cookie mix
1/3cup butter or margarine, softened
1egg
2tablespoons Gold Medal® all-purpose flour
Red and green food colors
16thin rectangular crème de menthe candies, cut into thirds
Assorted Betty Crocker® colored sprinkles, sugars, decors and decorating gels
Directions:
  1. Heat oven to 375°F. In medium bowl, stir cookie mix, butter, egg and flour until dough forms. Divide dough into thirds. Tint one-third red and one-third green with food colors; leave one-third plain. Keep dough covered tightly until ready to use.
  2. On floured surface, roll each third of dough until 1/8 inch thick. For round cookies, cut with 1 1/2-inch cookie cutter; for square cookies, cut into 1 1/2-inch squares using sharp knife. (Dip cutter or knife in flour for easier cutting.)
  3. On ungreased cookie sheet, place half the cookies 1 inch apart. Place 1 candy piece on center of each cookie; top with another cookie. Gently press edges together to seal, using tines of fork. To decorate before baking, sprinkle cookies with colored sprinkles, sugars or decors as desired.
  4. Bake 6 to 8 minutes or until edges are light brown. Cool 1 minute; remove from cookie sheet to wire rack. Cool completely, about 30 minutes. Decorate with gels as desired.

Monday, December 13, 2010

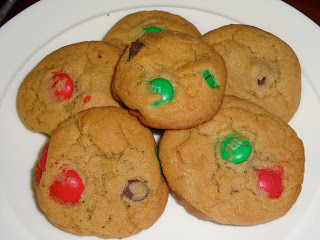
M&M Chocolate Chip Cookies


M&M'S® CHOCOLATE CHIP COOKIES
1 c. shortening
1 c. brown sugar
1/2 c. sugar
2 eggs
2 tsp. vanilla
2 1/4 c. flour
1 tsp. baking soda
1 tsp. salt
1 1/2 c. plain M&M'S®
1/4 c. chocolate chips

Combine shortening, sugars and vanilla. Sift flour, soda and salt. Add to creamed mixture. Mix well. Stir in M&M'S® and chocolate chips. Drop by teaspoon on cookie sheet. Bake at 375 degrees for 10 to 12 minutes. Use silver cookie pan.


**Recipe from Cooks.com

Wednesday, December 8, 2010

Candy Cane Blossoms


Ingredients
* Hershey's Kisses
* 1/2 cup butter, softened
* 1 cup sugar
* 1 egg
* 1 1/2 tsp. vanilla
* 2 cups flour
* 1/4 tsp. baking soda
* 1/4 tsp. salt
* 2 Tbls. milk
* red or green sugar crystals

Directions
* Heat over to 350 degrees.
* Remove wrappers from candies (get a little helper for this). =o)
* Beat butter, sugar, egg and vanilla in large bowl until well blended.
* Stir together flour, baking soda, salt and add alternately with milk to the butter and sugar mixture.
* Shape dough into 1 inch balls.
* Roll in red or green sugar crystals.
* Place on ungreased cookie sheet and bake for 8 - 10 minutes or until edges are slightly browned.* Remove from oven and let cool about 2 minutes.* Press a candy piece into the center of each cookie and allow to cool completely. (Kisses will harden back up after 
they have cooled off.)

Blog Design by Get Polished