Friday, June 29, 2012

DIY Bow Board

Here is another project from Avery's nursery.  I already made a bow holder, but that didn't fit all of the flowers and bows she has.  So, I decided to make a bow board to hang on the back of her bedroom door.  

Materials:
1 canvas (mine was 16x20)
Fabric to cover canvas
staple gun
ribbon
spray adhesive
Fabric Pen


Directions: 
I started with my canvas and fabric. 


I ironed my fabric to get all of the creases out. 


Next, I laid my fabric on the ground and put the canvas on top.  


I left about 1 1/2 to 2 inches around all of the sides of the canvas and cut the extra fabric. 


Then, get your spray adhesive and spray the entire canvas front with it.  


Place your fabric on top of the canvas.  Smooth out any bumps or lines. 


Next, use your staple gun to staple the fabric on the back of the canvas.  I made sure to pull tight enough to keep the fabric smooth.  Continue doing that around all four sides of the canvas. 


Now, your board is done.  All you need to do now is create a place to hang the bows.  


I measured the length of my canvas (after deciding which way I wanted it to hang on the door).  


I marked the distance I wanted to put each piece of ribbon.  I think I did mine about 3 inches apart.  The mark below is the width of the ribbon, so I knew exactly where to put it. 


Cut the amount of ribbon you'll need.  I measured mine about 18 inches and cut 5 pieces.

After that, staple the ribbon to the back of the canvas on both ends.  


Trim off any excess ribbon or fabric.  


Ta da- you have your bow board.  You can hang it with ribbon or place it on hooks, like I did.  

Fill it with bows and you're good to go! 


Tuesday, June 26, 2012

DIY Fabric Pom Poms

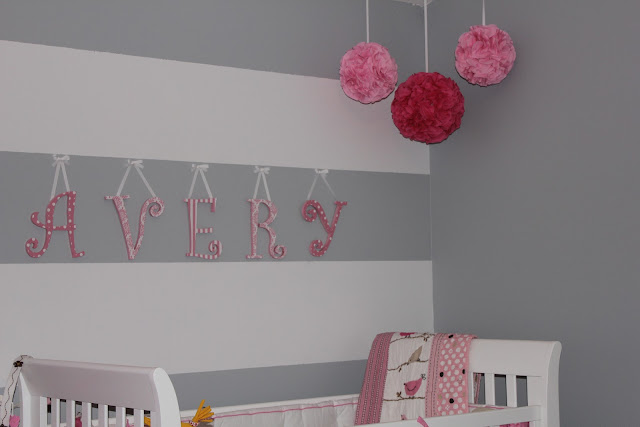
After spending lots of time working on Avery's nursery, things were finally coming together.  The room was painted, the crib was set up, the decorations were coming in. One of my last DIY projects were these fabric pom poms.  Of course, these were Pinspired.  But most of the tutorials used lanterns and hot glue.  I couldn't imagine hot gluing every one of the fabric circles into these balls, so I tried it a different way.  I used styrofoam balls as my base and pinned in the fabric.  It was a simple but LONG process.  Now that it's said and done, I would spend countless hours making these again.  They really bring the nursery together, they are without a doubt my favorite project in her room.  


Materials: 
Styrofoam Balls (I used 6 inch for the light pink and 8 inch for the dark pink
Fabric (about 4 yards for the 2 light pink and 3 yards for the dark pink)
Lots and lots of sewing pins (I used over 500)
Ribbon
Scissors
Fabric Pen

Directions: 
1. Iron fabric to get all of the creases out. This is optional, but it makes the tracing and cutting much easier.  

2.  Trace your circles.  I used a spool of ribbon as my tracer and a disappearing fabric marker to make the circles.  


3.  Cut out the circles.  I had to take breaks while doing this.  I did a yard at a time.  


4.  To make the puffy circles for the poms, first fold the circle in half.  


5.  Then fold the fabric in half one more time.  


6.  Now, take a sewing pin and put it through the corner of the fabric.  


7.  Pin it into the styrofoam ball.  Once it's in, fluff it out a bit.  I pinned them in groups of 4 to make sure the area was covered and all pieces were fluffed out.  


8.  Continue until the entire ball is covered.  It took me about 3 nights to finish all of the balls.  I probably spent 2-3 hours each night working on them.  


To hang them up, I just used grossgrain ribbon, sewing pins and a tack. I cut the ribbon the length I wanted to hang them from the ceiling.  Then I pinned one end of the ribbon into the styrofoam, I used about 10 pins to keep it in.  Then, I took a clear tack and stuck it into the ceiling.  I used 2 tacks for the bigger ball.  I will probably switch to nails eventually, but I did this on my own and didn't want to be 8 months pregnant, standing on a chair trying to hammer something into the ceiling.  I already caught enough flack for putting them up myself with tacks.  


Do you like this project?  Share it with your friends! 


Thursday, June 21, 2012

Daddy Survival Kit & Hospital Survival Kit

I wanted to do something special for hubs for Father's Day this year.  Since we're less than 8 weeks away from the birth of our baby girl, I decided to make survival kits for him.  I decided on two, one for the hospital and another for home.  The hospital one is filled with all his favorite candy, soda and snacks.  The Daddy Survival Kit is more meaningful with specific items and sayings to go with (sayings can be found below).  I also bought him the diaper bag that he wanted.  He was completely surprised and loved all his gifts.  Now the challenge will be not eating all the candy before we head to the hospital! 
*affiliate links used in this post*


PRINTABLE SURVIVAL KIT NOW AVAILABLE
CLICK HERE FOR BABY GIRL
CLICK HERE FOR BABY BOY


Tuesday, June 19, 2012

Father's Day Grandpa Frame


Thanks so Pinterest, I found a really cute Grandpa saying/quote that I wanted to use for Father's Day.  It was on a home made card, but I thought it would be perfect on a frame for my dad.  

I started out with a plain wood frame.  I found it for $1 at Michaels.  From there I found one piece of scrapbook paper that I thought would match his office.  

First, I painted the back of the wood frame and sides brown.  I used an acrylic paint.  

Once the paint was dry, I traced the frame onto the scrapbook paper.  I did the outside first and then the middle.  


After that, I used Mod Podge to adhere the scrapbook paper to the frame.  One thin coat is all I used on the wood.  Use something stiff to run over the scrapbook paper to make sure there aren't any bumps in the paper from the Mod Podge.  


Next, seal the frame with Mod Podge.  Make sure to cover the sides, front and back of the frame.  


I used 1 coat on the entire thing before I put the letters on.  


The last step is the letters.  You can use stickers, a paint pen or paper.  I used my Cricut to cut cardstock paper letters.  Line up the letters to make sure everything fits.  My letters were an inch on the top and 1.25 inches for Grandpa.  In order to adhere the letters to the frame, you'll need more Mod Podge.  

Paint a thin coat ontop of the scrap paper (again) and place the letters on.  Make sure they are straight and lined up in the right place.  Do this for all the letters/ saying.  Let dry.  

Finally, put another coat of Mod Podge over the entire frame and let it dry.  


Give your gift to a very deserving grandpa! 


Friday, June 15, 2012

Peanut Butter Cup Brownies


After making the Kit Kat brownies a few weeks back, hubs requested Peanut Butter Cup brownies.  So this week I gave them a try.  They were simple to make, especially since I used the boxed brownie mix. Hubs and I had them for dessert on Sunday night and they were absolutely divine.  I immediately packaged them up and sent them to work with hubs the next day, or else I would have had a large weight gain this week at the DR! When I talked to him at work the next day he said they were gone in minutes and people requested 9 batches of them.  To say these were a hit is an understatement!   


All you need is brownie mix (9x13) and 2 packages of king size peanut butter cups. 


Prepare the brownie mix according to the directions on the package.  Pour HALF of the mix into a greased pan, just enough to cover the bottom. 


Open the candy and cut each one into 4 pieces. 


Place the pieces on top of the brownie mix.  I tried to place them so that there would be candy in every bite. 


Pour the rest of the brownie mix on top.  Make sure to cover the candy completely. 

Bake for about 18 minutes or as long as is directed on the box.  Le them cool before you cut them & enjoy! 


You could also use the new mini candy pieces sold in the bags but I am not going to change this recipe one bit.  They were perfect they way they were!


Tuesday, June 12, 2012

Raspberry Lime Water


I've been craving fruit water recently.  With the high temperatures and wanting something sweet, it seems to be the perfect solution.  The first one I tried was raspberry and lime.  I used a carton of raspberries and two limes.  It was a little too sour for me, so next time I'll just use one lime.  

Have you tried any fruit water recipes, if so please share your favorites! 


Blog Design by Get Polished