Showing posts with label Tutorial. Show all posts

Monday, July 9, 2012

Nursery Door Sign


One of the last projects for Avery's nursery was a sign for the door.  I knew I wanted to do something in pink & grey.  I also knew I wanted an A or her name on it and I have loved the saying above for a while now.  Lots of people have this sort of sign on their front door.  But, I'm not too comfortable with announcing that I have a baby in my house so on the nursery door it goes!


Materials: 
plywood (I bought mine at JoAnn's for $1, I think it's 12x12)
acrylic paint
paint brush
Mod Podge
scrapbook paper
cricut or letter stickers
ribbon


Directions: 
Start with the plain piece of plywood

This is how thin the plywood is. 


I painted the back of the board grey.  I applied 2 coats and finished it off with a layer of Mod Podge. 


After that, I gathered my scrapbook paper.  I put a larger piece of the grey polka dot on the top of the wood and a smaller piece of the pink polka dots on the bottom.  I measured the paper, trimmed it and adhered it with Mod Podge to the unpainted side of the sign.  Make sure when using Mod Podge, that there aren't any bubbles under the paper.  


Next, I used my Cricut to cut the letters for the "You Wake Her, You Take Her" portion of the sign.  I adhered the letters with Mod Podge.  Make sure to center them first before you glue them on.  After that, I used a piece of chip board for the A, which was already cut.  I covered it with grey paper and glued it on top of the pink center.   Once the bottom layers of Mod Podge are dry, apply a layer or two to the top to seal it.  


To finish it off, I added a piece of white ribbon to separate the pink & grey.  I hot glued the ribbon to the back of the sign to keep it straight.  I also added ribbon to the top in order to hang it from a hook.


Monday, August 15, 2011

Back to School- Crayon Wreath

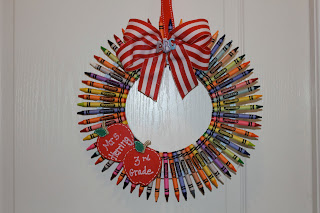
I'm officially back to school this week. As sad as I am to see summer go, I'm looking forward to a new school year.  To kick off back to school I'm focusing on classroom DIY creations this week on the blog. I'm starting things out with a crayon wreath.  

I've seen a few of these wreaths popping up on Pinterest over the past few months.  I had searched high and low for a tutorial, but didn't have much luck.  I believe the original idea was from Hobby Lobby, but I couldn't find step by step directions.  So, I played around and after many, many failed attempts I found a way that worked.  I bought two embroidery hoops, one smaller than the other.  I lined up the hoops and placed my crayons around the outside.  After I had lined everything up I started gluing (hot glue).  The key that I found was to line up the ends of the crayons while gluing.  My goal was to keep the bottom ends of the crayons together and form a circle as I glued.  The tops of the crayons will be separated, but not by much. I glued about 2 boxes of crayons around the wreath.  When I was finished, I made a bow for the top.  This covered/ hid the nails that were in the top of the embroidery hoop. I hot glued the bow on in the top center of the wreath.  After that, I took coordinating ribbon and hot glued a loop to the back of the wreath.  This is what I will use to hang the wreath.  Last, I bought 2 wooden already painted apples from Michael's.  I used the Sharpie paint pens to write my last name and room number  I hot glued them to the wreath for the perfect finishing touch.  


Sunday, July 24, 2011

Scrapbook Bow Holder Tutorial

Every little princess needs a place to hang all of her gorgeous bows and I've got just the creation.  There are so many different types of bow hangers out there, I've decided to share my scrapbook hangers with you today.  The scrapbook hangers are made with scrapbook paper and take less than an hour to make.  What I love about it, is that you can choose the perfect paper to match your little girls bedroom or bathroom.  

Materials: 
Wooden Letter
Acrylic Paint
Paint Brush
Mod Podge
Scrapbook Paper
Ribbon
Hot Glue 

Step 1: Start with a plain wooden letter. Paint the back a color of your choice.  

Step 2: Then, paint the edges and a bit of the front.  Just incase your paper doesn't match perfectly you won't see the plain wood. 


Step 3: Grab some coordinating scrapbook paper.  Trace the letter on the paper.  


Step 4: Cut out the letter.  


Step 4: Cover the painted wooden letter with Mod Podge.  Start with the back and move to the front.  The Mod Podge on the front will adhere the scrapbook letter.  


Step 5: Place the scrapbook paper onto the wooden letter.  Press it down on all sides to get rid of little air pockets.  Then, cover the front (scrapbook paper) with Mod Podge.  So, you would have painted Mod Podge on the back, then front of wood, then on top of the scrapbook paper.  


Step 6: Hot glue ribbon on the bottom in a loop.  I usually use 20 inches of thick grosgrain ribbon.  

Step 7: Glue a smaller piece of ribbon to the top in the shape of a hoop.  This is how your holder will hang on the wall.  Add ribbons or little accessories to dress it up a little more.   

Here are some of the finished products!  If you're interested in ordering one, visit Simply Made with Love


Monday, July 4, 2011

Patriotic Wreath Tutorial


Happy 4th of July!
I love wreaths hanging on my front door.  I especially love wreaths that are hand made especially for holidays.  Here is the wreath I made for the 4th.  


Materials:
Red, White and Blue Yarn
Scissors
3 Felt Stars
3 Star Buttons


Directions: 
Start our with a round foam wreath. Any Size.

Divide the wreath into a color pattern and mark it.  I decided to do a red, white, blue, white pattern.  I used a sharpie to mark it.  This helped me know where to start and stop each section of the yarn.  


Wrap the yarn around the wreath.  I tied the yarn in a knot to start it out and continued to wrap it until I came to the marked line.  When changing colors, I tied the two colors together to start the new section.  


You're wreath is now finished.  I found some felt stars at Jo Ann's (6 for $1).  I glued them on the bottom left side of the wreath.  When I was done with that, I felt like it needed a little more.  So, I added a few star buttons on top of the felt stars. 


Ta Da!

Thursday, June 30, 2011

Wine Cork Monogram


I'm not sure what I did before the days of Pinterest.  I love all of the ideas I've found during the countless hours I've spend on there.  This is one of those ideas I pinned onto my MAKE IT board. You can find the original project here.  I couldn't wait to make this wine cork initial.  I'm currently doing lots of work on our kitchen and knew this would be the perfect addition.  The whole project took me just over an hour.  And...I LOVE how it came out.  This would also make a great gift (wedding or housewarming).  

What You Need: 
Glue Gun
Wine Corks
Knife or Scissors
Wood Initial (found mine at Michael's) 
Craft Paint
Paint Brush

How To Do It: 

Start with your wooden letter.  You can choose to leave it white if that will match your decor.  My kitchen doesn't have any white, therefore I decided to paint mine black. 


Gather lots of wine corks. I saved mine and had some saved from my wedding projects.  
 The H took 35-40 corks, cut in half.  


Paint the letter.  I used black craft paint.  I painted 2 coats on the back of the H and one coat on the front because it will be covered in corks.  Let the paint dry.  


Cut the wine corks in half.  I thought the H would look weird if I used full corks.  I didn't want it to stick out really far if I hung it on the wall.  So I used a knife and cut them in half.  Hot glue the corks onto the letter.  Line up each row to make sure it fits before you start gluing.  Cover the entire letter.  


I had to cut a few corks at the bottom in order to cover the entire H.  Let the glue dry and display your great work! 

Wednesday, April 13, 2011

Cupcake Toppers Tutorial


I wanted to add a little personal touch to one of my best friend's bridal showers.  I decided to try cupcake toppers using craft punches (seen in step 1).  I've tried toppers before, but didn't love the way they came out.  This time, I had a plan.  I wanted to use scrapbook paper along with white card stock for the printed design.  Here is how I created the cupcake toppers for the shower.  PS.  I was beyond thrilled with how they turned out.  
Gather your supplies.  Two craft punches, scrapbook paper, white card stock, glue or some type of adhesive, glue gun & cake pop sticks. 


 Using the flower punch and your scrapbook paper, make however many punches you need.  One for each cupcake.  


 Design a label.  I used print shop, you can use word or any other design software.  I created a round one inch label and printed them on the white card stock.  I went with two different label designs.  


 Using the smaller round punch, punch out the card stock.  Create the same number as the flowers.  

 Using some sort of adhesive, place the card stock with the design on top of the punched flower.  Make sure to center it as best as you can.  


Turn on your glue gun to high heat.  Place a dab of glue on your cake pop stick.  I use the thinnest sticks I could find at my local craft store, in the baking section.  Attach the topper to the glue.  Set it down to cool/dry.  


  Place in cupcakes and enjoy! 

Blog Design by Get Polished