Tuesday, September 13, 2011

Tasty Pumpkin Muffins


When I saw a pumpkin recipe with over 4,000 reviews, I couldn't pass it up.  I have a pumpkin obsession- probably not the healthiest obsession. But cheaper than shoes right? 
When this time of year comes around, pumpkin takes over my life.   I'm at Dunkin Donuts everyday for their pumpkin coffee-no lie.  My house smells like Bath & Body works, with 7 pumpkin scented plug ins and pumpkin candles burning non stop.  What can I say....it's the little things that make you happy! Anyhow, I made this recipe right away.  I made a few big changes to the mix, which I noted below.  Then, I decided to make muffins instead of bread.  I'm more of a grab and go kind of girl.  I was able to make about 40 muffins.  I did one batch of just plain muffins.  I did another with dark chocolate chips.  And the last batch had cranberries and walnuts.  All of them were fabulous.  I couldn't pick a favorite if I tried.  And since I made so darn many, I can have a different kind each day.  I couldn't even part with these muffins, they went straight to the freezer.  I'll be enjoying them every morning for the next month! 


INGREDIENTS:
1 (15 ounce) can pumpkin puree
4 eggs
1 cup vegetable oil (1 cup applesauce)
2/3 cup water
3 cups white sugar (1 cup brown & 1 cup white)
3 1/2 cups all-purpose flour
2 teaspoons baking soda
1 1/2 teaspoons salt
1 teaspoon ground cinnamon
1 teaspoon ground nutmeg
1/2 teaspoon ground cloves
1/4 teaspoon ground ginger
1/4 tsp pumpkin pie spice 
DIRECTIONS:
1.Preheat oven to 350 degrees F (175 degrees C). Grease and flour three 7x3 inch loaf pans.
2.In a large bowl, mix together pumpkin puree, eggs, oil, water and sugar until well blended. In a separate bowl, whisk together the flour, baking soda, salt, cinnamon, nutmeg, cloves and ginger. Stir the dry ingredients into the pumpkin mixture until just blended. Pour into the prepared pans.
3.Bake for about 50 minutes in the preheated oven. Loaves are done when toothpick inserted in center comes out clean. The muffins took 20 minutes to bake.  

Sunday, September 11, 2011

Cheddar Bacon Ranch Pull Apart Bread

I searched high and low to find some different recipes for the first football game at our house.  I found this recipe on Pinterest, originally from Plain Chicken.  I looked like it would require minimal time and effort.  Which is exactly what I look for when it comes finding recipes and throwing a party.  This bread was addicting and delicious.  Probably one of the most talked about recipes from the party.  Add this guy to your next football party & enjoy! 


Cheddar Bacon Ranch Pulls 
1 unsliced loaf of (round is preferable) sourdough bread
8-12 oz cheddar cheese, thinly sliced
3 oz bag Oscar Mayer Real Bacon bits
1/2 cup butter, melted
1 Tbsp Ranch dressing mix

Using a sharp bread knife cut the bread going both directions. Do not cut through the bottom crust. Place slices of cheese in between cuts. Sprinkle bacon bits on bread, making sure to get in between cuts. Mix together butter and Ranch dressing mix. Pour over bread. Wrap in foil the entire loaf in foil and place on a baking sheet. Bake at 350 degrees for 15 minutes. Unwrap. Bake for an additional 10 minutes, or until cheese is melted.

Friday, September 9, 2011

Restaurant Style Salsa

I'm loving football season.  I'm especially loving all of the football parties and tailgates.  And, what football party is complete without chips and salsa?  I decided to make my own this past weekend and used a very popular Pioneer Woman recipe.  The salsa was super easy to make with my large food processor and provided lots of leftovers.  I over pulsed mine to get rid of all the chunks.  I would make this again instead of buying the jar, just to have salsa without chunks! 
When you buy the ingredients, make sure to get one can of mild Rotel.  I used original for both cans and I thought it had a little too much of a kick.  Use one mild and one original, I'm sure it will give you the perfect amount of heat.  Enjoy!

Pioneer Woman Salsa 

Ingredients


  • 1 can (28 Ounce) Whole Tomatoes With Juice
  • 2 cans (10 Ounce) Rotel (diced Tomatoes And Green Chilies)
  • ¼ cups Chopped Onion
  • 1 clove Garlic, Minced
  • 1 whole Jalapeno, Quartered And Sliced Thin
  • ¼ teaspoons Sugar
  • ¼ teaspoons Salt
  • ¼ teaspoons Ground Cumin
  • ½ cups Cilantro (more To Taste!)
  • ½ whole Lime Juice

Preparation Instructions

Note: this is a very large batch. Recommend using a 12-cup food processor, or you can process the ingredients in batches and then mix everything together in a large mixing bowl.
Combine whole tomatoes, Rotel, onion, jalapeno, garlic, sugar, salt, cumin, lime juice, and cilantro in a blender or food processor. Pulse until you get the salsa to the consistency you’d like—I do about 10 to 15 pulses. Test seasonings with a tortilla chip and adjust as needed.Refrigerate salsa for at least an hour. Serve with tortilla chips or cheese nachos.

Thursday, September 8, 2011

Ranch House Crock Pot Pork Chops

This recipe has been a hot pin on Pinterest recently.  A friend of mine made it and posted how delicious it was on her Facebook, so I decided to give it a go.  Now that it's almost fall, I've decided to break out my crock pot.  This was the first recipe I made in it this season. It comes from Real Mom Kitchen

I have to agree with my friend, this recipe was one of the best pork recipes I've ever had.  It was by far the easiest to make.  If you click on the link, you'll also find a great mashed potato side.  We went with brown rice and veggies for our sides.  Enjoy! 


Ranch House Crock Pot Pork Chops 
Ingredients:
6 pork chops, 1/2 inch thick
1 packet dry Ranch Dressing Seasoning
10 oz can Cream of Chicken Soup
Directions:
Place pork chops, Ranch seasoning and soup into a medium sized crock pot over high heat for 4 hours or low heat for 6 hours.


Tuesday, September 6, 2011

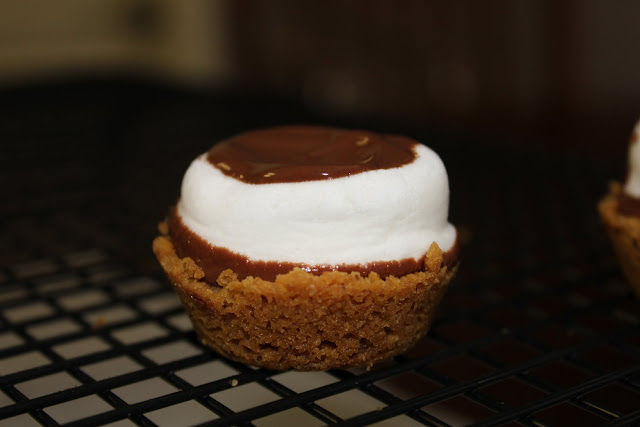
Pampered Chef-S'more Cups


I had first come across this recipe on Pinterest.  I have been addicted to everything and anything smores recently.  This one caught my eye immediately.  Then, I realized it was a Pampered Chef recipe.  Score!  I definitely had all of the tools for this recipe and couldn't wait to make it.  It was very easy to make.  But, you have to be patient with this recipe.  I wanted to take the cups out of the muffin pan before they were completely cooled.  But, they will fall apart if you do! I did make some changes to the recipe, but only to make it quicker and easier to make.  I used crushed graham crackers instead of crushing them myself.  I also used the Baker's melting chocolate in a cup.  It took 30 seconds to melt and I was able to save the leftover chocolate.  There weren't any leftover at our football kickoff party this past weekend.  Enjoy!


S'more Cups
Ingredients:
7  whole graham crackers (1 cup/250 mL finely crushed)
1/4  cup (50 mL) powdered sugar
6  tbsp (90 mL) butter, melted
4  bars (1.55 oz or 43 g each) milk chocolate candy, divided
12  large marshmallows

Directions:
  1. Preheat oven to 350°F (180°C). Place graham crackers into a large resealable plastic bag. Finely crush into crumbs using Baker's Roller®;. Combine graham cracker crumbs, powdered sugar and butter in Small Batter Bowl. Using Small Scoop, place scant scoop of crumb mixture in each cup of Deluxe Mini-Muffin Pan. Press crumbs to form shallow cups with Mini-Tart Shaper. Bake 4-5 minutes or until edges are bubbling. Meanwhile, break two of the candy bars into rectangles. Remove pan from oven; place one rectangle into each cup.
  2. Cut marshmallows in half crosswise using Professional Shears dipped in cold water. Place one marshmallow half, cut-side down, into each cup. Return to oven 1-2 minutes or until marshmallows are just slightly softened. Remove from oven to Stackable Cooling Rack; cool 15 minutes. Carefully remove cups from pan. Cool completely.
  3. Break remaining candy bars and place in (1-cup/250 mL) Prep Bowl. Microwave on HIGH 1 minute-1 1/2 minutes or until melted and smooth, stirring every 20 seconds. Dip the top of each marshmallow in melted chocolate. Turn top-side up and let stand 40 minutes-1 hour or until set.
Yield: 24 cups

Nutrients per serving: (1 cup) Calories 100, Total Fat 6 g, Saturated Fat 3.5 g, Cholesterol 10 mg, Carbohydrate 11 g, Protein 1 g, Sodium 60 mg, Fiber 0 g

Cook’s Tips: Dipping the Professional Shears in cold water before cutting the marshmallows helps minimize sticking.

The time it takes the chocolate to set varies depending on weather conditions and room temperature. You can refrigerate the cups briefly until the chocolate is set; store them at room temperature.

Store the cups in a single layer in an airtight container for up to 1 week. Freezing is not recommended.

For a richer chocolate flavor, substitute dark chocolate candy bars for the milk chocolate.

© 2011 The Pampered Chef used under license.
www.pamperedchef.com


Monday, September 5, 2011

Pampered Chef- Chocolate Nut Tarts


My mom made this Pampered Chef recipe two weeks ago at my first pampered chef party.  This recipe uses my favorite PC product, the mini muffin pan.  If you don't have a mini muffin pan, you must get one.  You can make the best bite size appetizers and desserts in them.  I use mine twice a week.  I'm so glad my mom decided to make this recipe, because it is now a new favorite of mine.  I made these for our football party this weekend and there was only a few leftover.  I froze them, hoping to take them out again for another party.  But...that didn't last long.  Hubs and I took them out tonight for dessert!  These are a must make! 

Chocolate Nut Tarts


Source: The Pampered Chef

1 (15 ounce) package fudge brownie mix (I prefer Dark Chocolate mix)
2 1/2 cups pecans or walnuts
1 tablespoon butter, melted
2 tablespoons dark corn syrup

Heat oven to 350 degrees F.

Prepare brownie mix in bowl according to package directions and set aside.

Chop nuts finely with the food chopper. Combine nuts, butter and corn syrup.

Generously spray mini-muffin pans with vegetable oil spray. Use the small stainless steel scoop to portion nuts into bottom of mini-muffin pan cups. Press with min-tart shaper to form a shallow crust (nuts will go up sides to form a cup). Flour mini-tart shaper after each use. Place brownie mixture on top of nuts with small stainless steel scoop. Bake for 13 to 16 minutes. Cool for 15 minutes or until tarts remove easily from pan.

48 tarts


To purchase any of the tools mentioned in this post, visit my Pampered Chef website.


Friday, September 2, 2011

Wine Cork Menu Board


I saw a cute menu board posted on Pinterest a while back.  I knew I wanted to make one, but wanted one to fit into the wine & red theme of our kitchen. After lots of contemplation, I decided to use some of my wine works to make my menu.  I originally wanted them cut long, but I didn't communicate that to my MR when I asked him to cut them.  Opps!  So instead of doing one row with flat corks, I did two rows of corks cut in half.  I actually think it looks better this way.  


Here is the frame I started with.  I put the glass in the frame and hot glued two rows of corks onto the glass.  Then, I used scrapbook paper as the background.  After that, I used a Sharpie to write the days of the week on the glass.  I'll use an Expo marker to fill in my dinner choices. That way it will be easy to wipe off.   I decided to buy a frame holder to place on the counter instead of hanging it on the wall. This will definitely be a statement piece in our kitchen.


Thursday, September 1, 2011

Pesto Chicken Bundles


This is the third variation of the chicken bundles I've made recently.  Love Love Love the convenience of using Pillsbury crescent rolls! I love the pesto, chicken and cheese combination.  I thought, why not tuck it into a crescent pocket and make it into a dinner? Took 10 minutes to prepare and another 12 to cook.  Dinner in less than 30 minutes, yes please!

Ingredients: 
1 can of Pillsbury Crescent Rolls (I use reduced fat)
2 cups of shredded chicken
1/2 cup of pesto (I use already prepared)
1/2 cup of shredded provolone cheese
olive oil
salt and pepper to taste

Directions: 
Place crescent rolls onto an ungreased baking sheet.  Separate them into 4 squares (2 triangles together).  Pinch edges together.  

Saute chicken with pesto.  I used rotisserie chicken that I had frozen the week before, so all I had to do was thaw and reheat it.  I heated it for a minute then added the pesto.  I mixed it in and cooked until it was heated through.  


Shred a half a cup of provolone cheese.  I did one cup and it was too much.  


Place a spoonful of chicken towards the bottom of the dough.  Top with a small spoonful of provolone cheese.  Fold dough over to form a pocket.  Press edges together.  


Brush with olive oil and sprinkle some salt and pepper on top.  
Bake at 350 for 12-15 minutes or as directed on package of rolls.  


Enjoy!


Blog Design by Get Polished