Tuesday, October 30, 2012

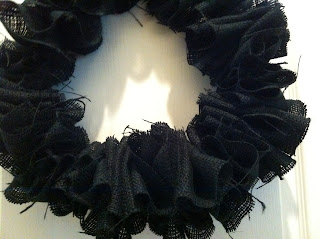
Halloween Burlap Wreath


Materials: 
1 3/4 yards of black burlap
1 wire hanger
scissors
festive ribbon
glue gun

Directions: 
Cut the burlap into 4 inch strips.  Make sure to cut them the same length, I just eyeballed it and it was obvious.  
Make the wire hanger into a circle.  Just unhook the top of the hanger, shape it into a circle and wait to rehook the top. 
Thread the burlap through the hanger.  I folded it back and forth to create a ripple effect.  Keep going, using all of your strips of burlap or until your wreath is full. 


 Rehook the top of the hanger.  I folded the hook park of the hanger down and hid it behind the burlap.  

 I finished off the wreath with an orange and black bow.  You can find tons of online tutorials on making bow, this is my favorite.  I just hot glued the bow to the burlap.


Monday, October 29, 2012

Creamy Chicken & Wild Rice Soup

I mentioned that a goal of mine this month was to try new crock pot recipes.  This was one of the ones I found on Pinterest and decided to make.  We usually buy a rotisserie chicken ever other week and have some left over meat.  I usually freeze the leftover meat, which ended up being perfect for this recipe. You'll notice from the picture that it looks thicker than your typical soup.  And it was.  But, that was because I let it cook for 8 hours on low instead of 6, which made the rice mushy.  I had to leave the house and ASSUMED it would be fine.  Whoops.  Even though that happened, I still wanted to share the recipe because it was really good. Even with the thick texture, we ate it all.  I'm sure it would be fantastic as a soup and plan on making it again. 
 This time, keeping more of an eye on it at the end.  Enjoy!

Slow Cooker Creamy Chicken and Wild Rice Soup
Courtesy of Chef Mommy 


Ingredients:

4 1/2 cups chicken broth
2 cups water
2 boneless, skinless chicken breasts
1 package of Rice-a-Roni long grain and wild rice 
1/2 tsp salt (plus more to taste)
1/2 tsp pepper
1/2 cup all purpose flour
1/2 cup butter
2 cups half and half (I used fat-free half and half)
1 cup grated carrots (I diced mine)
1 cup diced celery

Directions:


Combine broth, water, carrots, celery, chicken and rice (along with seasoning packet) in a large slow cooker. Cook on low for 6 hours or on high for 4 hours. Take out chicken and shred with two forks and then add back into slow cooker. In a small bowl combine salt, pepper, and flour. In medium saucepan over medium heat, melt butter. Stir in flour mixture by tablespoon to form a roux. Whisk in cream, a little at a time, until fully incorporated and smooth. Stir cream mixture into slow cooker and then let cook on low for 15 more minutes

Sunday, October 28, 2012

Pumpkin Oatmeal White Chocolate Chip Cookies

I've my fair share of pumpkin cookies over the past few years.  There aren't too many pumpkin recipes that I pass on.  And when I come across one where I have all the ingredients, I usually make it immediately.  That is what happened with this recipe.  I pinned it.  Checked my pantry.  Then started baking.  I was really excited about these cookies because I've never made a pumpkin oatmeal cookie before.  And I love oatmeal cookies.  The one thing I was missing from the original recipe (link below) was dark (or milk or semi sweet) chocolate chips.  To make up for what was missing, I just added more while chocolate chips.  I actually enjoyed the pumpkin and white chocolate combination and think the dark chocolate would have overpowered that.  When I make them again, I think I'll try the chocolate but only do dark chocolate instead of using white and dark together.
  These cookies were a hit with everyone who tried them.  Hubs took them to work and they flew out the door.  My parents came over a few days later and they enjoyed what was left.  If you're a pumpkin fanatic like myself, you'll enjoy these cookies.   

Pumpkin Oatmeal Chip Cookies 
Courtesy of Family Fresh Meals 


Ingredients:

1 cup sugar
1 cup brown sugar
2  cups all purpose flour
1 cup chocolate chips
1 cup white chocolate chips 
2 cups rolled oats (oatmeal) *I used quick cooking
1/2 tsp of ground cinnamon
2 tsp of pumpkin pie spice
1 TB vanilla extract
1/2 tsp salt
1 cup unsalted butter
1 tsp baking soda
1 cup pumpkin puree
1 egg

Directions:
1. Preheat oven to 350 degrees. Line a baking sheet with parchment paper, set aside. In a large bowl, whisk together flour, baking soda, cinnamon, pumpkin pie spice, and salt. Set aside.
2. Next beat butter, sugar and brown sugar until well creamed together.
3. Now add in pumpkin, egg and vanilla. Beat until combine well.
4. Gradually add the dry ingredients to wet ingredients and mix until incorporated.

5. Next, stir in your oats. Mix well.
6. Stir in both the white and dark chocolate chips.
7. Drop cookie dough by the rounded tablespoon on to the prepared baking. sheet.
8. Bake cookies for 14-15 minutes or until cookies are lightly browned. DO NOT OVER COOK. They will seem a little soft, but will firm up as they cool. You want to keep the nice, soft texture!

Saturday, October 27, 2012

Southern White Chicken Chili

Come fall, chili is a weekly staple in our household.  It's just so easy to make, I always do it in the crock pot. I've always made chili with beef.  But, this month I made a goal to try new crock pot recipes.  This was the perfect time to step away from my normal chili recipe and try something different.  And boy am I glad I did.  This recipe was amazing. Full of flavor and the perfect pair to a cool fall night.  
 It's now my favorite chili and I plan on making it for friends on Halloween.  


Southern White Chicken Chili 
Courtesy of Campbell's 
Ingredients: 
tablespoon vegetable oil
skinless, boneless chicken breast halves (about 1 pound), cut into cubes
teaspoons chili powder
teaspoons ground cumin
large onion, chopped (about 1 cup)
medium green pepper, chopped (about 3/4 cup)
can (10 3/4 ounces) Campbell's® Condensed Cream of Chicken Soup 
3/4 cup water
1 1/2 cups frozen whole kernel corn
cans (about 15 ounces each) white kidney beans (cannellini), rinsed and drained
tablespoons shredded Cheddar cheese

**I also added a white chili seasoning packet from McCormick & 1/2 cup of chicken stock to the recipe**

Directions:

  • Heat the oil in a 4-quart saucepan over medium-high heat. Add the chicken, chili powder,
     cumin, onion and pepper and cook until the chicken is cooked through and the
     vegetables are tender, stirring often.
  • Stir the soup, water, corn and beans in the saucepan and heat to a boil.  
    Reduce the heat to low.  Cover and cook for 5 minutes, stirring occasionally.  
    Sprinkle with the cheese.  


Thursday, October 25, 2012

Pot Roast- Crock Pot Recipe


A few weeks ago we went to our friend's house for dinner and she made pot roast.  It was delicious and hubs has been asking me to make it ever since.  I've been putting it off because I've never made a pot roast. But last weekend I gave in and told him I'd only do it with his help. Thankfully he's always willing to help me out.  We did all the prep in the morning and threw it in the crock pot for dinner that evening.  I was lucky enough to enjoy the smell of it all day and couldn't wait for him to get home for dinner.  The meat was tender and moist and the veggies were delicious.  This will be our go to pot roast from now on.  Hubs said he wants to make it once a week....we settled on twice a month.  Enjoy!


Ingredients:


    1 tbsp oil
    salt, pepper, flour
    pot roast
    1/2 c red wine

    1 onion, sliced
    5 medium potatoes, cut into one inch pieces
    3 carrots, cut into pieces

Directions:

   1. Heat a tablespoon of oil in a skillet over medium heat.
   2. Season your roast with salt and pepper then sprinkle with flour.
   3. Brown all sides of the meat in the hot oil. Remove to a plate. Add 1/2 cup of red wine to the skillet; stir to loosen browned bits.  Then remove from the heat.
   4. Place sliced onions in the bottom of the crock pot.
   5. Add the potatoes on top.
   6. Next, add the carrots.
   7. Put the browned roast on the vegetables.
   8. Pour the wine & juices from the skillet on top of the roast and veggies.
   9. Season with a little more salt and pepper,
  10. Cover and cook on the LOW for 8-9 hours.


We used some of the leftover meat to make sliders for dinner the following night. 


Wednesday, October 24, 2012

Cranberry Pork Loin

The husband picked out our meals last week. We had bought a pork loin at the store and he loves cranberry and pork together.  Which is exactly why he picked this recipe. I made it in the crock pot just as directed.  A few times through the day I basted the pork to make sure the meat remained moist and didn't dry out.  But don't do this too much or you'll let too much heat out of the crock pot.  Anyway, this meal was good for dinner but absolutely AMAZING the next day for lunch.  Letting the meat marinate in all the juices overnight made the world of difference. Overall, another recommended crock pot meal.  

I know I took a picture of this dinner but can't find it.  I still had to share because it was just that good.  

Courtesy of About.com


Cook Time: 8 hours
Total Time: 8 hours
Yield: Serves 4 to 6
Ingredients:

    * 1 (3 to 4 lb) boneless pork loin roast
    * 2 cloves garlic, minced
    * 1 can whole cranberry sauce
    * 1/4 c brown sugar
    * 1/2 c apple juice
    * 2 apples, cored and sliced
    * salt and pepper to taste

Preparation:
Place roast in slow cooker; rub all over with the minced garlic. Add remaining ingredients (except apples) and cook on low for 7 to 9 hours. Pork should be about 160° when fully cooked. About an hour before you're ready to serve, add the sliced apples.  Serve with rice.
Serves 4 to 6.

Tuesday, October 23, 2012

Candy Corn Craft

How cute are these little candy corn decorations?  
All you need is styrofoam cones, yarn and about 10 minutes.   

I started will two small styrofoam cones. 
 You need yellow, orange and white yarn .
 All you do is wrap the yarn around the cones.  
I used a small pin to pin the ends of the yarn in.
Started at the top and worked my way down.
Simple as that! 

Happy Crafting!


Friday, October 19, 2012

Pumpkin Magic Bars


I made a fall bucket list a few weeks back and this was one of the recipes I said I wanted to bake. Magic Layer Bars are one of my favorite desserts and so addicting!  When I came across one recipe made with pumpkin, I had to give it a try!  I made a few changes to the recipe which I noted below. The bars were AH-MAZING. The middle pumpkin layer tasted like pumpkin pie & the rest of it was just icing on top.  Enjoy!    

Pumpkin 7-Layer Magic Bars


Recipe Courtesy of BakersRoyale
Makes one 8×8 pan | 
Preparation: Heat oven to 350 degrees. Create a foil sling with a 1 inch over hang.
Ingredients:
  • 2 cups graham cracker crumbs (about 16 whole crackers)
  • 8 tablespoons butter
  • 1 14oz can sweetened condensed milk
  • 3/4 cup pumpkin puree
  • 1 teaspoon cinnamon
  • 1/4 teaspoon nutmeg
  • 1/4 teaspoon cloves
  • 11 oz. golden delicious apples, shredded (about 2 regular size apples) *OMITTED
  • 11/2 cup sweetened shredded coconut
  • 1 cup salted almonds, coarsely chopped *USED PECANS
  • 1 cup chocolate chips
Instructions:
  1. Combine graham crackers and butter  and stir until well blended. Press mixture onto bottom of pan
  2. Combine sweetened condensed milk, pumpkin puree, cinnamon, nutmeg, cloves and stir until well combined. Pour mixture over graham cracker crust.
  3. Peel and core apples. Use the large side of the  grating box to shred the apples. Layer shredded apples on the sweetened sweetened condensed milk. Sprinkle on chocolate chips, followed by the almonds and then finish by sprinkling coconut on top.
  4. Place assembled pan in the oven and bake for about 25-35 minutes. Let cool in pan completely and then transfer finished pan to the refrigerator to chill before cutting. 
  5.               *I KEPT THE DESSERT IN THE FRIDGE UNTIL IT WAS GONE*

Thursday, October 18, 2012

Chocolate Caramel Candy Bars

Chocolate is my weakness.  I love it.  Eat it every. single. day.  Can't get enough of it.  Maybe that's way this baby weight is not coming off as quick as I want it to....

In the most recent issue of Kraft Food & Family, I found these gems.  
They're like a DIY Twix bar.  Sign me up! 
They were a little messy but totally worth it.  Enjoy!


Chocolate Caramel Candy Bars
Courtesy of Kraft


What You Need
35 LORNA DOONE Shortbread Cookies
1 pkg.  (11 oz.) KRAFT Caramel Bits
1 Tbsp.  milk
3 squares  BAKER'S Semi-Sweet Chocolate
3 squares  BAKER'S White Chocolate

Make It

LINE 13x9-inch pan with foil, with ends of foil extending over sides; spray with cooking spray. Arrange cookies in single layer on bottom of prepared pan.

MICROWAVE caramel bits and milk in microwaveable bowl on HIGH 1-1/2 to 2 min. or until bits are completely melted and mixture is well blended, stirring after each minute. Pour over cookies; spread to completely cover cookies.

MICROWAVE chocolates in microwaveable bowl 2 min. or until almost melted, stirring every 30 sec.; stir until chocolates are completely melted. Pour over caramel layer; spread to completely cover caramel layer.

LET stand 2 hours before cutting into bars.

Wednesday, October 17, 2012

Chicken Noodle Casserole

If you love chicken noodle soup, you will definitely enjoy this recipe.  Of course, like most recipes I find it's easy to make, has very few ingredients and takes little time.  With a newborn at home, I'm really glad I've focused on simple recipes over the years.  I rarely have more than a half hour of hands free time in the evenings to make a meal.  I pinned this recipe a few months ago and recently went to my Pinterest board when planning my weekly meals.  
This is hands down one of the best casseroles I've made. Ever.  I ate two servings for dinner and had it for lunch for the next two days.  I couldn't get enough.  This would be a fabulous meal to make for a friend in need.  Enjoy!


Chicken Noodle Casserole 
Courtesy of BookCooking.net

Ingredients
4 skinless, boneless chicken breast halves
6 ounces egg noodles
1 (10.75 ounce) can condensed cream of mushroom soup
1 (10.75 ounce) can condensed cream of chicken soup
1 cup sour cream
salt to taste
ground black pepper to taste
1 cup crumbled buttery round crackers
1/2 cup butter


Directions
Poach chicken in a large pot of simmering water. Cook until no longer pink in center, about 12 minutes. Remove from pot and set aside. Bring chicken cooking water to a boil and cook pasta in it. Drain. Cut chicken into small pieces, and mix with noodles.
In a separate bowl, mix together mushroom soup, chicken soup, and sour cream. Season with salt and pepper. Gently stir together cream soup mixture with the chicken mixture. Place in a 2 quart baking dish.
Melt butter in a small saucepan, and remove from heat. Stir in crumbled crackers. Top casserole with the buttery crackers.
Bake at 350 degrees F (175 degrees C) for about 30 minutes, until heated through and browned on top.

Wednesday, October 10, 2012

Italian Tortellini Stew- Crock Pot


One of my monthly goals this month was to make some new crock pot meals.  I have been getting lots of emails from Kraft Foods, Betty Crocker & Cooking Light with new fall recipes.  This is the first one I picked out.  The prep time for this meal was a breeze.  I cooked the stew all day on low and added the tortellini as directed about 20 minutes before serving.  This is a perfect dinner for a cool winter night.

Italian Tortellini Stew
Courtesy of Betty Crocker

Ingredients:
1 small onion, finely chopped
2 medium zucchini, halved, cut into 1-inch slices
2 (14 1/2-oz.) cans ready-to-serve vegetable or chicken broth
1 (28-oz.) can crushed or diced tomatoes, undrained
1 (15.5-oz.) can great northern beans, drained, rinsed
1/4 teaspoon salt
1/4 teaspoon pepper
1 tablespoon dried basil leaves
1(8-oz.) pkg. uncooked dry cheese-filled tortellini

Directions:
   1. In 4 to 6-quart slow cooker, combine all ingredients except basil and tortellini; mix well.
   2. Cover; cook on low setting for 6 to 8 hours.
   3. About 20 minutes before serving, stir basil and tortellini into stew. Increase heat setting to high;   cover and cook an additional 20 minutes or until tortellini are tender.

Makes 8 (1 1/4-cup) servings

Tuesday, October 9, 2012

Chicken and Green Bean Casserole

I'd give this recipe an 8 out of 10.  It took a little more prep time than I prefer but it was worth it.  I like how the recipe uses fresh mushrooms and green beans.  I followed some of the reviews and instead of using cream cheese I used the original Philadelphia cooking creme. This would be a great meal to take a new mom or make for friends coming over for dinner.  Enjoy! 

Chicken and Green Bean Casserole
Courtesy of Kraft Food


What You Need
1 pkg.  (6 oz.) STOVE TOP Stuffing Mix for Chicken
1 Tbsp.  butter
6 small  boneless skinless chicken breast halves (1-1/2 lb.)
1/2 tsp.  black pepper
1/2 lb.  fresh green beans, trimmed, cut into 1-inch lengths
1 pkg.  (8 oz.) sliced fresh mushrooms
1 large  onion, chopped
1/4 cup  flour
1-3/4 cups  fat-free reduced-sodium chicken broth
4 oz.  (1/2 of 8-oz. pkg.) PHILADELPHIA Cream Cheese, cubed

Make It

PREPARE stuffing as directed on package.

MEANWHILE, melt butter in large nonstick skillet on medium heat. Add chicken; sprinkle with pepper. Cook 5 min. on each side or until chicken is done (165ºF); transfer to 13x9-inch baking dish sprayed with cooking spray.

COOK and stir beans, mushrooms and onions in same skillet 6 to 8 min. or until crisp-tender. Sprinkle with flour; cook and stir 1 min. Stir in broth; simmer 3 min. or until thickened, stirring frequently. Add cream cheese; cook and stir 2 to 3 min. or until melted. Spoon over chicken; top with stuffing. Cover. Refrigerate up to 24 hours.

HEAT oven to 400ºF. Bake casserole, uncovered, 30 min. or until heated through.

Monday, October 8, 2012

10 Minute Halloween Charger

I had a few extra minutes after I cleaned the house last week before the baby woke up.  So, I decided I would cross one of my Halloween crafts off my list.  I picked up black chargers at Hobby Lobby a few months back with the intentions of doing this project.  I used my Cricut to cut the Trick or Treat letters and white polka dots.  Then, I used the back of a paintbrush and orange acrylic paint to do the polka dots.  That is it.  Simple, Quick and Cute if I say so myself! 

Friday, October 5, 2012

Cinnamon Bun Rice Krispie Treats


While on my weekly outing to Target this past week I stumbled upon cinnamon bun marshmallows. Have you heard of them before?  Tried them?  I surely hadn't.  But, I love rice krispie treats and love cinnamon.  So, I picked up a bag and decided try out cinnamon bun rice krispie treats.  I followed the same recipe that is on the box for original rice krispie treats.  Since the cinnamon bum marshmallows are only 8 oz, I used about 5 cups of rice krispies instead of the normal 6.   

These are now a favorite of mine.  They taste like cinnamon toast crunch cereal.  Enjoy!


Thursday, October 4, 2012

Pumpkin Toffee Chip and Rolo Chunk Cookies


Pumpkin + Chocolate Candy = Pure Bliss
After another blogger suggested this recipe to me, I knew I had to make it immediately.  And boy am I glad I did.  I will say that this is by far my favorite chocolate pumpkin recipe.  I plan on going to the store again this week to get more ingredients so I can make them to share with my neighbors. If you love pumpkin and chocolate, you'll be sorry if you don't give this recipe a try! 
Recipe Courtesy of Picky Palate 
Ingredients:
1 Box Yellow Cake Mix
One 15 ounce can Pumpkin (I used Libby’s)
2 cups mini chocolate chips
1 cup toffee chips
1 1/2 cups chopped Rolo’s (I used the mini baking rolo's and cut them in half)

Directions:
1. Preheat oven to 350 degrees F. and line a large baking sheet with parchment or a silpat liner.
2. Place cake mix and pumpkin into a large bowl, mix to combine. Stir in chocolate chips, toffee chips and Rolo’s, mixing until combined. With a medium cookie scoop, scoop dough onto prepared baking sheet about 1 inch apart. Bake for 15-17 minutes until cooked through. Remove from oven and let cool on baking sheet for 10 minutes before transferring to cooling rack. Serve room temperature or chilled.


 *You'll notice the caramel from the rolo's seeped out, it was easy to break off after the cookies cooled.  BUT...I was glad I had used a baking mat!


Makes 4-5 dozen cookies

Tuesday, October 2, 2012

Chocolate Marshmallow Fluff Squares


This is a weight watchers recipe that I found while searching for yummy desserts that were low in points.  I always loved peanut butter, jelly & fluff sandwiches growing up, so I knew I would love this combination.  This recipe reminded me how much I love marshmallow fluff!  What I loved about this dessert is that you don't have to make too many, you can make one a night if you wish.  I didn't drizzle the chocolate over the top as the directions suggested, I just dipped the ends in the amount of chocolate called for.  The chocolate on the top made the dessert! Enjoy!


8 whole reduced-fat cinnamon graham crackers
3 Tbsp reduced-fat peanut butter, creamy style
3 serving(s) Culver's® Toppings Marshmallow Crème Topping, (tablespoons), or other brand
2 oz semisweet chocolate, chips variety, melted (1/4 cup)
3 Tbsp peanuts, oarsely chopped  


    * Break each graham cracker in half to make 16 squares. Spread each of 8 squares with 1 rounded teaspoon peanut butter. Spread each of the remaining 8 squares with 1 rounded teaspoon marshmallow crème. Press the peanut butter and marshmallow squares together to form sandwiches; place on a wax paper–lined baking sheet.

    * Drizzle the melted chocolate over each sandwich in a zigzag pattern and sprinkle with the peanuts. Freeze until the chocolate is partially set, about 10 minutes. Yields 1 sandwich per serving.


Each Square is 4 points

Monday, October 1, 2012

Grandma's Pumpkin Muffins


About a month after I had my baby I decided to join Weight Watchers.  I joined because I wanted to lose weight while being smarter with the food I was eating and maintain a healthy lifestyle, especially because I am nursing. Weight Watchers has a point allowance for nursing mothers, which is ultimately why I went with the program.  So far, I have lost 5 pounds in 3.5 weeks and feel more energized.  I love tracking points and am thankful that there are apps to track and scan the things I eat.  It's honestly much easier than I expected it to be.  


I chose this recipe because of my love of pumpkin.  I will say that this is not my favorite pumpkin recipe, it was just okay.  The muffins tasted low fat and weren't bad for being a healthier option.  A lot of the reviews said to use eggs instead of an egg substitute and add cranberries or chocolate chips to the recipes.  I laughed because that takes the healthy part of the recipe away.  I do agree that they would be better with all that added, but along with adding the ingredients you'll be adding points. I would probably add more pumpkin next time and less applesauce.  I'd also add some pumpkin pie spice.  Overall, I'd try these if you're looking for a healthy pumpkin muffin recipe. 

Ingredients:
1 spray(s) cooking spray
2 cup(s) all-purpose flour
1 Tbsp baking powder
1 tsp table salt
1 tsp baking soda
1/2 tsp ground cloves
1 tsp ground cinnamon
1 tsp ground nutmeg
  2/3 cup(s) unsweetened applesauce
  1 cup(s) canned pumpkin
2/3 cup(s) sugar
  1/2 cup(s) fat-free egg substitute
  2/3 cup(s) fat-free skim milk


Instructions

    * Preheat oven to 400ºF. Coat a 12-hole muffin tin with cooking spray. Line with cupcake wrappers if desired.

    * Combine flour, baking powder, salt , baking soda, cloves, cinnamon and nutmeg in a large bowl.

    * Combine applesauce, pumpkin, sugar, egg substitute and milk in a medium bowl; mix thoroughly with a wooden spoon.

    * Add applesauce mixture to flour mixture and mix until completely incorporated.

    * Pour batter into muffin tins so each hole is about 2/3 full. Bake for 20 to 25 minutes, or until a tester inserted in the center of a muffin comes out clean. Yields 1 muffin per serving.

Notes

    * We use both cooking spray and muffin wrappers to prevent any batter from sticking to the top of the pan but you can use a nonstick pan instead, if you prefer.

Blog Design by Get Polished