Tuesday, September 14, 2010

Bourbon Glazed Pork Chops


I decided to change things up this week and make something other than chicken or fish for dinner. I knew I wanted to make pork chops and did a little online searching. I found this sweet recipe on myrecipes.com. I followed all the directions and didn't make any changes. As a side, I baked red potatoes (tossed in olive oil, salt & pepper) at 425 for 20 minutes and poured the leftover bourbon sauce on the potatoes. They were very tasty. Thanks to hubs for doing the grilling!
Bourbon Glazed Pork Chops
Yield: Makes 6 servings
Ingredients
1/2 cup firmly packed light brown sugar
3 tablespoons Dijon mustard
2 tablespoons soy sauce
2 tablespoons bourbon
1/2 teaspoon salt
1/4 teaspoon pepper
6 (1-inch-thick) bone-in pork chops
Preparation
Stir together first 6 ingredients in a shallow dish or large zip-top plastic bag; add pork chops. Cover or seal, and chill 30 minutes, turning once.

Remove pork from marinade, reserving marinade.

Grill pork, covered with grill lid, over medium-high heat (350° to 400°) about 10 to 12 minutes or until a meat thermometer inserted into thickest portion registers 160°, turning once.

Bring reserved marinade to a boil in a small saucepan, and cook, stirring occasionally, 2 minutes. Pour over chops before serving.

Monday, September 13, 2010

Skillet Tacos


Delicious, cheap & easy!

Skillet Tacos

6 ServingsPrep/Total Time: 20 min.
Ingredients
1 pound ground beef *I used ground turkey
1 small red onion, chopped
1 can (15-1/4 ounces) whole kernel corn, drained **I used fiesta corn
10 corn tortillas (6 inches), cut into 1-inch pieces
1 bottle (8 ounces) taco sauce
1-1/4 cups shredded cheddar cheese, divided
Hot pepper sauce, optional
**I added a can of black beans

Directions
In a large skillet, cook beef and onion over medium heat until meat is no longer pink; drain. Add the corn, tortillas, taco sauce and 1 cup cheese; heat through. Sprinkle with remaining cheese. Serve with pepper sauce if desired. Yield: 6 servings.

Saturday, September 11, 2010

Wedding Time Capsule


When I started planning my wedding, I knew there were a lot of elements I wanted to do myself. I was determined to put personal touches on as much as I could. I wanted my guests to walk around and say "that's totally Leah &/or Derek". While looking through of my DIY magazines, I found this time capsule idea. I loved it and thought it would be a fun addition to the cocktail hour. The time capsule was set out on a table in the middle of our cocktail hour and guests could fill out the cards after they grabbed a drink and some food.
For this project I needed card stock, wrapping paper, ribbon, a box, a frame, thin sharpies, scissors. I printed two sets of card stock with a heading of "In Five Years..." or "In Ten Years...". I used a cute font and colors that matched the wedding decor. I bought a square box from Michael's and wrapped it with Damask black and white paper (from Michael's too). After wrapping the box, I made a slit in the top big enough for the pieces of card stock to fit in. One of my bridesmaids, Brittany also added a coral ribbon bow with a pearl center to the front of the box. At the wedding, the card stock was set out, along with the box and various thin sharpie markers. I made a black with pearl frame to give guests directions on what to do.

Predict the Future of Mr. & Mrs. Herring
1. Select a time 5 or 10 years ahead.
2. Write your predictions on the card that corresponds to the number of years ahead you want Derek and Leah to read your message (5 or 10 years).
3. Slip the card in the time capsule.
From what I've heard our guests really enjoyed this little "activity" and we can't wait to open the capsule in 5 years to see what everyone wrote!

Monday, September 6, 2010

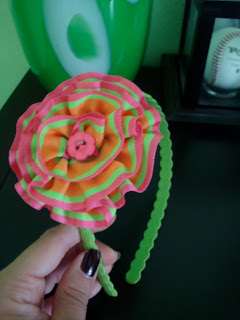
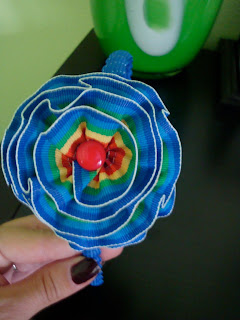
Children's Flower Headbands


I finally had a chance to make some more headbands this weekend after using my moms sewing machine when I was at home this weekend. These are more geared towards children. I bought the headbands at CVS and matched ribbon to them. Love the way they came out. Click here for how to instructions.


Bruschetta


I've tried this recipe a few times in the past, but that was before my blogging days. I was bringing an appetizer for a get together tonight and the main course was pasta. I thought this would be a perfect pair for the main course. It came out fabulous and was a hit. Will definitely make it again!
Ingredients:
6 roma (plum) tomatoes, chopped
3 cloves minced garlic
3 tbs. olive oil
2 tablespoons balsamic vinegar
1/4 cup fresh basil, stems removed
1/4 teaspoon salt
1/4 teaspoon ground black pepper
1 French baguette
1 1/2 cups mozzarella cheese

Directions
1. Preheat the oven on broiler setting.
2. In a large bowl, combine tomatoes, garlic, 1 tbs of olive oil, vinegar, basil, salt, and pepper. Allow the mixture to sit for 10 minutes (the longer it sits the better).
3. Cut the baguette into 3/4-inch slices. On a baking sheet, arrange the baguette slices in a single layer. Use the remaining olive oil and brush olive oil on both sides of the baguette.
4. Broil for 2 minutes, until the tops are slightly brown.
5. Flip the baguettes over so that the brown sides are now on the bottom. Sprinkle the cheese onto the bread.
6. Put baguettes back in the over for 3 minutes or until cheese is melted.
7. Divide the tomato mixture evenly over the baguette slices or put tomato mixture into a small bowl and allow guests to make their own bruschetta.
ENJOY!

Saturday, September 4, 2010

M&M Cookies


It's an exciting day in the Herring household today. It's a day we look forward to each year around this time....1st day of college football and the first USF home game! Hubs and I both went to the University of South Florida and are season ticket holders. Tonight is the first game, so I decided to make a sweet treat for the tailgate. I've never made M&M cookies and figured it would be cute to make them with green and gold M&M's. I bought a HUGE bag of M&M's and picked out all of the green and gold ones. I'm sure I'll be using all the leftover M&M's for some Halloween treats very soon.

Ingredients:
2 sticks of butter (1 cup)
1/2 cup packed light brown sugar
1/2 cup sugar
2 eggs (I used Egg Beaters)
2 teaspoons vanilla
2 1/4 cups flour
1 teaspoon salt
1 teaspoon baking soda
1 1/2 cup M&M's
1/2 cup mini chocolate chips

Directions:
1. Heat oven to 375°F.
2. Beat sugars and butter until light and fluffy.
3. Blend in eggs and vanilla.
4. Stir in flour, baking soda and salt. Mix well.
5. Stir in 1 cup of the M&M’S & chocolate chips.
6. Drop dough by rounded tablespoons onto ungreased cookie sheet. *I used a melon scoop for perfectly round cookies.
7. Press additional M&M's into each cookie.
8. Bake for 10 minutes or until golden brown.
9. Let cool for a minute and move to a wire rack.
*Makes 5 dozen

Thursday, September 2, 2010

Chicken stuffed with Spinach, Feta & Pine Nuts


My husband and I have loved all of the stuffed chicken recipes we've tried. That is the reason this recipe caught my eye and made it on the list for the week. Now this recipe was easy to make but was not my favorite stuffed chicken recipe. If I made it again, I would season the chicken and coat it in Panko crumbs. i would also use a little more feta too. I used a thin piece of chicken and folded/ rolled it to cook, instead of making a pocket. I don't think it made a difference. If you like spinach and feta, give this recipe a try!

Ingredients
5 ounces fresh spinach, chopped
1/2 cup (2 ounces) crumbled feta cheese
2 tablespoons pine nuts, toasted
1 teaspoon fresh thyme, minced
2 teaspoons fresh lemon juice
2 garlic cloves, minced
4 (6-ounce) skinless, boneless chicken breast halves
1/4 teaspoon salt
1/4 teaspoon freshly ground black pepper
1 tablespoon olive oil
1/2 cup fat-free, lower-sodium chicken broth


Preparation
1. Preheat oven to 350°.

2. Heat a large nonstick ovenproof skillet over medium-high heat. Add spinach to pan; cook 1 minute or until spinach wilts, tossing constantly. Place spinach in a colander; press until barely moist. Wipe pan clean.

3. Combine spinach, cheese, nuts, thyme, juice, and garlic. Cut a horizontal slit through the thickest portion of each chicken breast half to form a pocket. Stuff 3 tablespoons filling into each pocket. Seal with wooden picks. Sprinkle chicken with salt and pepper.

4. Heat oil in pan over medium-high heat. Add chicken; cook 3 minutes on each side or until brown. Add broth, and cover pan. Place pan in oven. Bake at 350° for 15 minutes or until done.

Wednesday, September 1, 2010

Apple n' Cheddar Tuna Pitas


I needed to vamp up my lunches in order to have more fuel for my half marathon training. So, I was on the hunt this weekend when looking through my magazines. I found this tuna pita recipe on a Hellmann's advertisement in the new Cooking Light magazine. I loved this pita and will make the recipe again next week with chicken instead of tuna. Enjoy!
APPLE 'N CHEDDAR TUNA PITAS

Serves: 4
Prep Time: 15 Minute(s)
2 cans (5 oz. ea.) tuna in water, drained and flaked
1/3 cup Hellmann's® or Best Foods® Real Mayonnaise
1/4 cup finely chopped celery
1/4 cup diced apple
1/4 cup dried cranberries
1/4 cup coarsely chopped walnuts (optional)
4 slices cheddar or American cheese, cut up
2 Tbsp. finely chopped red onion (optional)
2 (8-in.) whole wheat or plain pita breads, halved

Combine all ingredients except pita breads in medium bowl. Evenly stuff pita breads with tuna mixture.
Also terrific with Hellmann's or Best Foods Light Mayonnaise or Mayonnaise Dressing with Extra Virgin Olive Oil.

Tuesday, August 31, 2010

Chicken and Mushrooms with Marsala Wine Sauce


BREAKING NEWS: Cooking Light September arrived in my mailbox this week. Therefore....many new recipes coming your way. GET EXCITED!!!

I've made chicken marsala many times before but I've never followed a recipe. I usually just cook the chicken and let it sit with marsala wine and sautéed mushrooms before serving. So, while browsing through the magazine this chicken marsala recipe caught my eye. It looked good and like always...seemed pretty simple =-). So, I put it on my weekly calendar and we enjoyed it this past Monday night. I found a package of gourmet mushrooms at Publix this week and they were 2 for 5, SOLD! Both of the packages equalled the amount needed for the recipe and saved me a lot of time searching for the different types of mushrooms and some money too! Other than that, I followed the recipe exactly (I even used onions). It was a tasty dinner and just as great leftover for lunch.

Ingredients
1/2 cup dried porcini mushrooms (about 1/2 ounce)
4 (6-ounce) skinless, boneless chicken breast halves
4 teaspoons all-purpose flour, divided
3/4 teaspoon salt, divided
1/4 teaspoon freshly ground black pepper
2 tablespoons olive oil, divided
1/2 cup chopped onion
1/4 teaspoon crushed red pepper
5 garlic cloves, thinly sliced
1 1/2 cups thinly sliced shiitake mushroom caps (about 4 ounces)
1 1/2 cups thinly sliced button mushrooms (about 4 ounces)
1 teaspoon dried oregano
1/2 cup dry Marsala wine
2/3 cup fat-free, lower-sodium chicken broth
1 cup halved cherry tomatoes
1/4 cup small fresh basil leaves
Preparation
1. Place porcini mushrooms in a small bowl; cover with boiling water. Cover and let stand 30 minutes or until tender. Drain and rinse; drain well. Thinly slice.

2. Place each chicken breast half between 2 sheets of heavy-duty plastic wrap; pound chicken to 1/2-inch thickness using a meat mallet or small heavy skillet. Combine 3 teaspoons flour, 1/4 teaspoon salt, and black pepper in a shallow dish. Dredge chicken in flour mixture.

3. Heat a large stainless steel skillet over medium-high heat. Add 1 tablespoon oil to pan; swirl to coat. Add chicken; cook 3 minutes on each side or until done. Remove from pan; cover and keep warm.

4. Heat remaining 1 tablespoon oil in pan over medium-high heat. Add onion, red pepper, and garlic; sauté 2 minutes or until onion is lightly browned. Add remaining 1/2 teaspoon salt, porcini, shiitake, button mushrooms, and oregano; sauté 6 minutes or until mushrooms release moisture and darken. Sprinkle with remaining 1 teaspoon flour; cook 1 minute, stirring constantly. Stir in wine; cook 1 minute. Add broth; bring to a boil. Reduce heat, and simmer 1 minute. Add chicken and tomatoes; cook 2 minutes or until thoroughly heated, turning chicken once. Sprinkle with basil.

Sunday, August 29, 2010

Flower Snacks


I don't have kids, but I enjoy making things with my students (my kids from 8-2). I often see bloggers looking for things to do with their kids on the weekends and over the summer. I loved to help my mom in the kitchen (from what I remember) when I was growing up. I've decided to add a "kids in the kitchen" label to my blog that will be devoted to fun snacks kids can create with food. This first one was done at the end of last year in my classroom. My students enjoyed it and they tasted good too!

Ingredients:
2 vanilla wafers
1 twizzler
2 spearmint leaves
6-8 pieces of candy corn
1 gumdrop
1 tbs. frosting

Directions:
1. On a plate, create flower with all ingredients.
2. Place frosting on one vanilla wafer.
3. Put candy corn on top of frosting around wafer to create flower.
4. Add more frosting to 2nd vanilla wafer and put over the candy corn.
5. Using a bit of frosting, "glue" gumdrop on the center of the wafer.
6. Place twizzler between 2 wafers as the stem.
7. Using a bit of frosting, "glue" leaves to the twizzler.
**We even added some crunchy chinese noodles as roots.

Saturday, August 28, 2010

Chicken Veggie Casserole


This recipe was inspired by a recipe from Taste of Home magazine. Unfortunately, I can't remember which recipe to find the link. The original recipe had too many steps, so I was determined to find a way to make it easier. I think I was able to accomplish that goal, and it tasted delish. I can see this becoming a part of the weekly rotation.

Ingredients:
1 whole rotisserie chicken
1 1/2 cups of sliced zucchini
1 1/2 cups of sliced squash
1 cup of mushrooms
2/3 cup of chicken broth
2 1/2 cups of cooked brown rice
1/2 cup of parmesan cheese

Directions:
1. Cook rice as directed on bag/box.
2. Pull apart chicken. Set aside in a bowl.
3. Saute mushrooms, zucchini, and squash until browned. Mix chicken and vegetables together in bowl.
4. Heat chicken broth on stove until warm.
5. In a 9x13 casserole dish, place rice in a layer on the bottom.
6. Top with chicken/vegetable mixture.
7. Pour broth over chicken, veggies, and rice.
8. Sprinkle cheese mixture on top.
9. Bake at 350 for 20 minutes.

Monday, August 16, 2010

Sausage Veggie Grill


Summer veggie lovin! I think I made something like this before, but this is a (slightly) different recipe. Also, I take no credit for making this recipe. Yes, I found it. Yes, I bought the ingredients. Yes, hubs did the cooking. The only thing I he changed was leaving out the onions. Everything came out great. I especially liked it because it was veggies & meat and completely filled me up. Another plus is the nutritional info (notice I actually included it in the post!). We did add a little parmsean cheese before serving. Enjoy!!

Sausage Veggie Grill

Ingredients
1 pound Italian sausage links, cut into 1/2-inch slices
1 medium zucchini, cut into 1-inch slices
1 medium yellow summer squash, cut into 1-inch slices
1 medium sweet red pepper, sliced
1 medium onion, cut into wedges
1 cup quartered fresh mushrooms
1/4 cup olive oil
1 tablespoon dried oregano
1 tablespoon dried parsley flakes
1 teaspoon garlic salt
1 teaspoon paprika
Directions
In a large bowl, combine the first six ingredients. In a small bowl, combine the oil, oregano, parsley, garlic salt and paprika. Pour over sausage mixture; toss to coat. Divide between two pieces of heavy-duty foil (about 14 in. x 12 in.). Fold foil around sausage mixture and seal tightly.
Grill, covered, over medium heat for 25-30 minutes or until meat is no longer pink and vegetables are tender. Open foil carefully to allow steam to escape. Yield: 4 servings.

Nutrition Facts: 1 serving (2 cups) equals 359 calories, 29 g fat (7 g saturated fat), 45 mg cholesterol, 993 mg sodium, 12 g carbohydrate, 4 g fiber, 14 g protein.

Ribbon Hair Ties


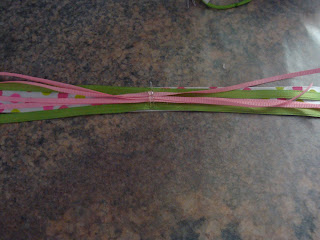
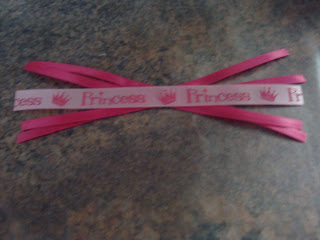
If you're looking for an EASY way to dress up your child's hair ties, you've come to the right place! The only materials I needed for this project were a glue gun, hair tie and ribbon. Use 4-8 pieces of ribbon that measure 6-8 inches long for these ties. You will also need one piece of ribbon that is 2-3 inches for the center.
Using the hot glue gun (carefully) glue the pieces of the ribbon together in the center of the ribbon. I took my thickest piece of ribbon and glued the other pieces onto it. I overlapped them so that they would noticeably stick out.
Take the smaller piece and glue it in the middle of the ribbon.
Put the hair tie on top of the middle piece you just glued. Glue the ribbon around the hair tie (wrap it around and glue it down).

TADA...your finished product!**This hair tie was measured to 10 inches. I suggest 6-8 inches, this one was too long.
Another Example:

Tuesday, August 10, 2010

Ribbon Flower Headbands


Lately, there have been many, many posts on the creative blogs I follow about flower headbands. I don't wear headbands too much, but I love the look of flower headbands. I did some research and ended up coming across some tutorials that seemed practical for me. I don't have a sewing machine (yet) so I had to do some prep work at my parents house before making these headbands. I made one at their house and just finished the rest today. I'm now obsessed with making these. To all of my friends with little girls....be on the lookout for headbands to come your way! The trickiest part of the ribbon bands is to unravel the ribbon while trying to get it to stick on hot glue. I did burn myself more than a few times, but I'm not complaining. All of the ones in this post will probably stay in my collection. Now that I have the knack of making them, I will be on the hunt for cute ribbon in fun colors. One of things I'm most excited about making is headbands for the holidays!!! Here is the tutorial I followed for these ribbon headbands. I prefer using the bands as opposed to the plastic headbands. Reason being, if you don't put the flower in the right spot, the band will move wherever. Enjoy!

Blog Design by Get Polished