Showing posts with label Christmas. Show all posts

Monday, December 3, 2012

Gift Bow Wreath Tutorial


Thank you to the Today Show for this DIY idea.  I was watching last week when they showcased it on one of their segments.  I made a note to pick up the supplies so I could make it for my front door.  Because, believe it or I don't have a Christmas wreath for my door.  This wreath took me 20 minutes to make and cost $6.  When I look at my front door, it makes me smile.  I love it.  


Materials:
Cardboard 
Glue Gun
Bows
Ribbon


Directions: 
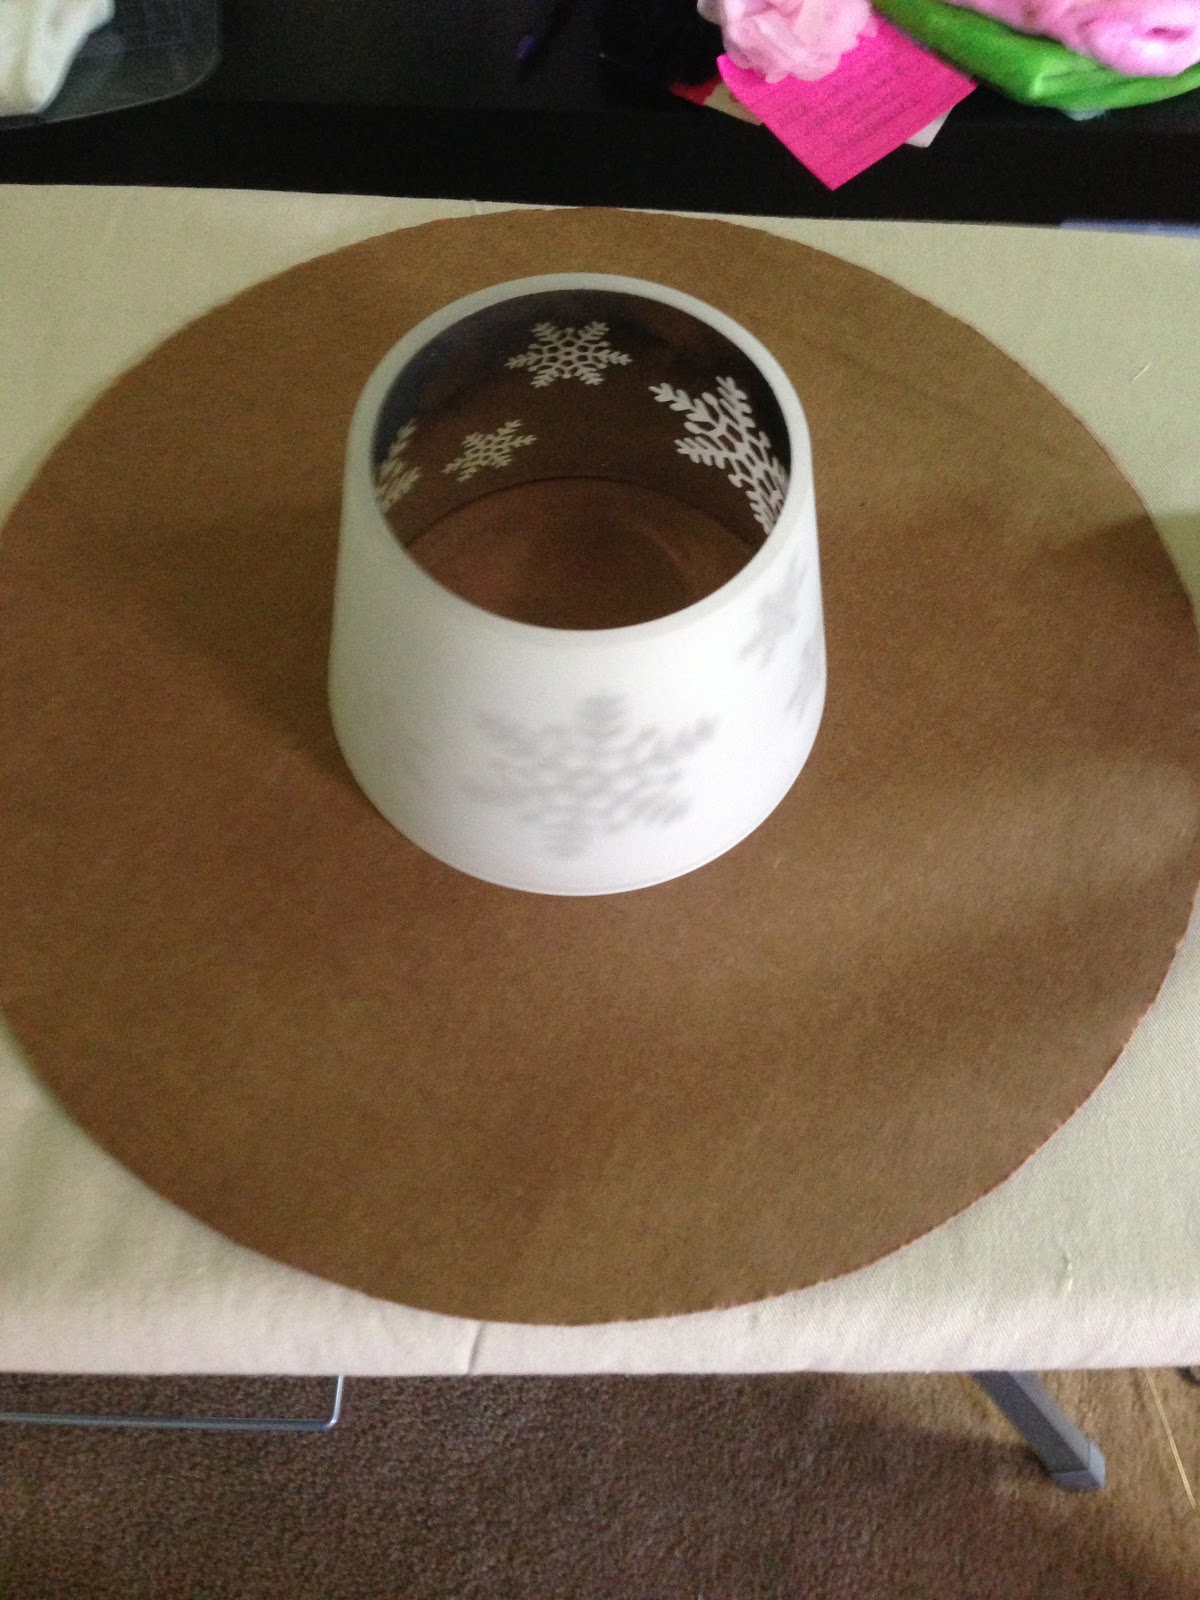
Find something to make a large circle on your cardboard.  I traced a large plate for the outside.  Using a good pair of scissors, cut our the circle.  

Find another item to trace for the center, I used a candle shade.  Trace it and cut out the center.  

Next, glue on the bows.  I bought 2 bags from Target and used about 45 bows.  There was no rhyme or reason to the placement of the bows.  I just started with clusters until the entire wreath was filled.  

Last, I glued a piece of festive ribbon on the back to give me a bow to hang from my door hook.  

It's as simple as that...enjoy!


Sunday, January 8, 2012

Christmas Card Album


Last year, I started this Christmas Card Album.  

It was our first year as a married couple, therefore our first Christmas card picture sent out together. I decided to save one card of ours each year that I will add to the album.  I love the thought of all our Christmas cards through the years being in one place for us (and future children and grandchildren) to look through.  What a perfect way to see how our family grows throughout the year.  
Here's the finished/started project:


I bought an 8x8 red photo album from Michael's.  I printed one of our wedding pictures for the front cover of the album.  After all, I can't think of a better representation of "the beginning" than a wedding picture.  I used some scrapbook paper to match our Christmas card, a little glue and then I typed up a little paragraph highlighting our year.  I LOVE the way it came out.  I showed it to D, he looked at it, then flipped through the (blank) pages.  Then, he made the comment "So, you think we'll only be together for the next 20 years".  I proceeded to explain that you can add pages to these books and they only come with 10 f/b pages to start.  I can't wait to pass this on to our children one day and hope they will then pass it down to their children.

*I am a little behind on adding our picture from 2011 to the album!*

Wednesday, December 28, 2011

French Toast Casserole

Recipe from Pillsbury

This casserole is our new Christmas morning tradition. 
 Ah-mazing!


INGREDIENTS

French Toast Bake
1/4
cup LAND O LAKES® Butter, melted
2
cans (12.4 oz each) Pillsbury® refrigerated cinnamon rolls with icing
6
LAND O LAKES® Eggs
1/2
cup heavy whipping cream
2
teaspoons ground cinnamon
2
teaspoons vanilla
1
cup Fisher® Chef's Naturals® Chopped Pecans
1
cup maple syrup
Garnish
Icing from cinnamon rolls
Powdered sugar
1/2
cup maple syrup, if desired


DIRECTIONS


1Heat oven to 375°F. Pour melted butter into ungreased 13x9-inch (3-quart) glass baking dish. Separate both cans of dough into 16 rolls; set icing aside. Cut each roll into 8 pieces; place pieces over butter in dish.2In medium bowl, beat eggs. Beat in cream, cinnamon and vanilla until well blended; gently pour over roll pieces. Sprinkle with pecans; drizzle with 1 cup syrup.3Bake 20 to 28 minutes or until golden brown. Cool 15 minutes. Meanwhile, remove covers from icing; microwave on Medium (50%) 10 to 15 seconds or until thin enough to drizzle.4Drizzle icing over top; sprinkle with powdered sugar. If desired, spoon syrup from dish over individual servings. Serve with the additional 1/2 cup maple syrup.


Monday, December 26, 2011

Candy Cane Punch

Recipe found on Pinterest.  Originally from Taste of Home


My mom and I made this punch for our annual Christmas Eve party.  My picture is definitely not as pretty as the Taste of Home picture, but the punch was definitely just as delicious.  I'm sure of that.  This will be a traditional drink on Christmas Eve from here on out! 


Ingredients

  • 2 jars (10 ounces each) strawberry jelly
  • 2 liters lemon-lime soda, divided
  • 2 quarts peppermint stick ice cream
  • Miniature candy canes, optional

Directions

  • In a large saucepan, melt jelly with 2 cups soda.
  •  Chill the jelly mixture and remaining soda. 
  • Just before serving, place 6 cups ice cream in a 
  • punch bowl.
  •  Gently stir in jelly mixture. 
  • Add remaining soda. Add remaining ice cream by scoopfuls. 
  • Garnish with candy canes if desired. 
  • Yield: 3-1/2 quarts. 

10


Sunday, December 18, 2011

Pampered Chef- Chocolate Peppermint Cups

While at Target at the beginning of December I came across peppermint icing.  I love peppermint and was eager to try this new (to me) icing.  I'm obsessed with making these little bite sized cups for all gatherings (you may remember the red velvet, halloween, or snickerdoodle).  They are so quick to make and so very easy.  I actually make them at all of my Pampered Chef shows.  Knowing you can't go wrong with a peppermint/ chocolate combination, I decided to use chocolate cake mix to create these bites.  The peppermint icing isn't too strong and paired perfectly with the cake mix to create a one bite dessert that I couldn't stop eating!  ENOY! 


Ingredients: 
Chocolate Cake Mix
1 egg
1/2  cup (or 1 stick) melted butter
1 tub of Peppermint Frosting 
Mini Tart Shaper 
2-3 Candy Canes

Directions: 
1. Melt your butter, add the cake mix and then the egg and mix together in the classic batter bowl
2. Once you get your  dough, simply scoop it into a greased mini muffin pan. using the small scoop.  
3. Bake at 350* for 8-10 min (until light brown)
4. When your cups come out of the oven they will be slightly brown, spray your mini tart shaper with cooking spray to help them not stick and press down the center of each cup. 
5. Once all the tops are pressed down, move the bites to a cooling rack.
6. Once the cups have cooled, fill with peppermint frosting using the easy accent decorator.   
7.  Using the food chopper, chop the candy canes into small pieces
8.  Sprinkle the candy cane pieces on top of the icing.  

ENJOY!

*Use any cake mix and frosting combination for a variety of sweet treats!


Yields: 30 bites 


Pringles Containers Cookie Jars


I'm always looking for creative and inexpensive ways to package gifts (especially cookies) over the holidays.  A while back, I saw these Pringles containers turned cookie containers on Pinterest.  I knew they would come in handy over the holidays. So, for the past few months I've been buying and eating Pringles when they go on sale.  I was able to save a few containers for gifts this season. I rinsed out the containers a few weeks before I used them. After that, I just used one sheet of scrapbook paper for each container.  They had to be trimmed down a little.  I just measured the length of the container and used a paper cutter to cut it evenly. From there, I glued the paper to the container, wrapped the rest of the paper around and glued the other side down.  To finish it off, I just added a little bit of ribbon.  If I had more time, I would have attached a little gift tag. I love how they turned out and will definitely be saving them next year as well! 


Friday, December 16, 2011

The Best Christmas Cookie Ever!


With my cookie exchange party around the corner, I was on the search for the perfect cookie recipe.  I was looking for something that others would be interested in recreating.  Something that didn't have a million ingredients and did have ingredients that could easily be found in the stores.  Of course I did my searching on Pinterest.  And as soon as I saw the title for this cookie (the best Christmas cookie ever)...I knew I found it. I made them the morning of the exchange and they were actually really easy to make.  The cookies did turn out a little smaller than I would have liked, but I wouldn't have had enough if I made them bigger.  They were a hit at the cookie exchange.  Everyone said they looked like santa hats =-).  They even won the most creative cookie award.  These are a must make this holiday season! 


ingredients
  • 1/2
    cup maraschino cherries, drained and finely chopped
  • 2 1/2
    cups all-purpose flour
  • 1/2
    cup sugar
  • 1
    cup cold butter
  • 12
    ounces white chocolate baking squares with cocoa butter, finely chopped
  • 1/2
    teaspoon almond extract
  • 2
    drops red food coloring (optional)
  • 2
    teaspoons shortening
  • White nonpareils and/or red edible glitter (optional)


directions
1.
Preheat oven to 325 degrees F. Spread cherries on paper towels to drain well.
2.
In a large bowl, combine flour and sugar. Using a pastry blender, cut in the butter until mixture resembles fine crumbs. Stir in drained cherries and 4 ounces (2/3 cup) of the chopped chocolate. Stir in almond extract and, if desired, food coloring. Knead mixture until it forms a smooth ball.
3.
Shape dough into 3/4-inch balls. Place balls 2 inches apart on an ungreased cookie sheet. Using the bottom of a drinking glass dipped in sugar, flatten balls to 1-1/2-inch rounds.
4.
Bake in preheated oven for 10 to 12 minutes or until centers are set. Cool for 1 minute on cookie sheet. Transfer cookies to a wire rack and let cool.
5.
In a small saucepan, combine remaining 8 ounces white chocolate and the shortening. Cook and stir over low heat until melted. Dip half of each cookie into chocolate, allowing excess to drip off. If desired, roll dipped edge in nonpareils and/or edible glitter. Place cookies on waxed paper until chocolate is set. Makes about 60.

Blog Design by Get Polished