Showing posts with label DIY. Show all posts

Wednesday, February 6, 2013

Valentine's Day Yarn Wreath


I'm finishing up my final DIY projects for Valentine's Day this week.  This project was inspired by this pin on Pinterest.  The original pin was linked back to Etsy, so there wasn't a tutorial with how to do it.  So I decided to create one so that you can all have an adorable wreath to hang on your door this Valentine's Day.  I love how this wreath turned out.  It may be my favorite one to date. 

How I Did It: 

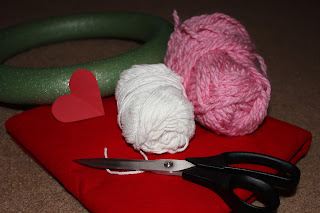
The supplies I used were a foam wreath, red felt, white yarn, pink yarn, scissors, a heart tracer and hot glue.  


First, I covered the wreath with pink yarn.  

Next, I used my 2 inch heart cut out to make my felt hearts.  I traced them and then cut.  


I placed them on the wreath as I went so I didn't make too many. 
I ended up cutting out 12 hearts. 


I hot glued down the hearts, putting two dots at the top and one at the bottom of the heart to make sure it would lay flat.  


After that, I started wrapping the white yarn.  I did one direction first. 

Then, I did the opposite direction to create the criss cross look. 


Lastly, I added a banner to the wreath. 
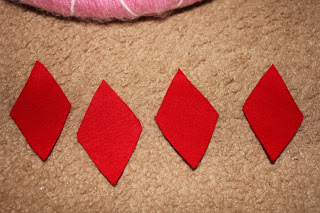
I used leftover felt cut into diamond pieces.  


I used my Cricut to cut out 1 inch LOVE letters using white cardstock.  I glued them to the bottom of the diamonds.  
I attached one piece of pink yarn to the wreath, going straight across. Then, I folded the diamond over, hot gluing it together.
After all the diamonds are glued down, you're finished!   


Hang it up and show off your hard work!

Wednesday, December 19, 2012

Baby Reindeer Footprint Craft


Of course, this craft was inspired by Pinterest! 
This craft took no time to create and will be a cherished decoration for years to come. 


Done on a small canvas using acrylic paint and Sharpie paint pens.  

Monday, December 3, 2012

Gift Bow Wreath Tutorial


Thank you to the Today Show for this DIY idea.  I was watching last week when they showcased it on one of their segments.  I made a note to pick up the supplies so I could make it for my front door.  Because, believe it or I don't have a Christmas wreath for my door.  This wreath took me 20 minutes to make and cost $6.  When I look at my front door, it makes me smile.  I love it.  


Materials:
Cardboard 
Glue Gun
Bows
Ribbon


Directions: 
Find something to make a large circle on your cardboard.  I traced a large plate for the outside.  Using a good pair of scissors, cut our the circle.  

Find another item to trace for the center, I used a candle shade.  Trace it and cut out the center.  

Next, glue on the bows.  I bought 2 bags from Target and used about 45 bows.  There was no rhyme or reason to the placement of the bows.  I just started with clusters until the entire wreath was filled.  

Last, I glued a piece of festive ribbon on the back to give me a bow to hang from my door hook.  

It's as simple as that...enjoy!


Monday, November 19, 2012

Turkey Wreath


How cute is this turkey wreath?  I pinned it a few weeks back and couldn't wait to make it.  You can find the original tutorial over at Baby Rabies.  I'm not going to reinvent the wheel because her tutorial is fabulous.  
But, I will tell you a few things I did to save money and a trip to the store....

1.  Instead of using a styrofoam cone, I used yellow card stock.  I folded it to make a cone and hot glued the back to the wreath. 
2.  I didn't use styrofoam balls for the eyes.  Again, I used card stock.  I cut 2 white circles, then two black.  I glued them together for the eyes.  Then, I glued a toothpick onto the back of the eyes and stuck it into the wreath.  
3.  I didn't have yellow tulle so I used white instead.  
4.  I used red felt for the waddle instead of foam.  

I just love how it looks on my door!


Wednesday, November 14, 2012

DIY Post It Holders

I remember seeing this little gift a while back on Pinterest.  I had them on my to make list for over 6 months!  I even bought he materials to make them months ago, I just ran out of time or another project took precedence.  Last month, I had a few gifts that I wanted to add a personal touch to.  I remembered this project and being that both recipients are teachers, I thought this would be a great addition to their gifts.  They are so easy to make and come out super cute.  These would be a great teacher appreciation gift or gift for a coworker.  We all use post its, this is a cute way to display them.  Enjoy!

Materials:
Clear Frame (about $1-2 at Walmart or Target) 
Scrapbook Paper
Post Its
Hot Glue
Stickers
Ribbon 
Any other embellishments you would like to use


Directions:
Cut the paper to the size of the frame. 
Put it in the frame. 
Hot glue the post it notes to the frame.
  I glued mine towards the bottom so that I could decorate the top more.  
From there, just decorate.  I used hot glue to glue ribbon to the top and glued stickers on top of them.  
You can decorate them however you would like.  


*After the post its run out, the recipient just has to hot glue another pad onto the back*

Friday, November 2, 2012

Out of Treats


This little creation was inspired by a pin on Pinterest.  It was a last minute craft, the day before Thanksgiving.  I figured/ hoped it would keep trick or treaters from ringing the doorbell or knocking on the door after we went inside.  Unfortunately, just turning the lights out doesn't get the message across in our neighborhood.  

Materials: 
1 piece of wood
paint
Sharpie paint pen
ribbon
hot glue


Directions: 
Paint the wood sign orange.  I painted all sides. 
 Then, I used the Sharpie paint pen to write "out of treats" and decorate the outside.  


To hang it, I took about 24 inches of ribbon.  I folded it in the middle and hot glued it to the back of the wood.  From there I tied it into a bow.  


After that, it was ready to go on the door.   

The sign worked because we didn't have any trick or treaters afterwards.  


Happy Crafting!

Tuesday, October 30, 2012

Halloween Burlap Wreath


Materials: 
1 3/4 yards of black burlap
1 wire hanger
scissors
festive ribbon
glue gun

Directions: 
Cut the burlap into 4 inch strips.  Make sure to cut them the same length, I just eyeballed it and it was obvious.  
Make the wire hanger into a circle.  Just unhook the top of the hanger, shape it into a circle and wait to rehook the top. 
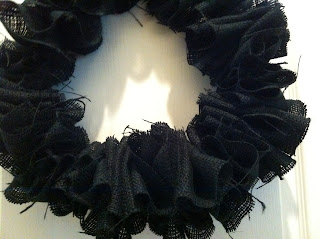
Thread the burlap through the hanger.  I folded it back and forth to create a ripple effect.  Keep going, using all of your strips of burlap or until your wreath is full. 


 Rehook the top of the hanger.  I folded the hook park of the hanger down and hid it behind the burlap.  

 I finished off the wreath with an orange and black bow.  You can find tons of online tutorials on making bow, this is my favorite.  I just hot glued the bow to the burlap.


Tuesday, October 23, 2012

Candy Corn Craft

How cute are these little candy corn decorations?  
All you need is styrofoam cones, yarn and about 10 minutes.   

I started will two small styrofoam cones. 
 You need yellow, orange and white yarn .
 All you do is wrap the yarn around the cones.  
I used a small pin to pin the ends of the yarn in.
Started at the top and worked my way down.
Simple as that! 

Happy Crafting!


Monday, October 8, 2012

10 Minute Halloween Charger

I had a few extra minutes after I cleaned the house last week before the baby woke up.  So, I decided I would cross one of my Halloween crafts off my list.  I picked up black chargers at Hobby Lobby a few months back with the intentions of doing this project.  I used my Cricut to cut the Trick or Treat letters and white polka dots.  Then, I used the back of a paintbrush and orange acrylic paint to do the polka dots.  That is it.  Simple, Quick and Cute if I say so myself! 

Monday, July 9, 2012

Nursery Door Sign


One of the last projects for Avery's nursery was a sign for the door.  I knew I wanted to do something in pink & grey.  I also knew I wanted an A or her name on it and I have loved the saying above for a while now.  Lots of people have this sort of sign on their front door.  But, I'm not too comfortable with announcing that I have a baby in my house so on the nursery door it goes!


Materials: 
plywood (I bought mine at JoAnn's for $1, I think it's 12x12)
acrylic paint
paint brush
Mod Podge
scrapbook paper
cricut or letter stickers
ribbon


Directions: 
Start with the plain piece of plywood

This is how thin the plywood is. 


I painted the back of the board grey.  I applied 2 coats and finished it off with a layer of Mod Podge. 


After that, I gathered my scrapbook paper.  I put a larger piece of the grey polka dot on the top of the wood and a smaller piece of the pink polka dots on the bottom.  I measured the paper, trimmed it and adhered it with Mod Podge to the unpainted side of the sign.  Make sure when using Mod Podge, that there aren't any bubbles under the paper.  


Next, I used my Cricut to cut the letters for the "You Wake Her, You Take Her" portion of the sign.  I adhered the letters with Mod Podge.  Make sure to center them first before you glue them on.  After that, I used a piece of chip board for the A, which was already cut.  I covered it with grey paper and glued it on top of the pink center.   Once the bottom layers of Mod Podge are dry, apply a layer or two to the top to seal it.  


To finish it off, I added a piece of white ribbon to separate the pink & grey.  I hot glued the ribbon to the back of the sign to keep it straight.  I also added ribbon to the top in order to hang it from a hook.


Blog Design by Get Polished