Showing posts with label Fall. Show all posts

Friday, January 4, 2013

Pumpkin Pie French Toast

By now you should know that I love all things pumpkin.  
Which is why I decided to give this recipe a try.  
I've had it on my Pinterest board for a while now, I always think of making it but never got around to it. 
I knew if I added it to our Christmas breakfast menu, I would definitely make it.  
And I did.  


Results: Delish.  I made sure there was a thin pumpkin layer on the toast after making the first one and thinking there was a little too much pumpkin on it.  Next time, I'll add some cinnamon and pumpkin pie spice.  
Enjoy! 

Pumpkin Pie French Toast
Courtesy of 5 Dollar Dinners

Yield – 4 servings


Ingredients


  • 14 slices whole wheat sandwich bread 
  • 3 eggs 
  • 1/2 cup milk
  • 3/4 cup canned pumpkin 
  • 1 tsp pumpkin pie spice
  • Butter and syrup for serving 


Directions


  • Set out the bread for dipping.
  • In a medium mixing bowl, whisk together the eggs, milk, pumpkin and pie spice until smooth.
  • Dip each side of the bread and cook on a hot, greased griddle or skillet. Flip after 1 – 2 minutes.
  • Once all are cooked, serve with butter and maple. And a side of fresh fruit.
  • If freezing, let cool completely to reduce freezer burn.
  • Enjoy this perfect fall “breakfast for dinner”!


Monday, November 5, 2012

Pumpkin Spice Rice Krispy Treats


Last month, I made these Cinnamon Bun Rice Krispie Treats.  I had no idea that there were different types of marshmallows out there until I came across the cinnamon bun kind.  Then, I heard there was pumpkin spice marshmallows.  I love anything pumpkin so I immediately was on the hunt for the marshmallows.  I ended up finding them at WalMart.  I followed the same recipe that is on the box for original rice krispie treats, but used 5 cups of krispies instead of 6.  Although both recipes were delicious, I actually enjoyed the cinnamon bun krispies a little bit more than the pumpkin spice.  Enjoy! 

Tuesday, October 30, 2012

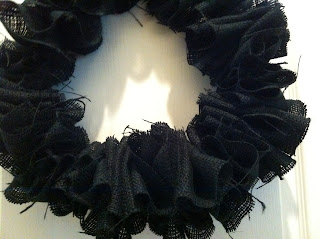
Halloween Burlap Wreath


Materials: 
1 3/4 yards of black burlap
1 wire hanger
scissors
festive ribbon
glue gun

Directions: 
Cut the burlap into 4 inch strips.  Make sure to cut them the same length, I just eyeballed it and it was obvious.  
Make the wire hanger into a circle.  Just unhook the top of the hanger, shape it into a circle and wait to rehook the top. 
Thread the burlap through the hanger.  I folded it back and forth to create a ripple effect.  Keep going, using all of your strips of burlap or until your wreath is full. 


 Rehook the top of the hanger.  I folded the hook park of the hanger down and hid it behind the burlap.  

 I finished off the wreath with an orange and black bow.  You can find tons of online tutorials on making bow, this is my favorite.  I just hot glued the bow to the burlap.


Thursday, October 25, 2012

Pot Roast- Crock Pot Recipe


A few weeks ago we went to our friend's house for dinner and she made pot roast.  It was delicious and hubs has been asking me to make it ever since.  I've been putting it off because I've never made a pot roast. But last weekend I gave in and told him I'd only do it with his help. Thankfully he's always willing to help me out.  We did all the prep in the morning and threw it in the crock pot for dinner that evening.  I was lucky enough to enjoy the smell of it all day and couldn't wait for him to get home for dinner.  The meat was tender and moist and the veggies were delicious.  This will be our go to pot roast from now on.  Hubs said he wants to make it once a week....we settled on twice a month.  Enjoy!


Ingredients:


    1 tbsp oil
    salt, pepper, flour
    pot roast
    1/2 c red wine

    1 onion, sliced
    5 medium potatoes, cut into one inch pieces
    3 carrots, cut into pieces

Directions:

   1. Heat a tablespoon of oil in a skillet over medium heat.
   2. Season your roast with salt and pepper then sprinkle with flour.
   3. Brown all sides of the meat in the hot oil. Remove to a plate. Add 1/2 cup of red wine to the skillet; stir to loosen browned bits.  Then remove from the heat.
   4. Place sliced onions in the bottom of the crock pot.
   5. Add the potatoes on top.
   6. Next, add the carrots.
   7. Put the browned roast on the vegetables.
   8. Pour the wine & juices from the skillet on top of the roast and veggies.
   9. Season with a little more salt and pepper,
  10. Cover and cook on the LOW for 8-9 hours.


We used some of the leftover meat to make sliders for dinner the following night. 


Tuesday, October 23, 2012

Candy Corn Craft

How cute are these little candy corn decorations?  
All you need is styrofoam cones, yarn and about 10 minutes.   

I started will two small styrofoam cones. 
 You need yellow, orange and white yarn .
 All you do is wrap the yarn around the cones.  
I used a small pin to pin the ends of the yarn in.
Started at the top and worked my way down.
Simple as that! 

Happy Crafting!


Monday, October 8, 2012

10 Minute Halloween Charger

I had a few extra minutes after I cleaned the house last week before the baby woke up.  So, I decided I would cross one of my Halloween crafts off my list.  I picked up black chargers at Hobby Lobby a few months back with the intentions of doing this project.  I used my Cricut to cut the Trick or Treat letters and white polka dots.  Then, I used the back of a paintbrush and orange acrylic paint to do the polka dots.  That is it.  Simple, Quick and Cute if I say so myself! 

Thursday, October 4, 2012

Pumpkin Toffee Chip and Rolo Chunk Cookies


Pumpkin + Chocolate Candy = Pure Bliss
After another blogger suggested this recipe to me, I knew I had to make it immediately.  And boy am I glad I did.  I will say that this is by far my favorite chocolate pumpkin recipe.  I plan on going to the store again this week to get more ingredients so I can make them to share with my neighbors. If you love pumpkin and chocolate, you'll be sorry if you don't give this recipe a try! 
Recipe Courtesy of Picky Palate 
Ingredients:
1 Box Yellow Cake Mix
One 15 ounce can Pumpkin (I used Libby’s)
2 cups mini chocolate chips
1 cup toffee chips
1 1/2 cups chopped Rolo’s (I used the mini baking rolo's and cut them in half)

Directions:
1. Preheat oven to 350 degrees F. and line a large baking sheet with parchment or a silpat liner.
2. Place cake mix and pumpkin into a large bowl, mix to combine. Stir in chocolate chips, toffee chips and Rolo’s, mixing until combined. With a medium cookie scoop, scoop dough onto prepared baking sheet about 1 inch apart. Bake for 15-17 minutes until cooked through. Remove from oven and let cool on baking sheet for 10 minutes before transferring to cooling rack. Serve room temperature or chilled.


 *You'll notice the caramel from the rolo's seeped out, it was easy to break off after the cookies cooled.  BUT...I was glad I had used a baking mat!


Makes 4-5 dozen cookies

Thursday, September 6, 2012

Pumpkin Coffee Cake with Brown Sugar Glaze


Pumpkin time is here and I couldn't be more thrilled. Expect to see lots of pumpkin posts around here in the coming months.  I started out the pumpkin making season with this recipe for Pumpkin Coffee Cake.  I've never made a coffee cake using a cake mix.  It was definitely easier to make but I could tell the difference in the taste and texture.  While this isn't my favorite pumpkin recipe, I still wanted to share it.  I was looking more for a breakfast item and to me it was more of a dessert.  If I make it again, I will add walnuts or pecans and more spices.  If you make it, let me know what you think!


Recipe Courtesy of Pretty Good Food 


Serves 18

Ingredients


⅓ cups Water
1 can Pureed Pumpkin (15 Oz)
2 whole Eggs
1 Tablespoon Vanilla Extract
2 teaspoons Pumpkin Pie Spice
1 box Yellow Cake Mix (18 Ounce Box)
1 teaspoon Baking Soda
1 cup Brown Sugar, Divided
½ cups Flour
4 Tablespoons Butter, Melted
¼ cups Granulated Sugar
1 teaspoon Vanilla Extract
¼ cups Heavy Whipping Cream

Directions:
1. Preheat the oven to 350F.
2.In a large bowl mix together the water, pumpkin, eggs, 1 Tablespoon of vanilla, and pumpkin pie spice until well combined. Add the cake mix and baking soda and mix until just combined.
3. Grease a 9×13 pan with butter and pour batter into pan.
4. In a small bowl mix together 1/2 cup of brown sugar, 1/2 cup flour and melted butter. Use your fingers to sprinkle over the top of the cake. Bake at 350 for 25-30 minutes, or until a toothpick inserted comes out clean.
5. For the glaze, combine the other 1/2 cup brown sugar, granulated sugar, 1 teaspoon vanilla, and heavy cream in a saucepan and bring to a simmer. Remove from heat and stir until all sugar is dissolved.
6. When cake is finished baking, poke holes in the top with a toothpick. Pour glaze over the cake, making sure to cover all surfaces. Serve cake warm or at room temperature.

Wednesday, November 23, 2011

Thanksgiving Treats


Last week I had a Thanksgiving feast in my classroom.  I've seen so many cute ideas for sweet treats on Pinterest, I decided to try a few.  
*These are IPhone pictures, so not as good as they could be*

Acorns
Vanilla Wafers, Hershey Kisses, Butterscotch Morsel & a little frosting to hold it all together. 


Pilgrim Hats
chocolate cookies, Rolos, frosting 


Turkey Sugar Cookies
sugar cookies, candy corn, mini chocolate morsels, frosting 


 Not as perfect as the ones on Pinterest, but the kids and parents loved them!

Monday, November 21, 2011

Pumpkin Spice Hot Chocolate


A few weeks ago we had some pretty chilly temps here in FL.  Right when I got home for work (on the one day it was cold) I made sure to light candles, bring out the blankets and made some hot chocolate.  I didn't just want the usual hot chocolate and I remembered this recipe from Pinterest.  It's from one of my favorite sites, Cookies and Cups.   Took only a few minutes to make and was a great spin on the old boring hot chocolate! Enjoy!

Wednesday, November 2, 2011

Pumpkin Rice Krispie Treats


This treat has been floating all over pinterest lately. Here is the recipe I used as my guide.   I decided to make them at the last minute to take to work for my team. I followed normal rice krispie treat directions.  After the marshmallow is melted, I added yellow and red food coloring to create the orange marshmallow.  I added the rice krispies and made sure they were coated with marshmallow.  After the mixture had cooled a bit I shaped a handful of the mixture into a round ball.  I used a Tootsie Roll as the stem and stuck it in the middle of the ball.  I used green icing to make the leaf and vine.  I will say that these were a lot easier to make than I thought they would be.  Enjoy! 


Saturday, October 29, 2011

Pumpkin Chili


Pumpkin Chili

1/2 cup chopped onion 
1 cup chopped red bell pepper 
1 clove garlic, finely chopped 
1 lb. ground turkey 
2 cans (14.5 oz each) diced tomatoes, undrained 
1 can (15 oz.) LIBBY'S 100% Pure Pumpkin 
1 can (15 oz.) tomato sauce 
1 can (15.25 oz.) kidney beans, drained 
1 can (4 oz.) ORTEGA Diced Green Chiles 
1/2 cup whole kernel corn 
1 tablespoon chili powder 
1 teaspoon ground cumin 
1 teaspoon salt 
1/2 teaspoon ground black pepper

Brown the meat then throw everything in the crock pot for 3 1/2 hours on high.
  Love this spin on chili!


Thursday, October 27, 2011

Halloween Sweet & Salty Bites


I've seen pictures floating around Pinterest using these three ingredients to make sweet treats.  I love the sweet and salty combination, so I added them to my "Must Make" list.  I made them last week for D to take to work.  I may have eaten a handful before I bagged them up for him to take.  They were that good!

Halloween Treats! 
Ingredients:
Square Pretzels (I used the butter snaps)
Hershey Kisses 
Candy Corn

Directions:
Preheat oven to 350 degrees F.  Place pretzels on cookie sheet, not touching. Unwrap Hershey's Kisses and place on top of pretzels. Place cookie sheet in oven. Bake for about 4 minutes or until the kisses are shiny.  When you take them out of the oven,  gently place candy corn on top of Hershey Kisses.  Press down gently.  Cool and then transfer to your desired serving dish. Enjoy!


Sunday, October 23, 2011

Cinnamon Sugar Pumpkin Blossoms

What better way to start a new week than with another tasty pumpkin recipe? This one was from Pinterest.  I made them last Sunday when my mom came over and spent the day baking with me.  Even though these were delicious cookies, they weren't as easy as we thought they'd be.  I didn't have the time to cool the dough over night (which I would recommend) so I decided not to coat the dough in cinnamon sugar.  Instead, I scooped the dough onto the cookie sheet and sprinkled the cinnamon sugar mixture on it.  They baked perfectly and the house filled with a sweet pumpkin aroma.  Out next little issue came with putting the kisses on the cookies.  The directions said to put them on immediately after they come out of the oven.  That did not work for us, see picture below.  Instead we let them cool for a few minutes on the cookie sheet, moved them to a wire cooling rack and after a few minutes pressed the kisses on top.  After two attempts, we finally had success.  And they were totally worth it.  Enjoy!
Pumpkin Spice Hershey Kisses (about 30, unwrapped)
1 pouch Betty Crocker Sugar Cookie Mix
1/3 cup butter, softened
1 egg
1 cup canned pumpkin
1/2 teaspoon pumpkin pie spice
1/2 cup sugar and 2 teaspoons cinnamon, mixed
Preheat oven to 350. 
  
Mix sugar cookie mix, butter, egg, pumpkin, and pumpkin pie spice with a mixer or by hand until well blended. Dough will be very soft. Cover and refrigerate for at least an hour.
I tried the dough after an hour, and after sitting in the refrigerator overnight. I preferred it after it had sat all night (firmer and less messy) but it’s really up to you.
Scoop the dough out with a small cookie scoop (or a tablespoon), roll into a ball, and roll in the cinnamon sugar. If your dough is less firm due to refrigerating it less, drop it in the cinnamon sugar before you shape it. The coating will keep it from sticking to your hands.
Place cookies on an ungreased cookie sheet and bake for about 10 minutes, or until bottoms are golden brown and centers are firm. Remove from oven and immediately press a Pumpkin Spice Kiss in the center of each.
                                                                               Woops! 

Saturday, October 15, 2011

Pumpkin Snickerdoodles


Are you surprised to see another pumpkin recipe?  You shouldn't be.  As soon as these gems caught me eye on Pinterest, I knew I had to make them.  Fortunately, I had all the ingredients at home so I didn't have to wait.  My Mr. has a busy season at work that is starting this week and I always try to send in lots of goodies for that 12 week period.  This was my first treat that I sent.  I followed all directions but did add a tsp of pumpkin pie spice into the cookie dough mix.  I chilled my dough overnight.  You definitely want to chill the dough, it will make it easier to work with.  I used the Pampered Chef small scoop to make the cookies, so I ended up with over 4 dozen. Enjoy! 


Pumpkin Snickerdoodles
Yield: about 3-4 dozen cookies
Ingredients:
For the cookies:
3¾ cups all-purpose flour
1½ tsp. baking powder
½ tsp. salt
½ tsp. ground cinnamon
¼ tsp. ground nutmeg
1 cup (2 sticks) unsalted butter, at room temperature
1 cup granulated sugar
½ cup light brown sugar
¾ cup pumpkin puree
1 large egg
2 tsp. vanilla extract
For the coating:
½ cup granulated sugar
1 tsp. ground cinnamon
½ tsp. ground ginger
Dash of allspice
Directions:
In a medium bowl, combine the flour, baking powder, salt, cinnamon, and nutmeg.  Whisk to blend and set aside.  In the bowl of an electric mixer, beat together the butter and sugars on medium-high speed until light and fluffy, 2-3 minutes.  Blend in the pumpkin puree.  Beat in the egg and vanilla until incorporated.  With the mixer on low speed add in the dry ingredients and mix just until incorporated.  Cover and chill the dough for at least 1 hour.
Preheat the oven to 350˚ F.  Line baking sheets with silicone baking mats or parchment paper.  Combine the sugar and spices for the coating in a bowl and mix to blend.  Scoop the dough (about 2½ tablespoons) and roll into a ball.  Coat the dough ball in the sugar-spice mixture and place on the prepared baking sheet.  Repeat with the remaining dough to fill the sheets, spacing the dough balls 2-3 inches apart.  Dip the bottom of a flat, heavy-bottomed drinking glass in water, then in the sugar-spice mixture, and use the bottom to flatten the dough balls slightly.  Recoat the bottom of the glass in the sugar-spice mixture as needed.

Bake the cookies for 10-12 minutes, or until just set and baked through.  Let cool on the baking sheets about 5 minutes, then transfer to a wire rack to cool completely.  Repeat with the remaining dough.  Store in an airtight container.
From Annie's Eats. 


Sunday, October 9, 2011

Fall Decor

Cinnamon Stick Candles 

I used a few bundles of cinnamon sticks and a tall white candle.  I had my hubs hold his hands open around the candle and I put the cinnamon sticks around it.  Once the candle was completely surrounded, I used twine to hold them together.  I did try to hot glue the cinnamon sticks together around the candle, but it didn't work.  It took 5 minutes to do once I had an extra set of hands.  


Filled Vases 


Popcorn seeds, split peas and red beans filled the vases in my dining room.  I used two bags of each.  I filled them and then placed a candle in the middle.  A quick and festive decoration.  

Sunday, November 7, 2010

Iced Pumpkin Cookies


By now you should be well aware of my love for pumpkin-anything pumpkin. Today, my husband sent me a message from work saying the people at work were wondering if I was mad at them, because I haven't sent in any goodies lately. Well, that is completely HIS fault because the pumpkin brownies I made last week are still in the fridge. SOMEONE forgot to bring them to work. Anyways, I wanted to make something today, but didn't feel like going to the store. I've stocked up on cans of pumpkin, so I went to All Recipes on a search for a new pumpkin recipe. And viola....Iced Pumpkin Cookies. I followed some of the recommendations from the reviews: I used the entire can of pumpkin, let them cook for 12 minutes, used Crisco instead of butter, and used pumpkin pie spice. I iced only half of my batch because the fewer calories for me...the better. On the ones without icing, I used a little brown sugar on the top. I LOVED these! For the icing, I just used boiling water, a little vanilla and confectioners sugar. It worked perfectly for me!

Ingredients
2 1/2 cups all-purpose flour
1 teaspoon baking powder
1 teaspoon baking soda
2 teaspoons ground cinnamon
1/2 teaspoon ground nutmeg
1/2 teaspoon ground cloves
1/2 teaspoon salt
1/2 cup butter, softened
1 1/2 cups white sugar
1 cup canned pumpkin puree
1 egg
1 teaspoon vanilla extract
Icing:
2 cups confectioners' sugar
3 tablespoons milk
1 tablespoon melted butter
1 teaspoon vanilla extract
Directions

Preheat oven to 350 degrees F (175 degrees C). Combine flour, baking powder, baking soda, cinnamon, nutmeg, ground cloves, and salt; set aside.
In a medium bowl, cream together the 1/2 cup of butter and white sugar. Add pumpkin, egg, and 1 teaspoon vanilla to butter mixture, and beat until creamy. Mix in dry ingredients. Drop on cookie sheet by tablespoonfuls; flatten slightly.
Bake for 15 to 20 minutes in the preheated oven. Cool cookies, then drizzle glaze with fork.
To Make Glaze: Combine confectioners' sugar, milk, 1 tablespoon melted butter, and 1 teaspoon vanilla. Add milk as needed, to achieve drizzling consistency.

Sunday, October 3, 2010

Pumpkin Chocolate Chip Muffins


Loved these! Took me no time at all, will definitely make these again!
Note: I only made one batch using one box of cake mix, 1 15oz. can of pumpkin and 2 cups of chocolate chips.

Easy Pumpkin Chocolate Chip Muffins

2 spice cake mixes (Duncan Hines, although not pictured, is the best for this recipe)
1 30-oz. can pumpkin
1 12-oz. bag of semi-sweet chocolate chips
Preheat oven to 350. Combine cake mixes and pumpkin. Add in chocolate chips. Spoon mixture into lined muffin tins. This can make as many as 48 muffins or as few as 36, just depending on how full the tins are filled. These really don't rise very much, so you can fill the tins pretty full. If aesthetics are a concern, keep in mind that how they look going into the oven is very much what they will look like coming out of the oven. So a cookie scoop works great to keep things on the prettier side.
Bake for 22-25 minutes or until a toothpick inserted in the middle of one of the muffins comes out clean.


Blog Design by Get Polished