Wednesday, December 1, 2010

Ho Ho Ho-Santa Hats


A mom of one of my former students sent a this link.  She said she thought of me when she saw it and she hit the nail right on the head.  This is my kind of crafty creation!  I went out and bought all the supplies and two days later....I got to work.  Now, this wasn't as easy as I thought it would be.  And...mine definitely didn't come out as perfect as Thrifty Chic's.  Nonetheless, it was a fun craft and it looks pretty darn cute on top of our bar".
 

I have enough left over materials, so it looks like someone is going to get this as a gift.  Any guesses on who?  


 *Notice how all of the pictures are from a certain angle?  Yes?  Well, there is a very good reason for that.  I'd recommend lining up the diamonds before gluing!  

Happy Crafting!

Tuesday, November 30, 2010

Chocolate Ganache Cake


I came across this recipe on one of my favorite recipe blogs Keeping Up with the Jonses . I made it for dessert on Thanksgiving. It went perfectly with our pumpkin pie and ice cream cake. I made the cake at my parents house, since mom didn't have round pans I used a bundt pan. It still worked very well. I'm a huge chocolate lover and I couldn't only get through a small slice of this cake. Chocolate overload! Next time, I would use half of the Heath bar crumbs in the middle layer of icing. Overall, a delicious dessert! Enjoy.

Chocolate Ganache Cake

Ingredients:
1 box Betty Crocker SuperMoist chocolate fudge cake mix
water, vegetable oil and eggs called for on box
1 container Rich & Creamy chocolate frosting
1/3 cup whipping cream
1/2 cup semi-sweet chocolate chips
2 bars (1/4 oz each) Heath bar, roughly chopped (*or if you store sells it, a half of a bag of Heath Bar crumbles)

Instructions:

Bake and cool cake according to box directions (make 2 layers, in 8 or 9 inch pans)

Place one layer, rounded side down on serving platter. Spread with about 1/3 cup frosting. Top with second layer, rounded side up. Frost top and side of cake with remaining frosting.

In 1 qt saucepan, heat whipping cream over medium-high heat until hot (do not boil). Remove from heat and stir in chocolate chips until melted and smooth. Let this cool until it thickens. You'll know this is ready when it mounds slightly when dropped from a spoon (and isn't runny). Pour over top of cake and let it run down sides. Top with Heath Bar.


Refrigerate about 1 hour until chocolate is set before serving. Store covered in the refrigerator.

Monday, November 29, 2010

Sweet Potato Casserole


This is the second new recipe I tried this year. I found the recipe on my friend Amy's blog. Definitely lots of butter in this recipe, but hands down the best sweet potato casserole I've made! Enjoy!

SWEET POTATO CASSEROLE

Serves 10-12

Ingredients:
3 cups mashed sweet potato (about 6-7 potatoes)
½ cup sugar
½ cup milk
1 and a ½ Tbsp. Vanilla
2 eggs beaten
½ cup butter
Cinnamon to taste

Topping:
1 cup brown sugar
½ cup butter
½ cup flour
1 cup chopped walnuts or pecans (I use pecans - it tastes better to me)

Mix all ingredients together; except topping and pour into a casserole dish sprayed with Pam. Sprinkle with Cinnamon. **Can be prepared the day before up to this point**

Cover and store in fridge over night.

Topping:
**Made the day you are serving the dish**
Mix all ingredients together and cover entire top of potatoes.

**Bring to room temp. if made the day before.**
Bake casserole @ 350 for 25-30 minutes.

Sunday, November 28, 2010

Corn Casserole

This is the first of two new recipes I made for Thanksgiving this year. I tried corn casserole for the first time at my work feast. It was scrumptious, so I set out to find a recipe. I came across this one at a blog I follow: Love From Texas. I followed all of the directions exactly. I was a little concerned with the amount of butter in the recipe, but it's a holiday-so calories don't count! After 20 minutes in the oven, I thought this recipe was going to be a flop. But, all it needed was an extra 5-10 minutes in the oven. This is my new favorite Thanksgiving side. Next time I make it, I'll try it will a little less butter. I'm sure it will be just as good. Enjoy!
Click here for the recipe.


*I wish I had better pictures for this recipe, but we dove right in as soon as it came out of the oven!

Saturday, November 27, 2010

Cinnamon Donut Muffins


This recipe came from a blog I enjoy-Just Another Day in our Midwest Paradise. These are very tasty. I used apricot and raspberry preserves. The apricot was nice and sweet and the raspberry was a bit tart. These will definitely be shared with our neighbors. Great recipe!

Cinnamon Donut Muffins (Makes 24)
Ingredients:
3 1/2 C Flour
3 Teaspoons Baking Powder
1 Teaspoon Salt
1/2 Teaspoon Ground Nutmeg
1 Teaspoon Cinnamon

1 1/4 Cup White Sugar
1 Teaspoon Vanilla
2 Eggs
1 1/2 Cup Milk
2/3 Cup Vegetable Oil


24 Teaspoons of Jam, preserves, etc. of your choice.

2 Tablespoons of Butter
1/3 cup sugar, 2 T cinnamon


Directions:
1) Pre-heat oven to 350.
2) Spray 2 muffin tins liberally with non-stick spray. Don't use liners, it pulls the muffin away from the filling and makes a gigantic mess.
3) Mix all dry ingredients together (minus the sugar, that goes with the wet stuff). Sift or aerate with a fork.
4) Lightly beat the eggs in another bowl. Add milk, oil, sugar, and vanilla.
5) Mix the wet ingredients into the flour mix.
6) Gently spoon the ingredients into muffin tins until each is about 1/3 full. There will be batter left.
7) Using a teaspoon, spoon jam/preserves of your choice into the center of the batter in each tin. Try to keep it in the middle and away from the sides so it doesn't ooze out when you turn the muffins out after baking.

8) Once all of the tins have filling, top them all off with the remaining batter.
9) Bake for 20 minutes.
10) Let cool for about 2 minutes. Not too long! Loosen them from the muffin tins with a knife.
11) Melt the butter in a small dish, and pour the cinnamon sugar into another small dish.
12) Dunk the tops of each muffin in the butter and roll in the cinnamon sugar. Let cool.

Friday, November 19, 2010

Personalized Wooden Letter


A great way to add a personal touch to your home decor. This would be a great engagement, wedding or engagement gift. I had looked at loads of places for a wooden H but never had any luck finding one that matched our decor. This was my first experience with Mod Podge...loved it! I already have added these letters to my list of gifts to create for the holidays! Happy Crafting!
Here is the tutorial I used as a guide.

1. Paint letter preferred color. This will be the background color. It will be noticeable from every angle except the front. You don't have to paint the front of the letter since you will be covering it with paper, but I would paint a little past the edge incase your paper doesn't cover all the way. Let letter dry.

2. Choose scrapbook paper for front of the letter. Trace paper and cut out.

3. Use mod podge to adhere the paper letter to the wood. I first painted the paper, put it on top of the wood then covered the whole thing with my new best friend-mr. podge.

4. Let dry and enjoy!

Thursday, November 18, 2010

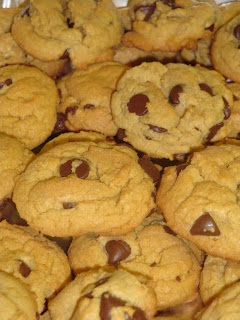
Award Winning Chocolate Chip Cookies


I found this cookie recipe on one of the blogs I follow last week, Hello Miss Chelsea. I bookmarked it, saving it for a time of need. Well, that time is now! I have to make cookies for the Great American Teach In at my school, I figured I can't go wrong with chocolate chip. She found the recipe from All Recipes and I have to agree with the title. They are one of the best chocolate chip cookies I've made. Enjoy!

Ingredients
4 1/2 cups all-purpose flour
2 teaspoons baking soda
2 cups butter, softened
1 1/2 cups packed brown sugar
1/2 cup white sugar
2 (3.4 ounce) packages instant vanilla pudding mix
4 eggs
2 teaspoons vanilla extract
4 cups semisweet chocolate chips
2 cups chopped walnuts (optional- I left these out)

Directions
Preheat oven to 350 degrees F. Sift together the flour and baking soda, set aside.
In a large bowl, cream together the butter, brown sugar, and white sugar. Beat in the two boxes of instant pudding mix until blended. Stir in the eggs and vanilla. Blend in the flour mixture. Finally, stir in the chocolate chips and nuts. Drop cookies by rounded spoonfuls onto ungreased cookie sheets.
Bake for 10 to 12 minutes in the preheated oven. Edges should be golden brown.

Wednesday, November 17, 2010

Chicken Spaghetti


WOW! Absolutely delicious! This is the first pioneer woman recipe I've attempted. Looks like I'm going to do a little searching through her website, because I'm hooked. I give this recipe 5 stars and can't wait to make it again. No changes necessary, the recipe is prefect just the way it is. It makes a good amount of food and will be feeding the Mister for lunch all week. This is a must try recipe!

Chicken Spaghetti
Ingredients
2 cups Cooked Chicken
3 cups Dry Spaghetti, Broken Into Two Inch Pieces
2 cans Cream Of Mushroom Soup
2 cups Grated Sharp Cheddar Cheese
¼ cups Finely Diced Green Pepper
¼ cups Finely Diced Onion
1 jar (4 Ounce) Diced Pimentos, Drained
2 cups Reserved Chicken Broth From Pot
1 teaspoon Lawry's Seasoned Salt
⅛ teaspoons (to 1/4 Teaspoon) Cayenne Pepper
Salt And Pepper, to taste
1 cup Additional Grated Sharp Cheddar Cheese

Preparation Instructions
Cook 1 cut up fryer and pick out the meat to make two cups. Cook spaghetti in same chicken broth until al dente. Do not overcook. When spaghetti is cooked, combine with remaining ingredients except additional 1 cup sharp cheddar.
Place mixture in casserole pan and top with remaining sharp cheddar. Cover and freeze up to six months, cover and refrigerate up to two days, or bake immediately: 350 degrees for 45 minutes until bubbly. (If the cheese on top starts to get too cooked, cover with foil).

Tuesday, November 16, 2010

Fluffernutter Cookies


I found this E-A-S-Y recipe from the Picky Plate. Of course it caught my eye because there were only 3 ingredients. I made them tonight and I feel like they were missing something. Mine definitely didn't look like the ones on the website, they were very flat. My Mister agreed with me, saying there was some sweetness missing. But, they may work out better for you, so I still decided to share. Let me know what you think if you try them!

Fluffernutter Cookies
1 Cup creamy peanut butter
1 large egg
1 cup marshmallow cream
1. Preheat oven to 350 degrees F. In a large bowl mix the peanut butter and egg until well combined with a spoon. Slowly stir in the marshmallow cream until just combined. You want to see the marshmallow cream not fully incorporated, almost like swirled through. With a small-medium cookie scoop, scoop dough onto a parchment or silpat lined baking sheet. Bake for 12-15 minutes or until baked through. Let cool for 5 minutes on cookie sheet before transferring to a cooling rack.
-about 18 cookies

Monday, November 15, 2010

Cake Mix Cookies


It is one of the busiest times of the year at my Mister's job and I wanted to send in something sweet for his team. I remembered seeing a recipe for cookies made from cake mix, which I had in my pantry. I went to All Recipes and found this fabulous recipe for cake cookies. I have to say these were very simple to make and came out delicious. I made my first batch with chocolate chips and then after a request from my Mister, I added butterscotch chips to my second batch. Loved these and will definitely make them again!
Ingredients

1 (18.25 ounce) package yellow cake mix
1/3 cup vegetable oil
2 eggs
2 cups semisweet chocolate chips
Directions

Preheat oven to 350 degrees F (175 degrees C). Grease cookie sheets.
Pour cake mix into a large bowl. Stir in the oil and eggs until well blended. Mix in chocolate chips. Drop dough by teaspoonfuls onto the prepared cookie sheets.
Bake for 8 to 10 minutes in the preheated oven. Remove from pan to cool on wire racks.

Sunday, November 14, 2010

Beef & Cheese Foldover


I am in love with this recipe. It's been in my dinner folder for way too long and I finally made it tonight. The only changes I made were using ground turkey instead of beef and using a can of refrigerated crescent rolls instead of making a biscuit batter. Everything else was followed completely. My dough fell apart a little in the oven, but it didn't take away from the deliciousness of the recipe. I also didn't read the directions the whole way through and added the cheese too soon. THANKFULLY-the cheese was perfectly bubbling when it came out. I give this recipe a 10 out of 10 and can't wait to make it again next week. This recipe would even be great rolled up in crescent rolls to make individual empanadas.

Beef & Cheese Foldover
what you need
1 lb. ground beef
1 onion, chopped
1 cup frozen corn
1/4 cup ketchup
2 Tbsp. A.1. Original Steak Sauce
1/2 cup hot water
2 cups all-purpose baking mix
1 cup KRAFT Mexican Style Finely Shredded Four Cheese
1/2 tsp. parsley flakes
make it
HEAT oven to 375ºF.

BROWN meat with onions in large skillet; drain. Return to skillet. Stir in corn, ketchup and steak sauce; set aside.

ADD water to baking mix; stir until mixture forms dough. Shape into ball. Place on lightly floured surface; knead 5 times or until smooth and no longer sticky. Roll into 12-inch circle; transfer to baking sheet sprayed with cooking spray.

SPOON meat mixture onto center of dough; spread to within 2 inches of edge. Fold edge of dough over meat, leaving center uncovered.

BAKE 20 min. Top filling with cheese; bake 5 min. or until melted. Sprinkle with parsley.

Sunday, November 7, 2010

Iced Pumpkin Cookies


By now you should be well aware of my love for pumpkin-anything pumpkin. Today, my husband sent me a message from work saying the people at work were wondering if I was mad at them, because I haven't sent in any goodies lately. Well, that is completely HIS fault because the pumpkin brownies I made last week are still in the fridge. SOMEONE forgot to bring them to work. Anyways, I wanted to make something today, but didn't feel like going to the store. I've stocked up on cans of pumpkin, so I went to All Recipes on a search for a new pumpkin recipe. And viola....Iced Pumpkin Cookies. I followed some of the recommendations from the reviews: I used the entire can of pumpkin, let them cook for 12 minutes, used Crisco instead of butter, and used pumpkin pie spice. I iced only half of my batch because the fewer calories for me...the better. On the ones without icing, I used a little brown sugar on the top. I LOVED these! For the icing, I just used boiling water, a little vanilla and confectioners sugar. It worked perfectly for me!

Ingredients
2 1/2 cups all-purpose flour
1 teaspoon baking powder
1 teaspoon baking soda
2 teaspoons ground cinnamon
1/2 teaspoon ground nutmeg
1/2 teaspoon ground cloves
1/2 teaspoon salt
1/2 cup butter, softened
1 1/2 cups white sugar
1 cup canned pumpkin puree
1 egg
1 teaspoon vanilla extract
Icing:
2 cups confectioners' sugar
3 tablespoons milk
1 tablespoon melted butter
1 teaspoon vanilla extract
Directions

Preheat oven to 350 degrees F (175 degrees C). Combine flour, baking powder, baking soda, cinnamon, nutmeg, ground cloves, and salt; set aside.
In a medium bowl, cream together the 1/2 cup of butter and white sugar. Add pumpkin, egg, and 1 teaspoon vanilla to butter mixture, and beat until creamy. Mix in dry ingredients. Drop on cookie sheet by tablespoonfuls; flatten slightly.
Bake for 15 to 20 minutes in the preheated oven. Cool cookies, then drizzle glaze with fork.
To Make Glaze: Combine confectioners' sugar, milk, 1 tablespoon melted butter, and 1 teaspoon vanilla. Add milk as needed, to achieve drizzling consistency.

Saturday, November 6, 2010

Honey Cornbread


I've always bought the box of cornbread mix from the store, but I had an itch to try to make them from scratch. So, I visited All Recipes.com for some ideas. After some searching, I found this Honey Cornbread recipe. The feedback looked great, so I decided to given them a try. Enjoy!
Ingredients
1 cup all-purpose flour
1 cup yellow cornmeal
1/4 cup white sugar
1 tablespoon baking powder
1 cup heavy cream
1/4 cup vegetable oil
1/4 cup honey
2 eggs, lightly beaten
Directions
Preheat oven to 400 degrees F (200 degrees C). Lightly grease a 9x9 inch baking pan.
In a large bowl, stir together flour, cornmeal, sugar and baking powder. Make a well in the center of the dry ingredients. Add the cream, oil, honey and eggs; stir to combine. Pour batter into prepared baking pan.
Bake in preheated oven for 20 to 25 minutes, until a toothpick inserted into center of pan comes out clean.

Friday, November 5, 2010

Pumpkin Swirl Brownies


One of my favorite combinations....chocolate and pumpkin! You've got to try these!
Thank you Betty Crocker.
Filling:
1 package (3 oz) cream cheese, softened
1/2 cup canned pumpkin (not pumpkin pie mix)
1 egg
3 tablespoons sugar
1 teaspoon ground cinnamon
1/4 teaspoon ground nutmeg
Brownies
1 box Betty Crocker® Premium Brownies Ultimate Fudge
1/4 cup vegetable oil
2 tablespoons water
1 egg

Directions:
1. Heat oven to 350°F (325°F for dark or nonstick pan). Grease bottom only of 9-inch square pan with shortening or cooking spray. In small bowl, beat all filling ingredients with electric mixer on low speed until smooth. Set aside.
2. Make brownie batter as directed on box, using 1/4 cup oil, 2 tablespoons water and the egg. Spread 3/4 of the batter in pan. Spoon filling by tablespoonfuls evenly over batter. Spoon remaining brownie batter over filling. Cut through batter several times with knife for marbled design.
3. Bake 40 to 45 minutes or until toothpick inserted 1 inch from side of pan comes out almost clean. Cool completely. Cut into 4. rows by 4 rows. Store covered in refrigerator.

Makes 16 brownies

Thursday, November 4, 2010

Caramel S’more Cups


These are as good as they look! The only thing I would recommend is putting them in the refrigerator after they've had a little time to cool from the oven. This made it easier for me to taken them out of the pan. I didn't add the melted chocolate because we didn't want to wait any longer for dessert! Enjoy!

Ingredients:
1 pouch (1 lb 1.5 oz) Betty Crocker® chocolate chip cookie mix
1/2 cup butter or margarine, softened
1 egg
24 round chewy caramels in milk chocolate, from 3 (1.91-oz) rolls, unwrapped
72 mini marshmallows (about 3/4 cup)
1/3 cup semisweet chocolate chips

Directions:
1. Heat oven to 350°F. Spray 24 mini muffin cups with cooking spray.
2. Make cookie dough as directed on package, using butter and egg. Shape dough into 24 (1 1/2-inch) balls. Place 1 ball into each muffin cup.
3. Bake 13 to 15 minutes or until edges begin to brown. Remove from oven; firmly press 1 candy into center of each cookie until flush with cookie top. Top each with 3 marshmallows. Bake 2 to 4 minutes longer or until marshmallows are puffed. Cool 10 to 15 minutes. Loosen edges of cookie with small metal spatula and remove to cooling racks. Cool completely.
4. Place chocolate chips in small resealable freezer plastic bag. Microwave on High about 1 minute or until softened. Gently squeeze bag until chocolate is smooth; cut off tiny corner of bag. Squeeze bag to drizzle chocolate over marshmallows. Let stand until hardened, about 10 minutes.

Monday, November 1, 2010

Chili Cheese Dip


My mom has made this dip for longer than I can remember. No matter the occasion...it's always a hit. I love it because it takes less than 10 minutes!

Ingredients:
1 package of cream cheese (8oz)
1 can of chili (I used w/o beans)
2 cups of shredded cheddar cheese

Directions:
1. Spread cream cheese on the bottom of a glass pie dish
2. Pour chili on top of the cream cheese. 3. Top with shredded cheddar cheese.
4. Cook in the microwave for about 7 minutes or until cheese is melted.
*Serve with tortilla chips

Enjoy!

Chicken and Veggie Tortellini


There aren't too many recipes I find myself ripping our of my Southern Living magazines, but this recipe has me regretting canceling my subscription. It was hands down one of the best recipes I've tried in a while. I don't know how to use the grill, so I decided to sauté the chicken and zucchini. It came out just as good. Enjoy!

Ingredients
4 small zucchini, cut in half lengthwise (about 1 1/4 lb.)
2 skinned and boned chicken breasts (13 oz.)
1 tablespoon freshly ground Italian herb seasoning
1 (19-oz.) package frozen cheese-filled tortellini
1 (7-oz.) container refrigerated reduced-fat pesto
2 large tomatoes, seeded and chopped
Garnish: grated Parmesan cheese
Preparation
1. Preheat grill to 300° to 350° (medium) heat. Sprinkle zucchini and chicken with seasoning.

2. Grill zucchini and chicken at the same time, covered with grill lid. Grill zucchini 6 to 8 minutes on each side or until tender. Grill chicken 5 to 6 minutes on each side or until done. Remove from grill; let stand 10 minutes.

3. Meanwhile, prepare tortellini according to package directions.

4. Coarsely chop chicken and zucchini. Toss tortellini with pesto, tomatoes, chicken, and zucchini. Serve immediately. Garnish, if desired.

Parmesan Knots


Easy, delicious, devoured! Another quality recipe from Taste of Home. Would be a great compliment to pasta or a great appetizer at a party.
Parmesan Knots
Ingredients
1/2 cup canola oil
1/4 cup grated Parmesan cheese
1-1/2 teaspoons dried parsley flakes
1-1/2 teaspoons dried oregano
1 teaspoon garlic powder
Dash pepper
3 tubes (12 ounces each) refrigerated buttermilk biscuits
Directions
In a small bowl, combine the oil, cheese, parsley, oregano, garlic powder and pepper; set aside.
Cut each biscuit in half. Roll each portion into a 6-in. rope; tie in a loose knot. Place on greased baking sheets.
Bake at 400° for 8-11 minutes or until golden brown; immediately brush with the Parmesan mixture. Serve warm or freeze for up to 2 months.

To use frozen knots: Reheat, unthawed, at 350° for 15-20 minutes. Yield: 5 dozen

Blog Design by Get Polished