Thursday, April 21, 2011

Easter Egg Nests

Here comes peter cottontail

Easter is right around the corner and I am looking forward to it.  I've been in a baking mood lately and have enjoyed coming up with some different holiday creations.  This is now the third time in three weeks I've made a variation of my snickerdoodle cups.  These cups couldn't be easier and are under $5 to make. I've now stocked up on cake mix and frosting incase I need to make these on a whim.  I have to say that this is the best one yet.  My absolute favorite.  They tasted like little german chocolate cakes. 


Ingredients: 
1 box of devil's food cake mix
1 egg
1 stick of butter (melted) 
green food coloring
1 cup of coconut
Robin's Eggs (whoppers) 
Frosting of your choice 


Directions: 
Melt your butter then add the cake mix and then the egg. Mix until it forms dough. 


Once you get your  dough, simply scoop into a mini muffin pan. I greased mine first. 

Bake at 350* for 8-10 min (until light brown)

When your cups come out of the oven they will be slightly brown, spray a mini tart shaper with cooking spray to help them not stick and press down the center of each cup. This will make the brownie bites in to a cup. 

Once all the tops are pressed down and the bites have cooled a bit, move them to a cooling rack. 

To finish them off, fill with your favorite frosting. 
I used chocolate buttercream for this recipe.  

Place a cup of coconut in a plastic bag and add a few drops of green food coloring.  Mix thoroughly until coconut is the color you want.  Empty onto a paper towel. I let it dry for 10 minutes.  Place 1-2 tsp of coconut on top of the frosting.  
Top them off with 2-3 Robin's Eggs.  


Happy Easter!


Wednesday, April 20, 2011

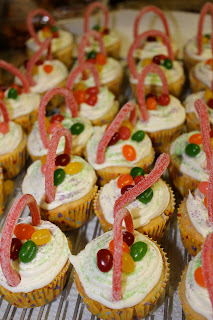
Easter Basket Cupcakes

How cute are these?  I decided to make my students a special treat before the Easter weekend.  Thanks to Publix's BOGO on Duncan Hines Cake mix, I now have over 10 boxes at home.  I didn't feel like making a cake, so cupcakes it was.  
I made confetti cupcakes and frosted them with vanilla icing.  I bought Starburst jelly beans as "eggs" and sour strawberry straws for the basket handle.  I added some sprinkles to the cupcakes for additional color.  Love Love Love how these turned out.  I can't wait to see what my students think tomorrow! 


*Note: I used the entire straw and pushed both ends into the cupcake.  


TP Bunnies

I was instantly in love with this No Sew TP Bunny the moment I saw them over at Oopsey Daisy.  As I scrolled through her tutorial, I realized that I had all of the materials.  So of course, I made one three.  I brought one into my classroom and my students were obsessed with it all day.  I’m probably going to keep the other and give the last one as an Easter gift.  I may even make some more, they’re too cute not to share!

I did make a few changes to the materials.  I didn’t have white felt or ric rac.  So I used white and pink foam for the ears.  Then I used a Sharpie paint pen for the eyeballs and pipe cleaners for the whiskers. 
Love how they turned out.  You HAVE to try one!

Tuesday, April 19, 2011

BBQ Glazed Chicken with Potato Smashers

I think I've fallen in love...with Kraft Foods Recipes! Which is exactly where I found this chicken recipe. Like I've said before, I don't use the grill.  So I did a great job preparing this dish and let my Mr. do all the dirty work.  The marinade is fantastic.  Easy to make and different from your typical BBQ sauce from the bottle.  I paired the chicken with potato smashers, also from Kraft Foods (duh). Now, this recipe was not as easy as I thought it would be.  My potatoes fell apart and definitely didn't look like the ones on the website.  Nonetheless, they were still tasty.  Enjoy!


Easy BBQ Glazed Chicken Directions:

               what you need

1/2 cup KRAFT Zesty Italian Dressing, divided
4 small  boneless skinless chicken breast halves (1 lb.)
1/4 cup KRAFT Original Barbecue Sauce
2 Tbsp.  orange marmalade

make it

HEAT grill to medium heat.
POUR 1/4 cup dressing over chicken in shallow dish; turn over to coat both sides of each breast. Refrigerate 10 min.
MEANWHILE, mix barbecue sauce, marmalade and remaining dressing.
REMOVE chicken from dressing; discard dressing. Grill chicken on covered grill 12 to 15 min. or until done (165°F), turning occasionally and brushing with barbecue sauce mixture the last few minutes.

Potato Smashers Directions:


what you need

new potatoes (3/4 lb.), 1-1/2 inch
1/2 cup  water
2 Tbsp. KRAFT Zesty Italian Dressing
1/2 cup  KRAFT Shredded Sharp Cheddar Cheese
4 slices OSCAR MAYER Center Cut Bacon, cooked, crumbled

make it

MICROWAVE potatoes and water in 2-qt. microwaveable dish on HIGH 10 min. or until potatoes are tender. Let stand 5 min.
DRAIN potatoes; place on work surface. Flatten to 1/2-inch thickness.
HEAT dressing in large skillet on medium heat. Add potatoes; cook 4 min. or until bottoms are golden brown. Turn potatoes over; top with cheese and bacon. Cover; cook 2 min. or until cheese is melted.

Monday, April 18, 2011

Strawberry Blondies

It's been a while since I've whipped up some blondies.  I 

found this recipe in the most recent issue of Food Network 

Magazine.  I was planning on bringing a sweet treat to a girls

 beach weekend away and decided to make this one.  What I 

LOVE LOVE LOVE was that this recipe takes no time to make.

  It is soo easy, I didn't even have to use my mixer.  I did make

 a few changes using white chocolate chips instead of 

butterscotch chips.  I made one batch with strawberry jam and

 another with raspberry preserves.  Both came out well.  Next

 time I make this recipe, I will use fresh pieces of strawberries

 and a touch of chocolate and will leave out the jam.  They

 tasted like breakfast bars but definitely weren't

 healthy enough to be eaten for breakfast!  


Ingredients

  • 4 tablespoons unsalted butter, plus more for the pan
  • 1 cup packed light brown sugar
  • 1 1/2 teaspoons vanilla extract
  • 1 large egg, lightly beaten
  • 3/4 cup all-purpose flour
  • 1/2 teaspoon salt
  • 1/4 teaspoon baking powder
  • 1/4 cup butterscotch chips
  • 1/4 cup chopped walnuts
  • 3 tablespoons strawberry jam

Directions

Preheat the oven to 350 degrees F. Line an 8-inch-square baking pan with foil, pressing it into the corners and up the sides; leave an overhang on 2 sides. Butter the foil.
Put 4 tablespoons butter and the brown sugar in a large microwave-safe bowl. Microwave until the butter is melted, about 1 minute. Stir in the vanilla. Let cool slightly, then stir in the egg.
Whisk the flour, salt and baking powder in a small bowl. Stir into the butter mixture. Stir in the butterscotch chips and nuts and spread the batter in the pan. Drop dollops of jam on top and swirl with a knife. Bake until set, 20 to 25 minutes. Let cool 15 minutes on a rack, then lift the foil and transfer the blondies to the rack to cool completely. Remove the foil and cut into bars.

Sunday, April 17, 2011

Baked Tilapia

We still have quite a bit of tilapia left from one of my super saver grocery trips last month ($7 for 3lbs).  I'm continuing to search for different recipes to try with the fish.  This one popped up in my inbox a few weeks ago from Taste of Home.  I immediately knew it was something I wanted to try because I love capers.  My love for capers developed in St. Lucia on my honeymoon. Before then, I don't recall ever eating them. Thank goodness I enjoyed them because they were in everything we ate!  To me, they add a perfect salty burst of flavor to any dish.  I served this fish with sweet potato fries.  Delish! 

Ingredients

  • 4 tilapia fillets (6 ounces each)
  • 3 tablespoons butter, melted
  • 3 tablespoons lemon juice
  • 1-1/2 teaspoons garlic powder
  • 1/8 teaspoon salt
  • 2 tablespoons capers, drained
  • 1/2 teaspoon dried oregano
  • 1/8 teaspoon paprika

Directions

  • Place tilapia in an ungreased 13-in. x 9-in. baking dish. In a small bowl, combine the butter, lemon juice, garlic powder and salt; pour over the fillets. Sprinkle with capers, oregano and paprika.
  • Bake, uncovered, at 425° for 10-15 minutes or until fish flakes easily with a fork. Yield: 4 servings.

Thursday, April 14, 2011

Red Velvet Bites


If you're a frequent follower, you may remember the snickerdoodle bites that I made a week or so ago.  If not, be sure to check them out here.  I knew once I made them that I would try some different variations of the recipe.  This past weekend, I made my first one-Red Velvet.  I don't know if I'll try any more because these are top notch.  Best part is they take 20 minutes to make!  I'm definitely keeping these ingredients on hand  just incase I need a last minute treat.  I had the leftovers for dessert each night this week and could not get enough of them.  My next step with these bites is adding toppings to the frosting.  Mmmm Mmmm Good! 

Items Needed:
  • Red Velvet Cake Mix
  • 1 egg
  • 1/2  cup (or 1 stick)melted butter
  • Cream Cheese Frosting 
  • Mini Tart Shaper 
Directions: 
Melt your butter, add the cake mix and then the egg.
Once you get your  dough, simply scoop into a mini muffin pan. 
Bake at 350* for 8-10 min (until light brown)
When your cups come out of the oven they will be slightly brown, spray your mini tart shaper with cooking spray to help them not stick and press down the center of each cup. 
Once all the tops are pressed down simply move to a cooling rack to cool. 
Once the cups have cooled, fill with your favorite frosting. 
I used pastry bag and round topper to fill the cups.  
Enjoy!


Blog Design by Get Polished