Thursday, March 14, 2013

Taco Bowl with Guac-a-salsa Salad

I love mexican food.  Hubs and I have it a few times a week.  I could honestly eat guacamole every single night.  Love it.  I made this recipe last week when hubs was working late.  A friend came over for dinner and I didn't want to spend a lot of time cooking. I also wanted to use the ground turkey I already had bought.  I've made taco bowls many times before, but enjoyed the smashed chips at the bottom of this one.  There were a few ingredients I omitted because I didn't have them at home and others because of my no dairy diet. I'm sure this would have been even better with some sour cream and cheese on the top, but it was a great (and healthy) dinner just the way it was.  Enjoy!


Taco Bowls with Guac-a-Salsa Salad


Courtesy of Rachel Ray

Ingredients

1 sack corn tortilla chips, any brand or color (yellow, blue, red, white) will do
3 tablespoons extra-virgin olive oil, divided
1 1/2 pounds ground beef
2 jalapeno peppers, seeded and finely chopped
2 medium onions, chopped
3 to 4 cloves garlic, chopped
1 tablespoon ground cumin
1 tablespoon chili powder
Coarse salt and black pepper
1 cup water
2 firm Haas avocados
3 plum tomatoes, seeded and chopped
Handful cilantro leaves, chopped
Juice of 1 lemon
2 sacks, 10 ounces, 2 cups each shredded Monterey Jack or sharp Cheddar cheese


Directions
Lightly crush the chips by popping open the bag and giving the chips a few light whacks with a frying pan – careful that they don't fly out of the sack! Hold the bag loosely at the top with 1 hand while you crush the chips with the other.

Heat a large nonstick skillet over medium high heat. Add extra-virgin olive oil – 2 turns of the pan. Add the beef to the skillet, brown and crumble it, 5 minutes. To the browned meat, add half the jalapeno peppers, 3/4 of the chopped onions and all of the garlic. Season the meat with cumin, chili powder, salt and pepper. Cook together 5 minutes more, then add the water and reduce heat to low. Adjust salt, to taste.

Halve and separate the avocados. Remove pit with a spoon. With the skin in tact, using a small knife, dice the avocado while still in the skin. Scoop out the diced flesh and place in a bowl. Combine tomatoes, remaining onions, jalapenos, and cilantro gently with avocado and dress the salad with the juice of 1 lemon, extra-virgin olive oil, and salt, to your taste.

Layer a 1 or 2 handfuls of chips in soup or chili bowls and top with a handful of cheese. Fill bowls with taco meat and top with more cheese, then mound up some salad on top and serve.


Monday, March 11, 2013

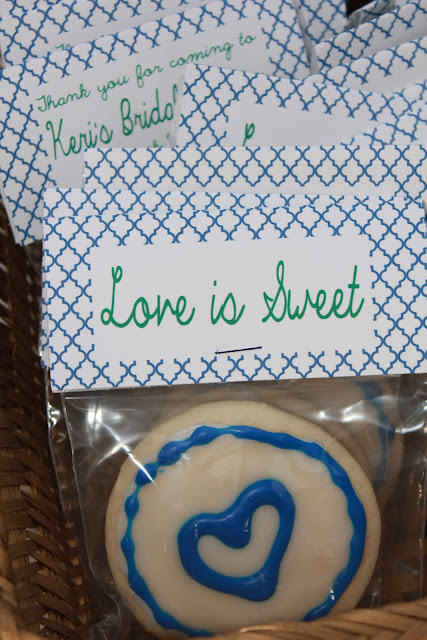
Rolled Sugar Cookies- Party Favors

A few months ago I volunteered to make favors for one of my best friend's bridal showers.  I've made lots of favors in the past, but thanks to Pinterest, I have wanted to try something new, rolled sugar cookies.  I've attempted these a few times in the past but have completely failed.  This time I was determined.  First, I searched for a well reviews cookie recipe.  Second, I did the same for an icing recipe.  I found both over at All Recipes.com. 


Results: These cookies were a success! They rolled out easily, kept their shape and were pretty darn tasty.  The icing was the cherry on top!  I will be using this recipe again and again and have a feeling this is just the start these cookie favors! There are a lot of recommended changes to the recipe in the reviews section.  I kept everything the same and it was good, just the way it was.  For the icing, I had to add a little extra milk to thin it out to the consistency that worked for me.  


INGREDIENTS:
3/4 cup butter, softened
1 cup white sugar
2 eggs
1/2 teaspoon vanilla extract
2-1/2 cups all-purpose flour
1 teaspoon baking powder
1/2 teaspoon salt

DIRECTIONS:
You have scaled this recipe's ingredients to yield a new amount (30). The directions below still refer to the original recipe yield (60).
1.In a large bowl, cream together butter and sugar until smooth. Beat in eggs and vanilla. Stir in the flour, baking powder, and salt. Cover, and chill dough for at least one hour (or overnight).
2.Preheat oven to 400 degrees F (200 degrees C). Roll out dough on floured surface 1/4 to 1/2 inch thick. Cut into shapes with any cookie cutter. Place cookies 1 inch apart on ungreased cookie sheets.
3.Bake 6 to 8 minutes in preheated oven. Cool completely.


INGREDIENTS:
1 cup confectioners' sugar
2 teaspoons milk
2 teaspoons light corn syrup
1/4 teaspoon almond extract
assorted food coloring
DIRECTIONS:
1.In a small bowl, stir together confectioners' sugar and milk until smooth. Beat in corn syrup and almond extract until icing is smooth and glossy. If icing is too thick, add more corn syrup.
2.Divide into separate bowls, and add food colorings to each to desired intensity. Dip cookies, or paint them with a brush.

Tuesday, March 5, 2013

Monica's Favorite Pork Tenderloin

A sweet friend sent me this recipe, a family favorite at her house.  
She said she makes it weekly,  I knew it had to be good.  

Results: The prep for this meal was simple.  The marinade was delicious and the pork was perfectly tender.  After letting the pork rest, we cut it into slices and browned each side.  Hubs put the oven on med high heat and they are on there less than a minute.  He likes his pork chops to have the crisp on the outside.  He said these were some of the best he had had.  I have a feeling he will be requesting this meal again soon. Enjoy!


Monica's Favorite Pork Tenderloin


1 pkg. pork tenderloins (2 tenderloins, about 2-2.5 lbs.)
4 garlic cloves
1/4 cup soy sauce
2 T. country dijon mustard (whole grain mustard)
4 T. honey
2 T. fresh orange juice
1 T. finely chopped fresh rosemary OR herbs de provence
freshly ground pepper to taste
3 T. olive oil


Yield: 1 cup of marinade.

Preheat oven to 350 F. Take tenderloins out of package. Rinse and pat dry. Place in a 9×13-inch Pyrex sprayed with non-stick cooking spray.
Take a paring knife and poke holes in the tenderloins (on the top side only) about an inch deep. Peel garlic cloves and quarter each clove of garlic-lengthwise. If they’re really big, cut them a bit smaller- about the size of slivered almonds. Place the garlic slivers in each pocket. Set aside while making marinade.
 
In a measuring cup or in a medium bowl, whisk together all the ingredients except for the olive oil. Then slowly drizzle the olive oil while still whisking.
Pour the mixture over the tenderloins and put into preheated oven. Bake, uncovered, for 45 minutes, basting once halfway through the baking process.

Once removed from the oven, allow the tenderloins to rest on a cutting board for about 10 minutes before slicing. Spoon the pan sauce over the tenderloin medallions and enjoy!
 

Monday, March 4, 2013

Clean Eating Curry Pineapple Turkey Rice Bowl


Hubs and I have been trying hard to eat healthy dinners recently.  The problem we've both run into is that a lot of the healthier meals we've tried aren't filling. It defeats the purpose of eating healthy if you're going to go to the pantry an hour later looking for more to eat. 

When I came across this recipe, it not only looked delicious but it looked filling. 
And it was.  

Results: I will be making this meal once a week and having it for lunch.  I love the sweetness that the cinnamon and pineapple juice brought to the dish.  The only change I made was not adding all of the {chunk} pineapple from the can.  I added about 1/2 of the pineapple chunks and felt it was the perfect amount of pineapple.  This meal was not only filling for the stomach but it was filled with flavor.  You must try this healthy meal.  

Clean Eating Curry Pineapple Turkey Rice Bowl
Courtesy of The Gracious Pantry


(Makes 8 servings)
Ingredients
1 1/2 lbs. ground turkey
1 tbsp. olive oil
2 tsp. curry powder
1 tsp ground cinnamon
1/2 tsp. ground ginger
1 (20 oz.) can pineapple and juice, no sugar added
3 cups cooked rice brown rice (best if cooked in chicken broth)
1 cup shredded raw carrots
1 cup shredded raw zucchini
Salt to taste (optional)
Directions
Step 1 – Place the turkey in a large skillet with olive oil and cook with spices and pineapple juice.
Step 2 – While the meat cooks, mix the cooked rice, carrots and zucchini in a large mixing bowl. When the meat is done mix that in along with the pineapple and serve.
Eat and Enjoy!

Wednesday, February 27, 2013

Steak Tips with Peppered Mushroom Gravy

My husband never complains about the food I cook.  I always ask him what he rates the meals I cook and he usually never gives me less than a 10.  Yet, when I offer to make {some} meals again he politely declines or offers another option.  It makes me laugh.  But, tonight...tonight was different.  First, he cooked this meal.  I helped with some measurements and cleaned up as he made a mess cooked.  When he took his first bite he wowed himself.  I have to admit, it was pretty good.  Next time, we will cut the meat a little smaller.  That's it, enjoy! 


Results from hubs: The meal was rich in flavor.  The noodles were the perfect compliment for the light creamy sauce and steak tips.  


Steak Tips with Peppered Mushroom Gravy
Courtesy of My Recipes (Originally from Cooking Light)

Ingredients

  • 2 cups uncooked egg noodles
  • Cooking spray
  • 1 pound top sirloin steak, cut into 3/4-inch pieces
  • 1 tablespoon butter
  • 2 tablespoons finely chopped shallots
  • 1 (8-ounce) package presliced baby bella mushrooms
  • 1 teaspoon minced garlic
  • 1 tablespoon lower-sodium soy sauce
  • 3 tablespoons all-purpose flour
  • 1 1/2 cups fat-free, lower-sodium beef broth
  • 1/2 teaspoon black pepper
  • 1/4 teaspoon salt
  • 3 fresh thyme sprigs
  • 1 teaspoon fresh thyme leaves (optional)

Preparation

1. Cook noodles according to package directions, omitting salt and fat; drain.
2. While noodles cook, heat a large nonstick skillet over medium-high heat. Coat pan with cooking spray. Add steak; sauté 5 minutes, browning on all sides. Remove from pan; cover.
3. Melt butter in pan over medium-high heat. Add shallots and mushrooms; sauté 4 minutes. Add garlic; sauté 30 seconds. Stir in soy sauce. Sprinkle flour over mushroom mixture; cook 1 minute, stirring constantly. Gradually add broth, stirring constantly. Add pepper, salt, and thyme sprigs. Bring to a boil; cook 2 minutes or until thickened. Return beef to pan; cook 1 minute or until thoroughly heated. Discard thyme sprigs. Garnish with thyme leaves, if desired.

Monday, February 25, 2013

Stuffed Pepper Soup

Let me introduce you to my new favorite soup recipe.  
I am obsessed with this recipe and have been craving it since I first made it. 
It's healthy but filling.  Hubs isn't a soup fan and loved it. 
It provided us with lunch for the next day.  
It was simply delicious.  

I made this soup stovetop but I think it would be good in the crockpot as well.  I used brown rice and ground turkey instead of beef.  Everything else remained the same.  Do yourself a favor and add this to your menu this week!


Stuffed Pepper Soup
Courtesy of The Country Cook 

Stuffed Pepper Soup
Ingredients:
1 lb. ground beef
1 small onion, diced
1 large bell pepper, diced
1 can (29 oz.) diced tomatoes
1 (10 oz) can tomato soup (or tomato sauce)
1 (14 0z) can chicken broth (or beef broth)
2 cups cooked rice
1 tbsp. sugar
t tsp. garlic powder
salt & pepper, to taste
shredded cheddar cheese, for topping

Directions:
In a large pot, brown and crumble ground beef along with diced green peppers and onion over medium-high heat.

When meat is thoroughly cooked, drain excess grease from beef mixture.

Put beef mixture back into pot. Add in diced tomatoes, chicken (or beef) broth and
tomato soup (or tomato sauce).

Give it all a good stir. Then add in rice. Stir again.

Then stir in seasonings; sugar, garlic powder, salt & pepper (to taste).

Cover and let soup simmer on low-medium heat for about 30 minutes to let all the flavors blend.

Then serve with shredded cheddar cheese on top of each serving.

Enjoy!

Sunday, February 24, 2013

Easy Italian Stew


Kraft recipes does is once again.  This past week we enjoyed a filling and delicious dinner courtesy of Kraft.  Even though the weather is quite warm here, I'm still enjoying "winter" meals.  I've been trying to use my crock pot a few times a week and have been filling it with various soups and stews.  The original recipe wasn't a crock pot meal.  I thought it would be good either way, so I opted for the quicker option.  


Results: The recipe provided us not only with a filling dinner but with a good amount of leftovers.  It's a healthy meal and you could even use fresh veggies if you wished.  Since I can't have dairy, we didn't add the cheese.  I didn't feel like it was missing anything.  Hubs added red pepper flakes for a little more flavor.  Overall, we'd give it a 5! 


Easy Italian Stew

Adapted from Kraft Recipes 


what you need


2 Tbsp.  KRAFT Zesty Italian Dressing

1 lb.  turkey sausage (I sliced it into pieces, you can also use ground sausage)

2 cans  (14-1/2 oz. each) fat-free reduced-sodium chicken broth


1 pkg.  (16 oz.) frozen stir-fry vegetables (any variety will work, we used broccoli, mushrooms, water chestnuts, celery, peppers and carrots)
1

1 can  (15 oz.) cannellini beans, rinsed


1 can  (14-1/2 oz.) Italian-style diced tomatoes, undrained


1 cup  elbow macaroni, uncooked

make it


HEAT dressing in large saucepan on medium heat. Slice sausage into 1/2 inch pieces.  Cook 8 to 10 min. or until done, stirring occasionally. Drain.

In the crock pot ADD all of the ingredients except the pasta.  Cook on low for 6 hours.  About 25-30 minutes before serving, add the pasta.  Make sure the pasta is cooked before serving.  Enjoy! 


Saturday, February 23, 2013

Simple Skirt

They day Avery's first Valentine's Day play date, I realized she couldn't wear the outfit I had originally made for her because it would be too hot.  I definitely wasn't planning for the weather to be in the 80's in February. I didn't want to buy her something, so I decided I would try my hand at making a skirt.  I knew I could quickly embroider a shirt to match, problem solved.  So, I searched for a skirt tutorials.  I needed something simple and quick.  

I found the perfect tutorial over at Made.  
The tutorial was easy to follow.  
I'm no expert seamstress, I would definitely call myself a beginner. 
With that said, the entire skirt took me a half hour to make. 
Not too bad for my first skirt! 


Of course, my little miss looked adorable for her first Valentine's play date! 

Thank you Dana for a simple and easy to follow tutorial!


Wednesday, February 20, 2013

Easy Peasy Banana Muffins


These are the easiest muffins I've ever made. 
Better yet, they are delicious! 
They're light, fluffy and have the perfect amount of banana.  


Ingredients: 
1 box of yellow cake mix
2 eggs
3 overripe bananas 

*mix-ins of your choice (chocolate chips, walnuts, etc.)

Directions: 
Heat oven to 350. Spray muffin tins or use liners (I usually spray my liners).  Mash bananas in a bowl.  I just used my mixer.  Add in cake mix, eggs and other ingredients, if you choose.  Fill the muffin tins 2/3 of the way fill.  Bake for 20 minutes or until toothpick comes out clean.  

Enjoy!


Tuesday, February 19, 2013

Cross Door Hanger


Earlier this month, my daughter was baptized.
I love to throw a party and couldn't wait to host one after her baptism.   
As soon as the Christmas decorations were put away, I got to planning.  
The colors were light pink and white.  
I always have a festive door hanger when I host parties. 
So to go with the colors and theme of the party, I decided to make a cross door hanger. 

Materials:
Cardboard
Yarn
Hot Glue
Embellishments (pearls)
Cardstock 
Scissors or Cricut 

How I Did It: 
I printed a cross pattern that I found online. 
 I just Googled cross pattern and printed the first one I came across. 
Then I cut it out and traced it onto a piece of cardboard (an old Crate and Barrel box)


I cut out the cross.  Strong scissors will be a big help. 


Then I started wrapping my white yarn around the cross. 


I continued around all the sides and did a few crosses in the middle.  
The middle was not covered completely. 


After all the sides of the cross were covered with yarn, I worked on the center. 
I used my Cricut to cut out a circle for the center.  
Then, I printed her monogram on white cardstock. 
I cut it out and glued it onto the bigger circle.  
Then, I glued little craft pearls around the outside.  
To finish it off, I took a piece of pink yarn and hot glued it to the top of the back side of the cross. 
I tied it into a knot and used that to hang it off the door hanger.  


Monday, February 18, 2013

Honey Lime Shrimp

Shrimp has become a weekly staple in our house.  For the past month, I've been making shrimp in pasta dishes.  This week I decided to change things up.  

Results: Delish.  Took about 15 minutes to make. Loved the marinade and even used a little of the remaining over my rice.  Without a doubt we will be making this one again.  Enjoy!

Honey Lime Shrimp

1/2 pound large shrimp, peeled and deveined
1/4 cup olive oil
2 T honey
juice of one small lime, or half a large lime (2-3 T)
zest of one small lime, or half a large lime
2 cloves garlic, smashed
1/2 tsp kosher salt
1/4 tsp black pepper
1/4 tsp red pepper flakes
1.) In a large ziploc bag, combine all the marinade ingredients. When everything is well-combined, add the shrimp, squeeze as much air as possible out of the bag, and close it up. Place it in the fridge.
2.) Let the shrimp marinate for 30-60 minutes, flipping the bag around once or twice during that time, so that all the shrimp stay evenly covered in the marinade.
3.) When you’re ready to cook, take the shrimp out of the fridge and let them sit at room temperature for about 10 minutes. Heat a large skillet over medium-high heat; there is no need to add any oil or butter to the pan, as the marinade has enough oil in it to keep the shrimp from sticking to the pan. (If you would prefer to use the grill for these, you can thread them onto skewers and toss them on the grill at this point.)
4.) Add your shrimp to the pan in a single layer, making sure they are not too crowded; you can always cook them in more than one batch. Let them cook on one side for about a minute, until they curl up and start to turn pink. Flip them over, and cook for another 30 seconds or so, until the shrimp are opaque. Remove from the pan, and serve immediately!

Thursday, February 14, 2013

Candy Heart Valentine Frame


Here is a simple and cute Valentine's decoration for your house. 

Materials: 
8x10 frame
candy hearts
heart tracer
red cardstock (or your color choice)
hot glue

How it's done....
1. Take the paper out of the frame. 

I made sure the background paper was the same size as the paper I was taking out.
2.  I used my Crucit to cut out a heart tracer.  I glued the tracker onto the background paper I chose, which was red card stock. 


3. Put the frame back together.  


4. Line up the hearts on the tracer.  I made sure to put them all on BEFORE I started gluing. 
Once everything was the way I wanted it, I glued down the hearts one by one (with hot glue). 


Once they are all glued down, you're done! 


Wednesday, February 13, 2013

Date Night In- Jar


2016 updated date night jar 

One of the goals hubs and I set for the year was to have date nights in.  With a baby, getting out of the house for a date is not as easy as it used to be.  So, we decided we would try to do two date nights in a month.  He would plan one and I would plan the other.  For Valentine's Day, I'm giving him this jar filled with ideas for our date nights.  It's easy for me to come up with things to do but not as easy for him.  Now, he'll have a whole bunch of ideas at his fingertips!

All I used for this project was the printables below, a glass jar, ribbon, crinkle paper and card stock in red and white.  

I printed the ideas for date night on white cardstock. 
I made a red tag that was 3 1/2 inches on my Cricut.  


 Then, I printed out the date night in sign.  I made sure it was no bigger than 3 inches. 


I used this handy dandy puncher to round the edges. 


My tag for the jar was complete!


Next, I cut out all the date night ideas.  I included blank ones on the printable and decided to put the blank ones in the jar.  That way hubs can fill in some ideas that he thinks of along the way. 
Once they were all cut out, I put them in the jar on top of some crinkle paper.  
I added the crinkle paper to help fill the jar.  I wanted to use a mason jar but didn't have one in my stash. 
You can use any embellishments or fillers you'd like. 


Last, I used some thin red ribbon to attach the tag.  I made sure it hung on the front of the jar.  
Simple as that.  
Hopefully this will prevent the "what do you want to do?", "I don't know, what do YOU want to do?" conversations! 


Download the Date Night In Ideas Pages Here & Here 

I think the date ideas are pretty self explanatory.  But if you have any questions, don't hesitate to ask! 

Tuesday, February 12, 2013

Valentine's for Him & Free Printable


Valentine's Day is just around the corner. 
 Like usual, I've waited until last minute to make a gift for the husband.  
I love making him baskets filled with goodies. 
Since we don't do big gifts for Valentine's Day, a basket of little gifts is the perfect way to go. 
It shows him how much I love him and satisfies his sweet tooth at the same time.  
I can't wait to give it to him on Thursday.  


You can download the printable tags here.
If you have trouble downloading them, comment with your email and I will send the PDF to you.   


Here are some of my other gifts I've made for hubs:


Blog Design by Get Polished