Tuesday, June 26, 2012

DIY Fabric Pom Poms

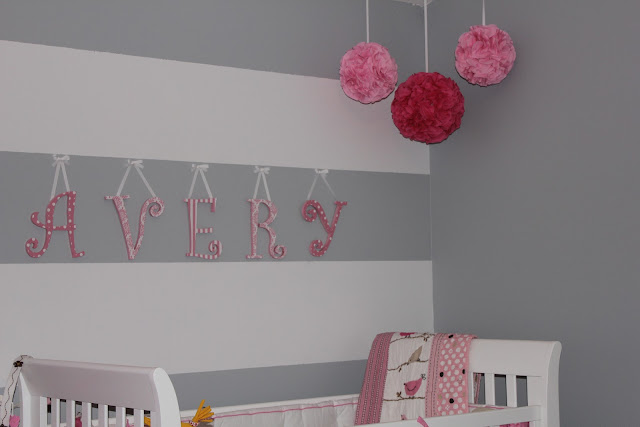
After spending lots of time working on Avery's nursery, things were finally coming together.  The room was painted, the crib was set up, the decorations were coming in. One of my last DIY projects were these fabric pom poms.  Of course, these were Pinspired.  But most of the tutorials used lanterns and hot glue.  I couldn't imagine hot gluing every one of the fabric circles into these balls, so I tried it a different way.  I used styrofoam balls as my base and pinned in the fabric.  It was a simple but LONG process.  Now that it's said and done, I would spend countless hours making these again.  They really bring the nursery together, they are without a doubt my favorite project in her room.  


Materials: 
Styrofoam Balls (I used 6 inch for the light pink and 8 inch for the dark pink
Fabric (about 4 yards for the 2 light pink and 3 yards for the dark pink)
Lots and lots of sewing pins (I used over 500)
Ribbon
Scissors
Fabric Pen

Directions: 
1. Iron fabric to get all of the creases out. This is optional, but it makes the tracing and cutting much easier.  

2.  Trace your circles.  I used a spool of ribbon as my tracer and a disappearing fabric marker to make the circles.  


3.  Cut out the circles.  I had to take breaks while doing this.  I did a yard at a time.  


4.  To make the puffy circles for the poms, first fold the circle in half.  


5.  Then fold the fabric in half one more time.  


6.  Now, take a sewing pin and put it through the corner of the fabric.  


7.  Pin it into the styrofoam ball.  Once it's in, fluff it out a bit.  I pinned them in groups of 4 to make sure the area was covered and all pieces were fluffed out.  


8.  Continue until the entire ball is covered.  It took me about 3 nights to finish all of the balls.  I probably spent 2-3 hours each night working on them.  


To hang them up, I just used grossgrain ribbon, sewing pins and a tack. I cut the ribbon the length I wanted to hang them from the ceiling.  Then I pinned one end of the ribbon into the styrofoam, I used about 10 pins to keep it in.  Then, I took a clear tack and stuck it into the ceiling.  I used 2 tacks for the bigger ball.  I will probably switch to nails eventually, but I did this on my own and didn't want to be 8 months pregnant, standing on a chair trying to hammer something into the ceiling.  I already caught enough flack for putting them up myself with tacks.  


Do you like this project?  Share it with your friends! 


Thursday, June 21, 2012

Daddy Survival Kit & Hospital Survival Kit

I wanted to do something special for hubs for Father's Day this year.  Since we're less than 8 weeks away from the birth of our baby girl, I decided to make survival kits for him.  I decided on two, one for the hospital and another for home.  The hospital one is filled with all his favorite candy, soda and snacks.  The Daddy Survival Kit is more meaningful with specific items and sayings to go with (sayings can be found below).  I also bought him the diaper bag that he wanted.  He was completely surprised and loved all his gifts.  Now the challenge will be not eating all the candy before we head to the hospital! 
*affiliate links used in this post*


PRINTABLE SURVIVAL KIT NOW AVAILABLE
CLICK HERE FOR BABY GIRL
CLICK HERE FOR BABY BOY


Tuesday, June 19, 2012

Father's Day Grandpa Frame


Thanks so Pinterest, I found a really cute Grandpa saying/quote that I wanted to use for Father's Day.  It was on a home made card, but I thought it would be perfect on a frame for my dad.  

I started out with a plain wood frame.  I found it for $1 at Michaels.  From there I found one piece of scrapbook paper that I thought would match his office.  

First, I painted the back of the wood frame and sides brown.  I used an acrylic paint.  

Once the paint was dry, I traced the frame onto the scrapbook paper.  I did the outside first and then the middle.  


After that, I used Mod Podge to adhere the scrapbook paper to the frame.  One thin coat is all I used on the wood.  Use something stiff to run over the scrapbook paper to make sure there aren't any bumps in the paper from the Mod Podge.  


Next, seal the frame with Mod Podge.  Make sure to cover the sides, front and back of the frame.  


I used 1 coat on the entire thing before I put the letters on.  


The last step is the letters.  You can use stickers, a paint pen or paper.  I used my Cricut to cut cardstock paper letters.  Line up the letters to make sure everything fits.  My letters were an inch on the top and 1.25 inches for Grandpa.  In order to adhere the letters to the frame, you'll need more Mod Podge.  

Paint a thin coat ontop of the scrap paper (again) and place the letters on.  Make sure they are straight and lined up in the right place.  Do this for all the letters/ saying.  Let dry.  

Finally, put another coat of Mod Podge over the entire frame and let it dry.  


Give your gift to a very deserving grandpa! 


Friday, June 15, 2012

Peanut Butter Cup Brownies


After making the Kit Kat brownies a few weeks back, hubs requested Peanut Butter Cup brownies.  So this week I gave them a try.  They were simple to make, especially since I used the boxed brownie mix. Hubs and I had them for dessert on Sunday night and they were absolutely divine.  I immediately packaged them up and sent them to work with hubs the next day, or else I would have had a large weight gain this week at the DR! When I talked to him at work the next day he said they were gone in minutes and people requested 9 batches of them.  To say these were a hit is an understatement!   


All you need is brownie mix (9x13) and 2 packages of king size peanut butter cups. 


Prepare the brownie mix according to the directions on the package.  Pour HALF of the mix into a greased pan, just enough to cover the bottom. 


Open the candy and cut each one into 4 pieces. 


Place the pieces on top of the brownie mix.  I tried to place them so that there would be candy in every bite. 


Pour the rest of the brownie mix on top.  Make sure to cover the candy completely. 

Bake for about 18 minutes or as long as is directed on the box.  Le them cool before you cut them & enjoy! 


You could also use the new mini candy pieces sold in the bags but I am not going to change this recipe one bit.  They were perfect they way they were!


Tuesday, June 12, 2012

Raspberry Lime Water


I've been craving fruit water recently.  With the high temperatures and wanting something sweet, it seems to be the perfect solution.  The first one I tried was raspberry and lime.  I used a carton of raspberries and two limes.  It was a little too sour for me, so next time I'll just use one lime.  

Have you tried any fruit water recipes, if so please share your favorites! 


Monday, June 11, 2012

Baby Name Blocks


                                                                                                                                                                      I've seen these cute blocks all over Pinterest and Etsy recently and decided to make them for AG's nursery.  I didn't take pictures as I was making them and totally regret it.  So sorry!  But, they were really easy and hopefully the directions will be simple to follow.  If you have ANY questions about how to make them, let me know.  I am happy with how they turned out and am hoping to also use them in our maternity pictures tonight! 

Materials:
wooden blocks (hobby lobby about 2 inches)
coordinating scrapbook paper
Mod Podge
letters (I used my cricut to cut them, you can do stickers or store bought paper letters)
paint brush
paint

Directions:
1.  Paint the wooden blocks.  I decided to paint them all pink and grey.  Although, about half way through I had wished I did light pink for all sides.  Make sure all sides are painted, you may need a few coats for good coverage.
2.  Using your scrapbook paper, cut out squares to go on the wood. Trace the squares on paper and cut the scrapbook paper a little smaller then the wood (I actually used my cricut for the cutting).  Make sure you know how many pieces of each paper to use.  I used 5 coordinating pieces.
3.  Once the paint is dry, it's time to put the scrapbook paper on.  Paint a little Mod Podge on the painted wood square.  Then adhere the scrapbook paper on top.  Smooth it out so that there aren't any bumps.  Do this with all sides of all the squares.  This will be a process because you will have to wait for a few sides to dry before moving on.
3.  Time for the letters.  Whether you're using stickers or paper letters, make sure they are cut and ready to go.  Brush another coat of Mod Podge on top of the newly adhered scrap paper.  Place the letter on top of the Mod Podge.  Make sure you press it down all the way and smooth them out.  Do this for all of the letters for the child's name.  **Pay attention to where you are putting the letters.  I didn't plan mine out well enough and ended up with two polka dot papers for the last two letters, which I had to go back and fix.
4.  The last step is another coat of Mod Podge.  Make sure the coat under the letters is completely dry.  This final coat is to seal everything.  Let the blocks dry and then enjoy!  These would make a great baby shower gift!


A few notes:
*Before you want anything to stick on, apply Mod Podge.  
*Always let the Mod Podge dry before you apply another coat or you will get a film. 
*Make sure you know exactly where you are going to glue the letters, make sure paper alternates, etc. 
*The wood doesn't have to be painted, but her furniture is white so I didn't want to leave the wood.  
*You can cut the scrap paper to be the exact size of the blocks so you don't have to paint the wood and there would be no wood showing.  


Thursday, June 7, 2012

End of the Year Gifts

Summer is here! Well, as of 12:00 tomorrow it is.  It's been another great year in the classroom, but I'm ready for the summer and for my little one to make her arrival in August.
  I wanted something cute and easy for gifts for my students and homeroom parents.  Of course, I turned to Pinterest for a little pinspiration.  Here are a few things I came up with based on some neat things I found.  
Happy Summer!!

Since our classroom theme this year was All Stars, I decided on this little gift for my students. 

These cups and goodies were part of the gift for my homeroom moms.  


HERE is the link to download the parent gifts.  

HERE is the link to download the end of year student gift.  

Wednesday, June 6, 2012

Lamp Shade Revamp

Before

After


I was thrilled when I found this bright pink lamp for Avery’s nursery at Target.  It matched perfectly with the colors but to me needed a little something extra.  So, I decided to put a bow around the lamp shade to make it more “girly” and also to tie in the different pinks around her room.  I’ve been making bows for a year and a half now, so this was a quick and easy project for me.  If you haven’t made a bow before, here is a link to a great tutorial site.  You’ll be amazed at how easy they are!

Step 1: Measure around your lamp shade, cut your ribbon an inch longer then the measurement. Put that piece to the side.

Step 2:  Using the same ribbon you’re putting around the lamp, make your bow (cut another piece).  The size is up to you.  I wanted something big enough to stand out but didn’t want the entire lamp covered.  Make the bow, but wait to put the center knot on.

Step 3:  Sew (or hot glue) the bow to the middle of the first piece of ribbon (which will go around the lamp).  I folded my ribbon in half first and put a dot of glue in the middle.  Then, I placed the  unfinished bow on the glue. Next, take a piece of string and wrap it around the center of the bow and the ribbon.  This will scrunch the ribbon and bow together, which is what you want.

Step 4: Add your center piece of ribbon, I made a knot.  I hot glued the knot to the front of the bow and wrapped it around the back of your scrunched piece.

Step 5: Hot glue the ends of the ribbon together.  This will make your ribbon into a circle, which will go around the lamp shade.

Step 6:  Carefully slide the bow and ribbon onto the lamp shade and position to your liking.

Enjoy!


**Pictures will help so much, I am working on another one and will post pictures ASAP!

Tuesday, June 5, 2012

Mod Podge Scrapbook Wall Letters

One thing I knew from the day I found out I was pregnant was that I was going to make his/her name to hang on the wall.  I’ve seen it all over Pinterest and in many of my friends homes.  I love how it looks, especially above the crib.  When we found out our little one was a girl, I knew exactly what I wanted to do for the nursery.  I wanted a grey and white room with pink accents.  We decided on one wall of horizontal stripes at the focal point for the room, it would also be the wall the crib was in front of. 
 As soon as that was finished, I began working on her name for the wall.  It took weeks for me finish this project.  I had to make sure to get the letters I wanted, then came the paper that had to match the nursery, from there we needed to figure out how we wanted to hang them (which I left up to hubs to decide).  I personally think they are the perfect addition to our little one’s nursery, but I’m a little partial =-)

Here is how to make them.  
Materials:
Wooden letters (I found mine at Hobby Lobby)


Scrapbook Paper
Acrylic paint that matches
Mod Podge
Hot Glue
Ribbon
Scissors


Directions: 

  1. Paint the outside and the edges of your letters.  I only did one coat although, it could have used two.  I knew it wouldn’t be obvious to see from far a  away and I honestly didn’t want to take the time to do it.  
2. Trace the letter on scrapbook paper.  Make sure you decide which paper you want to use for which letter.  I used three different pieces of paper for this project.  When you trace the letter, flip It over and make sure you’re tracing it to the decorated side of the paper matches the top of the letter.                                        
3. Cut out the letters.  Do this as carefully as you can so that it matches the letters perfectly,
4. Put Mod Podge on the top of the letter.  Just enough to adhere the scrapbook paper.  After a thin coat of mod podge, place the scrapbook paper on top.  Press it down so that there aren’t any bubbles or raised edges.  
5. After that is dry, apply a layer of Mod Podge to the entire top and sides of the letter.  The back doesn’t matter because it won’t be visible.  
6. Now you’re ready to hang it up.  I decided to glue ribbon to the back and hang the ribbon off of very thin nails in the wall. I put hubs in charge of the leveling and hanging.  

There are so many things you can do with these letters from monograms in your living room to baby shower decorations to door hangers.  The possibilities are endless, ENJOY!


Monday, June 4, 2012

Festive Fruit Pizza


Looking for a fun and different dessert this 4th of July?  Look no further!  Try a fruit pizza.  They're easy to make and you get to choose the toppings.  This one was made for Memorial Day  few weeks ago. Enjoy!


Ingredients:
blueberries- about a cup
strawberries- sliced just over a cup
sugar cookie dough
whipped vanilla frosting


Directions:
I used refrigerated sugar cookie dough and pressed it out on a round cookie sheet.  Make it as even as possible so it can cook evenly.  Bake for time directed on package or until crust is cooked.  Let it cool.  Once it's cooled, frost it with the icing.  To top it off, add your choice of fresh fruit.  Transfer to s serving plate and slice just before serving.  I don't recommend adding the fruit too long before serving, the juices will start running and it can become messy.  

Monday, May 28, 2012

DIY Bow Holder


I started making bow holders about a year and a half ago when I found out one of my best friends was having a baby girl.  They soon became the perfect gift to give expectant mothers along with some handmade bows.  Now that I’m having a little girl of my own, I’ve been on a mission to create different things to match her nursery.  One of the first projects on my list was a bow holder.  I didn’t want to do the typical monogram because the space I planned on hanging it was pretty big.  So, I decided to do a framed monogram look. I love how it turned out and even more now that it’s filled with bows.  The only thing I need is a little princess to put them on!

Materials:
1 square wood frame (mine was from Hobby Lobby, but can be found at most craft stores).
1 monogram letter to go on the top.  Make sure it’s not too much smaller than the frame and definitely not bigger.  (Michaels is where I found mine).
Acrylic Paint to match the nursery or color scheme you’re going for
Matching Ribbon (Grossgrain is preferred, bows slip off the rest)
Hot Glue
Mod Podge


Directions:

Paint the wood frame the color of your choice.  Here is where you can be as creative as you wish.  Think of fun patterns or keep it simple.  It’s up to you.  
After the wood frame is painted, brush over it with a layer or two of Mod Podge.  Make sure to get the sides as well, they will be visible.  
After the Mod Podge is dry, hot glue the monogram to the frame.  My “A” already came white, or else I would have painted and sealed it first.  
To finish it off, hot glue a ribbon loop to the top of the frame.  I used about 8 inches for the loop and glued a bow I made to the tippy top for an added touch.  
Lastly, using more matching ribbon, glue about 20 inches to the bottom of the holder.  I usually glue it in a loop and cut it at the bottom to create two straight lines of ribbon, which leaves two places to hang bows.  A final touch is to seal the ends with heat from a lighter. 


If you have any questions, let me know.  If you make a holder of your own, please share!

Thursday, May 24, 2012

Broccoli, Grape and Pasta Salad


This recipe was another Pinterst find.  I made this salad for our Mother's Day cook out.  I knew it would be the perfect pair for juicy burgers and baked beans.  I made the dressing while the pasta was cooking.  I will admit, that I wasn’t completely sold on the dressing after it was finished.  It was a little too strong for my liking (vinegar wise).  But, I left it alone and continued to follow the directions.  I used all the ingredients besides the red onions and bacon. I mixed everything up (according to directions) and  left it in the refrigerator for only 2 hours.  Of course I taste tested it before I served it to my family and I was pleasantly surprised.  The dressing wasn’t as strong and provided the perfect amount of sweetness and tang for the salad.  I had the leftovers for lunch the rest of the week and it was just as good. It won't be long before I make this meal again.  Enjoy!


Broccoli, Grape and Pasta Salad 
Courtesy of My Recipes 
Ingredients

1 cup chopped pecans
1/2 (16-oz.) package farfalle (bow-tie) pasta
1 pound fresh broccoli
1 cup mayonnaise
1/3 cup sugar
1/3 cup diced red onion
1/3 cup red wine vinegar
1 teaspoon salt
2 cups seedless red grapes, halved
8 cooked bacon slices, crumbled


Preparation

1. Preheat oven to 350°. Bake
pecans in a single layer in a shallow pan 5 to 7 minutes or until lightly toasted and fragrant, stirring halfway through.
2. Prepare pasta according to package directions.
3. Meanwhile, cut broccoli florets from stems, and separate florets into small pieces using tip of a paring knife. Peel away tough outer layer of stems, and finely chop stems.
4. Whisk together mayonnaise and next 4 ingredients in a large bowl; add broccoli, hot cooked pasta, and grapes, and stir to coat. Cover and chill 3 hours. Stir bacon and pecans into salad just before serving.

Saturday, May 19, 2012

Poke Cupcakes

I made these cupcakes about a week ago for a classroom celebration.  I thought they would be a fun treat for my students.  I've never made a poke cake before, but supposedly this is very similar.  I already had strawberry cake mix at home, so I decided to pair that with strawberry jello.  I loved this combination and so did my students.  The original recipe called for a cool whip frosting, but I just used store bought vanilla.  
Be prepared for a sticky pan and cupcake liner if you use one.  The gelatin will seep through but after some time in the fridge, it will dry.  I also didn't use all the gelatin because it looked like a lot, but next time I will use more.  There weren't enough of the lines seeping through when I cut them open.  I will most definitely make these again and will try out a few different cake/ jello combinations as well. 
Enjoy! 


Poke Cupcakes
Adapted from The Country Cook 


Ingredients:
1 box Strawberry Cake Mix
(Ingredients required to make cake; usually egg whites, water and oil)
1 box strawberry gelatin
1 cup boiled water
1 container of Vanilla Frosting

Directions:
Mix cupcakes as directed on the back of the box and bake as directed.
Allow cupcakes to cool completely.
Boil 1 cup water and add jello, stir until completely dissolved.
 Poke holes in cupcakes with fork or toothpick. Don't be afraid to pick right down in there several times. 
You want plenty of holes for the jell-o to seep into.
Using a spoon, pour strawberry gelatin mixture over cupcake.
They are still a little naked. Now they need to go into the fridge for about 2-3 hours to set.
Once set, frost cupcakes using whipped frosting. 
And if you like, top it off with fresh, sliced strawberries and enjoy!

Wednesday, May 16, 2012

Harvest Pasta Bake

If you don’t already subscribe to Kraft Foods emails, go sign up now.  Every few days I receive delicious recipe ideas right to my inbox.  Which is where I found this new recipe.  I’ve been trying to make a big pasta dish at the beginning of each week in order to get some good (and cheap) lunches for the week.  I selected this one because I love squash and already had cooking crème at home.  Credit for this meal goes completely to hubs.  I feel asleep watching the news this night, so he took over dinner.  Of course, the one change he made was adding meat to this veggie dish.  He cooked ground Italian sausage and added it to the mixture before it was topped with croutons and cheese.  I have to admit, the meat (and red pepper) added a great kick to the pasta.  I enjoyed this dish for dinner and for lunch throughout the week.  This will definitely be made again, next time I might even add zucchini to it!


                                                   Harvest Bake  
                                            Courtesy of  Kraft Foods 

    
What You Need


    1 butternut squash (2 lb.), peeled, cut into 1-inch cubes
    1 onion, cut lengthwise in half, then sliced crosswise
    1/2 tsp. crushed red pepper
    2Tbsp. olive oil
    8 oz. (1/2 of 16-oz. pkg.) rigatoni pasta (3-1/3 cups), uncooked
    1/2 cup PHILADELPHIA Original Cooking Creme
    1 pkg. (8 oz.) KRAFT Shredded Three Cheese with a TOUCH OF    PHILADELPHIA, divided
    1/4 cup croutons, crushed


Make It

    HEAT oven to 400ºF.

    COMBINE first 4 ingredients in 13x9-inch baking dish. Bake 30 to 40 min. or until squash is tender. Meanwhile, cook pasta as directed on package, omitting salt.

    DRAIN pasta, reserving 1/2 cup cooking water. Add to squash mixture with cooking creme and 1 cup shredded cheese; mix lightly. Top with crouton crumbs and remaining shredded cheese.

    BAKE 20 min. or until heated through.
    Kraft Kitchens Tips

Monday, May 14, 2012

Kit Kat Brownies


I've seen lots of candy brownie combinations floating around lately.  My favorite candy bar is Kit Kat.  After teacher appreciation week I came home with about 10 kit kat candy bars, so I decided to see how they would taste in a brownie.  I used a dark chocolate Betty Crocker brownie mix and prepared the mix as directed on the box. Pour half of the brownie mix into a 9x13 greased baking dish.  Break apart the bars and lay them across the pan.  You can break them into smaller pieces if you choose.  After all the candy bars are on the mix, top it off with the remainder of the brownie mixture.  Make sure all the candy bars are covered.  Bake as directed on the box.  These brownies are best the day they are made. Enjoy!


Sunday, May 13, 2012

Spring Monogram Door Hanger


This project was pinspired, like most of my projects lately.  
We've been in need of door decorations for spring and I knew this would be a quick and easy project.
All you need is a wooden letter, paint, ribbon and embellishments of your choice.  
I bought a plain white letter from Michael's for about $2 (with a coupon).  I already had yellow paint at home and these little flowers with rhinestones in the middle.  I decided to paint diagonal stripes on the monogram.  I didn't measure the out the lines before I painted them.  I just freehanded it.  It's not perfect but that's what gives it character.  After the paint was dry, I hot glued the flowers onto the wooden monogram.  To finish it off, I hot glued about 8 inches of ribbon to the top of the H.  Once it was completely dry, I used the ribbon to hang it off a over the door hook.  Overall, this entire project took just 15 minutes. 
My door is now one of the cutest on the block! 


Thursday, May 10, 2012

Baked Oatmeal Cups


Are you even in need of a quick, yet healthy breakfast recipe?  I feel like we are always on a constant search in our household.  I came across this recipe on Pinterest from Sugar Free Mom.  It looked good and I love how there were many different variations we could make.  So, I decided to give it a try for the week.  I followed the linked recipe and was happy with the results. I used a bag of frozen blueberries for my topping/ mix in.  Hubs wished they were a little sweeter, that would probably be the only thing I would change next time.  We've been enjoying them all week for breakfast.  Follow the links above for the recipe.  Enjoy!

Blog Design by Get Polished