Tuesday, August 30, 2011

Carrot Cake Cupcakes (Light)


I found a recipe for carrot cake bars in the June issue of Fitness magazine.  I wanted treats to pass out on the first day of school and I had leftover carrots from my carrot, coconut & walnut bread.  So, I decided to try this "healthier" recipe and make them into cupcakes to share with my coworkers.  Below you will find the recipe from the magazine.  I followed all directions, except I used store bought frosting.  Loved the way these came out and will be making these again this fall. 


 Ingredients:
  • 2 cups all-purpose flour
  • 1 cup packed brown sugar
  • ¾ cup granulated sugar
  • 2 teaspoons ground cinnamon
  • 1 ½ teaspoons baking powder
  • 1 ½ teaspoons baking soda
  • 7 egg whites slightly beaten (1 cup)
  • ½ cup applesauce
  • ½ cup canola oil
  • 3 cups finely shredded carrot
Frosting Ingredients:
  • 2 cups powdered sugar
  • 8 ounces reduced-fat cream cheese
Directions:
  1. Preheat oven to 350 degrees & coat a 15 x 10 inch baking dish with cooking spray.
  2. Stir together dry ingredients.
  3. Spread batter into the prepared pan & bake until toothpick inserted near the center comes out clean…about 25-30 minutes.
  4. Cool completely!
  5. Frosting: beat together powdered sugar & cream cheese until smooth & spread over cooled cake.

Monday, August 29, 2011

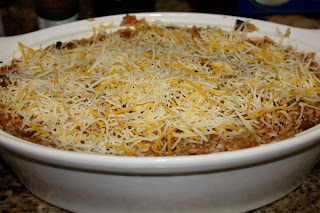
Burrito Casserole

I recently subscribed to Family Circle magazine through a great deal I found on Coupon Divas. I've received a few issues already and am very pleased with my purchase. This is one of the recipes I ripped out and placed in my binder. I pulled it out last week because I wanted to make something that would give Mr & I lots of leftovers for the week.  Mission accomplished with this recipe.  We both had lunch for 4 days with the leftovers.  I did make a few changes, which I noted below.  Enjoy! 


Ingredients
  • packages (8.8 ounces each) fully cooked brown rice (such as Uncle Ben's)
  • jar (15 1/2 ounces) salsa
  • 1/2 teaspoon dried oregano
  • can (15 ounces) refried beans
  • package (10 ounces) frozen corn, thawed
  • 1/2 teaspoon chipotle chile powder
  • 1/2 teaspoon ground cumin
  • 1 1/2 cups shredded reduced-fat taco-cheese blend
  • packages (10 ounces each) frozen chopped spinach, thawed and squeezed dry (I used 1 package)
  • tablespoons chopped cilantro
  • I added 2 cups of cubed cooked chicken
  • 3 TBS sour cream

Directions

1. In a large bowl, combine rice, salsa and oregano. In a second bowl, combine refried beans, chicken, corn, chile powder and cumin.

2. Coat a 12 x 8 x 2-inch baking dish with nonstick cooking spray. Spread half of the rice mixture evenly in dish. Layer refried bean mixture and half the cheese over the rice. Scatter spinach over cheese. Top with remaining rice mixture and cheese.

3. Cover with plastic wrap and refrigerate for up to 2 days. I made mine in one night

4. Heat oven to 350 degrees F. Bake, uncovered, for 35 minutes or until internal temperature registers 140 degrees F. Sprinkle with cilantro before serving and add a dab of sour cream to the top. 


Sunday, August 28, 2011

Carrot, Coconut & Walnut Bread

I made this bread a few weeks ago, hoping to have it for the week.  But, I brought it to work and it was gone in an hour. Enjoy!

Ingredients: 
1 cup shredded carrot
1 cup shredded coconut 
3/4 cup toasted walnuts
1 3/4 cups flour
3/4 cup sugar
1 tsp baking powder
1 tsp salt
1/2 tsp baking soda
1 tsp cinnamon
1/2 tsp nutmeg
2 eggs
1/2 cup vegetable oil
1/2 cup plain greek yogurt 
1 tsp vanilla 

Directions: 
Preheat the oven to 350.  Grease a 9 X 5 loaf pan. Mix the flour, sugar, baking powder, salt, baking soda, cinnamon and nutmeg in a large bowl.  Add the coconut and walnuts to the mix.  In a medium bowl, whisk the eggs, oil, vanilla and yogurt.  Stir in the shredded carrot to the egg mixture.  Fold the egg mixture into the dry mixture.  Spread the batter into a prepares loaf pan.  Bake for about 55 minutes or until a toothpick comes out clean.  Cool for 30 minutes in the pan, on a rack.  Then take out of pan to cool completely on the rack.  


Saturday, August 27, 2011

Bacon Cheddar Corn Muffins

I've been all about making things to freeze ever since we received a small freezer for our garage.  I had ripped this recipe out a while ago from Cooking Light, knowing the MR would love these.  With school starting back up, I don't usually have time to eat breakfast.  I knew these would be easy to grab on my way out the door.  The muffins were pretty simple.  I didn't use a jalapeno because they were out at the store.  Next time, I'll definitely add one for a little spice.  I'll also add some salt and pepper to the mix as well.  They were a tad bland, but still good.  I would recommend heating them up in the microwave for a few seconds before eating.  Enjoy!

Ingredients

  • 4 1/2 ounces all-purpose flour (about 1 cup)
  • 3/4 cup yellow cornmeal
  • 1/2 cup (2 ounces) shredded sharp cheddar cheese
  • 2 tablespoons sugar
  • 1 teaspoon baking powder
  • 1 teaspoon baking soda
  • 3/4 teaspoon ground cumin
  • 1/4 teaspoon salt
  • center-cut bacon slices, cooked, drained, and crumbled
  • jalapeño pepper, seeded and minced
  • 1 1/4 cups low-fat buttermilk
  • 1/4 cup canola oil
  • large egg, lightly beaten
  • Cooking spray

Preparation

  • 1. Preheat oven to 375°.
  • 2. Weigh or lightly spoon flour into dry measuring cups; level with a knife. Combine flour and next 7 ingredients (through salt) in a large bowl, stirring with a whisk. Stir in bacon and jalapeño; make a well in center of mixture. Combine buttermilk, oil, and egg in a bowl, stirring well with a whisk. Add buttermilk mixture to flour mixture, stirring just until moist.
  • 3. Place 12 muffin-cup liners in muffin cups; coat with cooking spray. Divide batter among muffin cups. Bake at 375° for 15 minutes or until a wooden pick inserted in center comes out clean. Cool 5 minutes in pan on a wire rack


Tuesday, August 23, 2011

Coconut Macaroons


I love coconut.  I also love recipes with very few ingredients.  Which is exactly why I ripped this recipe out of my Taste of Home magazine about a year ago.  I was looking for a light cookie to make for a group of friends, at the last minute.  I had all these ingredients on hand and 30 minutes to spare. I'm so glad I went with this recipe.  They were chewy, simple and delicious.  Enjoy!

  • 9 Servings
  • Prep/Total Time: 25 min.
101525

Ingredients

  • 2-1/2 cups flaked coconut
  • 1/3 cup all-purpose flour
  • 1/8 teaspoon salt
  • 2/3 cup sweetened condensed milk
  • 1 teaspoon vanilla extract

Directions

  • In a bowl, combine the coconut, flour and salt. Add milk and vanilla; mix well (batter will be stiff).
  • Drop by tablespoonfuls 1 in. apart onto a greased baking sheet. Bake at 350° for 15-20 minutes or until golden brown. Remove to wire racks. Yield: 1-1/2 dozen.


Monday, August 22, 2011

Chocolate Chip Cookies


This recipe comes from Keeping Up with the Joneses. I've made tons of different recipes for Chocolate Chip Cookies over the years. They've all been pretty good, but I'm still looking for "the one". What attracted me to this recipe was the size of the cookie. I was looking for a bigger cookie to make and these were the perfect size. They were light, moist and oh so sweet. Two thumbs up in my book!


Ingredients:
3/4 cup butter, melted
3/4 cup sugar
3/4 cup packed dark brown sugar
2 large eggs
1 1/2 tsp vanilla extract
2 1/4 cups flour, plus 2 Tbsp
1 tsp baking soda
3/4 tsp salt
1 (12 oz) package of semi-sweet chocolate chips


Instructions:
Beat butter and sugars at medium speed with an electric mixer until creamy. Add eggs and vanilla, beating until blended.

Combine flour, soda, and salt in a small bowl; gradually add to butter mixture, beating well. Stir in morsels. Drop by tablespoonfuls onto parchment paper-covered cookie sheets. Note that the mixture is so moist and gooey that it can't be shaped into perfect balls, but it doesn't matter, just drop them with a spoon as best you can :)

Bake at 350° for 8 to 14 minutes or until desired degree of doneness. Remove to wire racks to cool completely. For me, these were perfect at 12 minutes!

Total Time: 40 minutes
Makes: 4-5 dozen, depending on size


Cranberry Chocolate Scones


This is the first time I've ever made scones.  I enjoy eating them at Starbucks, I just thought they were too much work to make.  Last week, we had a breakfast meeting at work.  I decided to pull out an easy recipe for scones I had found a while back.  The recipe was from Southern Living.  This is a basic recipe, you can add mixins create the scone you want.  I added 1/4 cup dried cranberries and 1/2 cup chocolate chips.  I personally loved my creation and my team did as well.  There weren't any leftover!  Now that I know how easy scones are to make, I'll be making them more often.  

Ingredients

  • 2 cups all-purpose flour
  • 1/3 cup sugar
  • 1 tablespoon baking powder
  • 1/2 teaspoon salt
  • 1/2 cup cold butter, cut into 1/2-inch cubes
  • 1 cup whipping cream, divided
  • Wax paper

Preparation

  • 1. Preheat oven to 450°. Stir together first 4 ingredients in a large bowl. Cut butter into flour mixture with a pastry blender until crumbly and mixture resembles small peas. Freeze 5 minutes. Add 3/4 cup plus 2 Tbsp. cream, stirring just until dry ingredients are moistened.
  • 2. Turn dough out onto wax paper; gently press or pat dough into a 7-inch round (mixture will be crumbly). Cut round into 8 wedges. Place wedges 2 inches apart on a lightly greased baking sheet. Brush tops of wedges with remaining 2 Tbsp. cream just until moistened.
  • 3. Bake at 450° for 13 to 15 minutes or until golden.
  • Sweet Variations
  • Chocolate-Cherry Scones: Stir in 1/4 cup dried cherries, coarsely chopped, and 2 oz.coarsely chopped semisweet chocolate with the cream.
  • Apricot-Ginger Scones: Stir in 1/2 cup finely chopped dried apricots and 2 Tbsp. finely chopped crystallized ginger with the cream. Drizzle with Vanilla Glaze after baking.
  • Cranberry-Pistachio Scones: Stir in 1/4 cup sweetened dried cranberries and 1/4 cup coarsely chopped roasted salted pistachios with the cream.
  • Brown Sugar-Pecan Scones: Substitute brown sugar for granulated sugar. Stir in 1/2 cup chopped toasted pecans with the cream.
  • Savory Variations
  • Bacon, Cheddar, and Chive Scones: Omit sugar. Stir in 3/4 cup (3-oz.) shredded sharp Cheddar cheese, 1/4 cup finely chopped cooked bacon, 2 Tbsp. chopped fresh chives, and 1/2 tsp. freshly ground pepper with the cream.
  • Ham-and-Swiss Scones: Omit sugar. Stir in 3/4 cup (3 oz.) shredded Swiss cheese and 3/4 cup finely chopped baked ham with the cream. Serve warm with Mustard Butter: Stir together 1/2 cup softened butter, 1 Tbsp. spicy brown mustard, and 1 Tbsp. minced sweet onion.
  • Pimiento Cheese Scones: Omit sugar. Stir in 3/4 cup (3-oz.) shredded sharp Cheddar cheese and 3 Tbsp. finely chopped pimiento with the cream.
  • Rosemary, Pear, and Asiago Scones: Omit sugar. Stir in 3/4 cup finely chopped fresh pear, 1/2 cup grated Asiago cheese, and 1 tsp. chopped fresh rosemary with the cream.
  • Festive Touch
  • Bite-Size Scones: Pat dough into 2 (4-inch) rounds. Cut rounds into 8 wedges. Bake as directed for 12 to 13 minutes.


Saturday, August 20, 2011

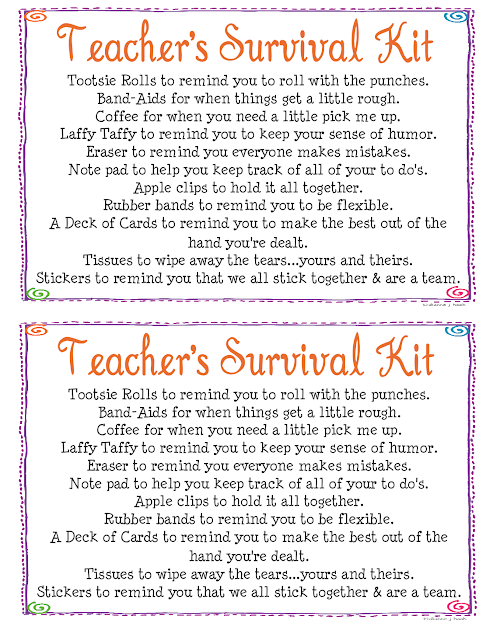
Teacher's Survival Kit


This year I am the third grade team leader.  We have 8 ladies on our team, which is a pretty large team.  I always like doing little things for my team at the beginning of the year.  This year I decided to do a survival  kit to give each of them at our first team meeting.  I had a found a lot of great ideas on Pinterest and some teacher sites, which helped me create the survival kit I used.  I found the small drink tubs at Target in the dollar section and used Sharpie paint pens to personalize each one.  Then, I filled the inside with some tissue paper and all of the items below.  My team really enjoyed these gifts and I know we all have a great year ahead of us.  


TO DOWNLOAD THIS PRINTABLE GO HERE

Wednesday, August 17, 2011

Crayon Monogram

I started with a plain wooden letter.  Next, I painted it green.  I painted two coats on all sides except the front.  Since the crayons will cover the front.  After that, I painted a coat of Mod Podge over the green.  Let it dry.  The final step is to hot glue the crayons to the front of the letter.  I didn't do a particular pattern, but I tried my best to make sure the Crayola logo on all the crayons lined up.  I tried a few different directions and decided it looked best with all the crayons facing the same way.   In order to get the crayons in the middle to fit, I used a knife to cut them.  That's it, simple as that. I can't wait to add this decoration to my classroom!


Tuesday, August 16, 2011

Back to School- Classroom Welcome Sign

I've decided to stick with my sports all star theme again this year in my third grade classroom.  This year, I decided to make a welcome sign for the door in my room.  Here is what I did: 

I started with a plain wood framed chalk board.  I found it in the wood section of Jo Ann Fabrics.  


I covered the wood edges of the frame with different sports ribbon, to match my sports theme.  I attached it to the back of the sign with hot glue.  


I then used wood sports decorations on each of the corners.  I used hot glue to attach them.  


To finish it off, I used Sharpie Paint Pens to write on the chalk board.  You could write in chalk and change the words as you wish.  I wanted it to stay, so I used white paint pen.  


Blog Design by Get Polished