Showing posts with label Baby. Show all posts

Tuesday, June 5, 2012

Mod Podge Scrapbook Wall Letters

One thing I knew from the day I found out I was pregnant was that I was going to make his/her name to hang on the wall.  I’ve seen it all over Pinterest and in many of my friends homes.  I love how it looks, especially above the crib.  When we found out our little one was a girl, I knew exactly what I wanted to do for the nursery.  I wanted a grey and white room with pink accents.  We decided on one wall of horizontal stripes at the focal point for the room, it would also be the wall the crib was in front of. 
 As soon as that was finished, I began working on her name for the wall.  It took weeks for me finish this project.  I had to make sure to get the letters I wanted, then came the paper that had to match the nursery, from there we needed to figure out how we wanted to hang them (which I left up to hubs to decide).  I personally think they are the perfect addition to our little one’s nursery, but I’m a little partial =-)

Here is how to make them.  
Materials:
Wooden letters (I found mine at Hobby Lobby)


Scrapbook Paper
Acrylic paint that matches
Mod Podge
Hot Glue
Ribbon
Scissors


Directions: 

  1. Paint the outside and the edges of your letters.  I only did one coat although, it could have used two.  I knew it wouldn’t be obvious to see from far a  away and I honestly didn’t want to take the time to do it.  
2. Trace the letter on scrapbook paper.  Make sure you decide which paper you want to use for which letter.  I used three different pieces of paper for this project.  When you trace the letter, flip It over and make sure you’re tracing it to the decorated side of the paper matches the top of the letter.                                        
3. Cut out the letters.  Do this as carefully as you can so that it matches the letters perfectly,
4. Put Mod Podge on the top of the letter.  Just enough to adhere the scrapbook paper.  After a thin coat of mod podge, place the scrapbook paper on top.  Press it down so that there aren’t any bubbles or raised edges.  
5. After that is dry, apply a layer of Mod Podge to the entire top and sides of the letter.  The back doesn’t matter because it won’t be visible.  
6. Now you’re ready to hang it up.  I decided to glue ribbon to the back and hang the ribbon off of very thin nails in the wall. I put hubs in charge of the leveling and hanging.  

There are so many things you can do with these letters from monograms in your living room to baby shower decorations to door hangers.  The possibilities are endless, ENJOY!


Monday, May 28, 2012

DIY Bow Holder


I started making bow holders about a year and a half ago when I found out one of my best friends was having a baby girl.  They soon became the perfect gift to give expectant mothers along with some handmade bows.  Now that I’m having a little girl of my own, I’ve been on a mission to create different things to match her nursery.  One of the first projects on my list was a bow holder.  I didn’t want to do the typical monogram because the space I planned on hanging it was pretty big.  So, I decided to do a framed monogram look. I love how it turned out and even more now that it’s filled with bows.  The only thing I need is a little princess to put them on!

Materials:
1 square wood frame (mine was from Hobby Lobby, but can be found at most craft stores).
1 monogram letter to go on the top.  Make sure it’s not too much smaller than the frame and definitely not bigger.  (Michaels is where I found mine).
Acrylic Paint to match the nursery or color scheme you’re going for
Matching Ribbon (Grossgrain is preferred, bows slip off the rest)
Hot Glue
Mod Podge


Directions:

Paint the wood frame the color of your choice.  Here is where you can be as creative as you wish.  Think of fun patterns or keep it simple.  It’s up to you.  
After the wood frame is painted, brush over it with a layer or two of Mod Podge.  Make sure to get the sides as well, they will be visible.  
After the Mod Podge is dry, hot glue the monogram to the frame.  My “A” already came white, or else I would have painted and sealed it first.  
To finish it off, hot glue a ribbon loop to the top of the frame.  I used about 8 inches for the loop and glued a bow I made to the tippy top for an added touch.  
Lastly, using more matching ribbon, glue about 20 inches to the bottom of the holder.  I usually glue it in a loop and cut it at the bottom to create two straight lines of ribbon, which leaves two places to hang bows.  A final touch is to seal the ends with heat from a lighter. 


If you have any questions, let me know.  If you make a holder of your own, please share!

Friday, March 30, 2012

Gender Reveal Party


As soon as we found out we were pregnant, I knew I wanted to throw a gender reveal party.  I had seen so many cute ideas on Pinterest and thought it would be the perfect way to share with close friends and family what Baby Herring would be.  I started planning the party at about 14 weeks.  I used my time off for spring break to get most of the decorations done, most of which involved my Cricut.  I tried to use as many things as possible from my craft room to create things for the reveal.  Luckily I had a wreath, yarn, ribbon and tons of blue and pink paper.  I planned a small menu since the party was at 3 in the afternoon on a Sunday.  We served lemonade, water, sangria and little sandwiches, pasta salad, spinach dip and fruit.  It ended up being the perfect amount of food.  For the reveal we used an empty box we found at Office Depot and 8 balloons.  Since we already had found out what Baby Herring was 2 days before the party, we knew what color to buy and fill the box with.  As soon as everyone arrived for the party, we revealed outside in our front yard.  My parents and best friend were ready to rip the box open if they had to wait any longer.   Hubs cut the tape and I helped the balloons out of the box.  We let some into the air and taped the others to the box for pictures.  We had such a wonderful time at the party and can't wait to show Avery the pictures of when all her aunts and uncles found out she was a girl!
P.S. Most of our family and friends thought she would be a he! 


Like it? Share it!


Sunday, July 31, 2011

Diaper Clutch


I've seen many diaper clutch tutorials over the past year, many which I have bookmarked.  Recently, I wanted to make one for a special little baby that will be arriving shortly.  I went through all of my tutorials and decided to use this one over at A Lemon Squeezy Home.    She has an awesome downloadable template that I used for this project.  The entire thing took me less than an hour and I was thrilled with how it came out.  I was able to fit 3 diapers and a personalized wipes case in the clutch I made.  Head on over to A Lemon Squeezy Home and make one yourself! 


Thursday, July 28, 2011

Binky Clips


Binky clips have been on my to do list for months now.  It's one of those things that I had never been able to get around to.  Usually, because another project came up.  But, the upcoming birth of Brittney's baby boy gave me the  motivation I needed.  I followed the tutorial over at Seven Sisters.  These were so so easy to make.  I'm kicking myself for not making them sooner.  I could have added them to many many baby shower gifts.  I especially love how the ribbons are interchangeable.  So, all you really need is one paci and one clip for each gift with a bunch of different ribbons.  One for every day of the week if you wish.  The options are endless.  


Supplies:
One Inch Ribbon
Iron on velcro 
Mitten clips 
Iron

Directions:
Measure and cut your Ribbon. I used heat to seal the ends.  
Place sticky side of velcro onto ribbon, turn ribbon over and iron on.
Make sure to leave enough room between the velcro for the binki and clip to fit. You'll end up with two pieced of velcro on each side of the ribbon.  
That's it, plain and simple! 


Monday, March 21, 2011

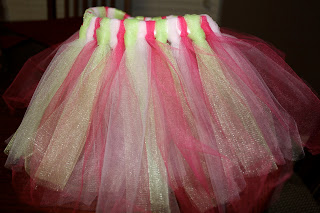
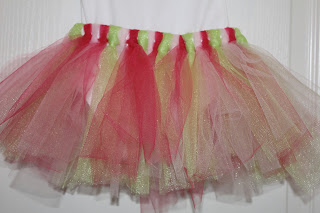
No Sew Tutu

What little girl doesn't need a tutu?  I made one for one of my best friend's baby shower last month. I found a few tutorials that were very helpful.  There's no need for me to reinvent the wheel and create my own, so check out Samster Mommy or Sumo's Sweet Stuff.  Now mine definitely didn't take me 10 minutes, but it sure was easy.  I can't wait to see it on baby Callie! 


Sunday, March 13, 2011

Pink & Green Baby Shower

I threw a pink & green baby shower for my MOH last month.  I spent lots of time working on the little details that I knew she would love.  Here are the pictures from the shower.  Below, you will find the links to the tutorials for each DIY project.  Also, another fabulous resource I used was a baby shower checklist I found at BabyShower101.com. It was a huge help in planning the day.  

Onesie Sugar Cookies.  I used pre-made sugar cookie dough, a onesie cutout from Michael's and this recipe for royal icing.  I love how these came out! 

No baby shower is complete without a diaper cake!  I stepped a little outside my box for this design using the flowers instead of stuffed animals.  I also doubled the amount of ribbon I usually use and love that added detail.  Click on the link for the diaper cake tutorial.  

Read a little about the advice jar here.  


I'm a big fan of edible favors, whether it's for showers or weddings.  Guests will most likely eat edible favors as opposed to a picture frame or wine opener or coaster.  I can't tell you where all the favors I've received at events end up.  So, I decided to make baby carriage shaped rice krispie treats.  I made a batch of rice krispie treats according to the directions on the package.  I made the royal icing (recipe link above) for the icing on top and the decorative work.  The cutter used was found at Michael's.  I wrapped all the favors in clear bags and tied them with a ribbon.  


I used the ribbon above to decorate pretty much anything I could for the shower.  I used this apothecary jar and filled it with gumballs to match the colors for the shower.  It was placed next to the diaper cake and advice jar.  

Even though I wanted to make cupcakes from scratch, time did not permit.  So, I went with the trusted box of cake mix.  I used strawberry with cream cheese icing and chocolate with vanilla icing.  I tied in the colors with the sprinkles on top.  


I'm now a huge fan of cake pops.  L-O-V-E them! And...I would say they were the guests favorites (any a favorite of my family who was in town that week).  Visit my post on Bakerella's cake pops for the link for directions and more pictures! 

center table


dessert table

drinks table

food table-cheese ball, spinach dip, pasta salad, subs, fruit salad, brie and more 

Diaper wreath used at the door as guests walked in.  Of course, it's pink and green. 

Party Punch.  Super simple to make and everyone was asking for the recipe!

I made this clothes line and banner to go in the front of the room. Since the shower was in my classroom, I wanted to cover all of my teacher stuff.  It worked perfectly!  I also made all of the white onesies and bought the rest at Target to match the shower.  


Centerpieces used on each table.  Bought the flowers at Michael's, used clear vases filled with pink and clear marbles.  Love that these can be used over and over again!


Here is the beautiful mommy to be and myself.  


Love it? Share it! 

Blog Design by Get Polished