Monday, March 21, 2011

Tilapia Milanese

This is the first of many upcoming tilapia recipes.  Reason being, I bought 6 large pieces of fresh tilapia for $7.00 (thank you buy one get two free from Albertsons).  The picture below is just HALF a piece of tilapia.  I was able to cut and freeze 12 pieces of fish.  Thankfully, I love tilapia and am looking forward to finding some creative recipes! This one was fabulous.  The lemon zest definitely made the meal.  I didn't use the flour, butter and bread in order to eliminate some calories.  Instead, I dipped the fish in egg then Panko crumbs before throwing it on the stove with a little olive oil.  Other than that, I followed all directions from the Food Network Magazine recipe. I served it with asparagus and brown/wild rice.  Enjoy!


 Ingredients

  • 4 6-ounce tilapia fillets
  • 1 1/2 cups milk
  • 1 cup all-purpose flour
  • Kosher salt and freshly ground pepper
  • 3 large eggs
  • 6 slices white sandwich bread, torn into pieces
  • 1/3 cup fresh parsley leaves
  • Finely grated zest of 1/2 lemon, plus lemon wedges for serving
  • 5 to 6 tablespoons extra-virgin olive oil
  • 4 tablespoons unsalted butter
  • 6 cups baby arugula

Directions

Preheat the oven to 425 degrees F. Soak the fish in a bowl with the milk and 2 cups ice, 15 minutes. Meanwhile, mix the flour with 1/2 teaspoon each salt and pepper in a shallow dish. Lightly beat the eggs in another dish. Pulse the bread, parsley, lemon zest and 1/2 teaspoon salt in a food processor until crumbs form, then transfer to a third dish.
One at a time, remove the fillets from the milk and dredge in the flour, shaking off the excess. Dip in the eggs, then coat with the breadcrumbs, gently pressing to coat both sides. Transfer to a large plate.
Line a baking sheet with foil. Heat 2 tablespoons each olive oil and butter in a large skillet over medium-high heat. Add 2 fillets and cook until golden, about 3 minutes per side. Transfer to the prepared baking sheet. Repeat with the remaining 2 fillets, adding 2 more tablespoons each olive oil and butter. Transfer the fish to the oven and bake until cooked through, about 8 minutes.
Toss the arugula with the remaining 1 to 2 tablespoons olive oil, and salt and pepper to taste. Serve the fish with the salad and lemon wedges.

No Sew Tutu

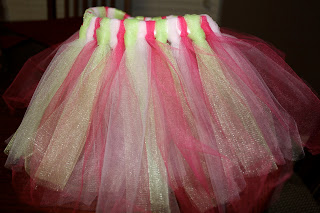
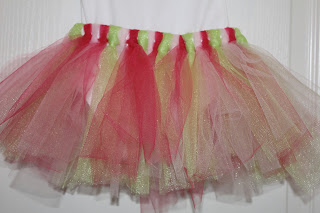
What little girl doesn't need a tutu?  I made one for one of my best friend's baby shower last month. I found a few tutorials that were very helpful.  There's no need for me to reinvent the wheel and create my own, so check out Samster Mommy or Sumo's Sweet Stuff.  Now mine definitely didn't take me 10 minutes, but it sure was easy.  I can't wait to see it on baby Callie! 


Sunday, March 13, 2011

Chicken Tamale Casserole

This recipe comes to you from Cooking Light.  I had most ingredients at home and didn't want to spend lots of time on dinner tonight.  This recipe was ah-mazing.  I was really nervous that we'd end up having to get take out about half way through.  But, it turned out great.  Hubs event went back for thirds! And...there's enough left over for at least 4 more meals! 


Ingredients

    * 1  cup  (4 ounces) preshredded 4-cheese Mexican blend cheese, divided
    * 1/3  cup  fat-free milk
    * 1/4  cup  egg substitute
    * 1  teaspoon  ground cumin
    * 1/8  teaspoon  ground red pepper
    * 1  (14 3/4-ounce) can cream-style corn
    * 1  (8.5-ounce) box corn muffin mix (such as Martha White)
    * 1  (4-ounce) can chopped green chiles, drained
    * Cooking spray
    * 1  (10-ounce) can red enchilada sauce (such as Old El Paso)
    * 2  cups  shredded cooked chicken breast
    * 1/2  cup  fat-free sour cream

Preparation

1. Preheat oven to 400°.

2. Combine 1/4 cup cheese and next 7 ingredients (through chiles) in a large bowl, stirring just until moist. Pour mixture into a 13 x 9–inch baking dish coated with cooking spray.


3. Bake at 400° for 15 minutes or until set. Pierce entire surface liberally with a fork; pour enchilada sauce over top. Top with chicken; sprinkle with remaining 3/4 cup cheese. Bake at 400° for 15 minutes or until cheese melts. Remove from oven; let stand 5 minutes. Cut into 8 pieces; top each serving with 1 tablespoon sour cream.


Pink & Green Baby Shower

I threw a pink & green baby shower for my MOH last month.  I spent lots of time working on the little details that I knew she would love.  Here are the pictures from the shower.  Below, you will find the links to the tutorials for each DIY project.  Also, another fabulous resource I used was a baby shower checklist I found at BabyShower101.com. It was a huge help in planning the day.  

Onesie Sugar Cookies.  I used pre-made sugar cookie dough, a onesie cutout from Michael's and this recipe for royal icing.  I love how these came out! 

No baby shower is complete without a diaper cake!  I stepped a little outside my box for this design using the flowers instead of stuffed animals.  I also doubled the amount of ribbon I usually use and love that added detail.  Click on the link for the diaper cake tutorial.  

Read a little about the advice jar here.  


I'm a big fan of edible favors, whether it's for showers or weddings.  Guests will most likely eat edible favors as opposed to a picture frame or wine opener or coaster.  I can't tell you where all the favors I've received at events end up.  So, I decided to make baby carriage shaped rice krispie treats.  I made a batch of rice krispie treats according to the directions on the package.  I made the royal icing (recipe link above) for the icing on top and the decorative work.  The cutter used was found at Michael's.  I wrapped all the favors in clear bags and tied them with a ribbon.  


I used the ribbon above to decorate pretty much anything I could for the shower.  I used this apothecary jar and filled it with gumballs to match the colors for the shower.  It was placed next to the diaper cake and advice jar.  

Even though I wanted to make cupcakes from scratch, time did not permit.  So, I went with the trusted box of cake mix.  I used strawberry with cream cheese icing and chocolate with vanilla icing.  I tied in the colors with the sprinkles on top.  


I'm now a huge fan of cake pops.  L-O-V-E them! And...I would say they were the guests favorites (any a favorite of my family who was in town that week).  Visit my post on Bakerella's cake pops for the link for directions and more pictures! 

center table


dessert table

drinks table

food table-cheese ball, spinach dip, pasta salad, subs, fruit salad, brie and more 

Diaper wreath used at the door as guests walked in.  Of course, it's pink and green. 

Party Punch.  Super simple to make and everyone was asking for the recipe!

I made this clothes line and banner to go in the front of the room. Since the shower was in my classroom, I wanted to cover all of my teacher stuff.  It worked perfectly!  I also made all of the white onesies and bought the rest at Target to match the shower.  


Centerpieces used on each table.  Bought the flowers at Michael's, used clear vases filled with pink and clear marbles.  Love that these can be used over and over again!


Here is the beautiful mommy to be and myself.  


Love it? Share it! 

Friday, March 11, 2011

Necklace Onesie


Love, love, love this necklace onesie! I found the tutorial over at Sumo's Sweet Stuff. These are so incredibly easy to make and turn into a perfect baby shower or welcoming baby gift.  All you need to make this is heat and bond, fabric, a plain onesie, an iron and a sewing machine.  Once you make one, you wont be able to stop! I can't wait to see these two on baby Callie!


Wednesday, March 9, 2011

Brown & Pink Baby Shower

These pictures are from the second baby shower I helped throw for my MOH.  I can't take credit for everything you see in the pictures, everyone involved worked hard on every little detail.  My work can be seen in the diaper cake, diaper wreath, clothes hanger bows and the cookies.  The shower was perfect and we can't wait to meet baby Callie! You can find the diaper cake tutorial here, diaper wreath tutorial here, smores cookies here, lemon cookies here and bow directions here.  That's a lot of heres! Enjoy!


Monday, March 7, 2011

Advice & Wishes for the Mommy to be...


I loved every minute of planning my MOH's baby shower.  I wanted to add lots of personal touches to the shower, which lead me to countless hours of online searching.  One of the things I decided to make, was this advice and wishes jar. 

Here's How: 
I bought a vase from Michael's and decorated it with ribbon and rhinestones. The rhinestones were self adhesive and I hot glued the ribbon.  I found the bottle frame in the dollar section at Target and printed out a little sign/direction.  Last, I used old scraps of scrapbook paper.  I found every pink & green piece of paper I had and cut it into different sizes.  All with enough room for guests to write a little message.  I put a small pail with pink & green pencils on the table for guests to use to write. 


Sunday, March 6, 2011

Lemon Cookies

Baby Shower Recipe- The title of these cookies is Easy Lemon Cookies and that is exactly what they were.  My best friend's father loved my lemon blossoms I made over the summer, so I made these with him in mind.  We also already had cake, chocolate covered pretzels and chocolate chip cookies. So light and lemony was the perfect final dessert for the shower.  I have to admit that I'd pick chocolate over lemon any day, but these cookies were my #1 choice for the night.  Delicious!! 


Ingredients

  • 1 (18.25 ounce) package lemon cake mix

  • 2 eggs

  • 1/3 cup vegetable oil

  • 1 teaspoon lemon extract

  • 1/3 cup confectioners' sugar for decoration

Directions

Preheat oven to 375 degrees F (190 degrees C).

  1. Pour cake mix into a large bowl. Stir in eggs, oil, and lemon extract until well blended. Drop teaspoonfuls of dough into a bowl of confectioners' sugar. Roll them around until they're lightly covered. Once sugared, put them on an ungreased cookie sheet.
  2. Bake for 6 to 9 minutes in the preheated oven. The bottoms will be light brown, and the insides chewy.

Blog Design by Get Polished