Showing posts with label DIY. Show all posts

Tuesday, April 12, 2016

DIY Tutu Wreath

For Avery's second birthday, we decided on an ice cream and sprinkles birthday party. At the time we were living in Texas but decided to throw her party in Florida while we were on vacation visiting since that was where our most of our friends and family were. It was a bit tricky planning and executing a party in another state and at my parents house, but the day was completely worth it! 

My parents have a great entryway that I knew I wanted to decorate for the party. After a little time spent on Pinterest, I decided on a tutu wreath with a 2 in the center. Since it was an ice cream and sprinkles party, I covered the 2 with sprinkles. The wreath took less than an hour to make and cost less than $10. 


Materials: 
styrofoam wreath- 10 inches
tulle- I used two 25 yard rolls 
scissors


Directions: 
1. cut 14-16 inch strips of tulle, separating the colors into two piles
2. tie the pieces of tulle around the wreath, making a double knot. I did about 5 pieces of orange and 8 pieces of pink in a pattern. 
3. cover the entire wreath with tulle make sure the knots line up. I moved mine a bit towards the back of the wreath. 
4. trim the edges if needed to get the desired length you'd like and even things out. 

To create a fuller look, you can move the knots towards the front and fluff up the tulle. 


To see the rest of the party details, go here


Thursday, September 18, 2014

Big Sister Survival Kit

I've been working hard getting things ready for little man's arrival, which is less than two weeks away. For the most part my bags are packed, clothes are washed and we have what he will sleep in. That is all I need, right? 

Anyhow, one of the big things on my to do list before he gets here was making a survival kit for big sister Avery. I have it packed for the hospital so it's there when she visits Luke for the first time. I wanted to include items in it that would keep her busy and entertained while she was there once the newness of her little brother wore off. 

Here is what I included in the survival kit:

(top left to bottom right)

{One}
This adorable and personalized notebook is from Tiny Prints. I'm absolutely in love with how it came out and the quality of the notebook. Avery loves to color and write in all of my notebooks so I figured she would love one of her own. I personalized it with pictures of our family on the front, it makes me smile every time I look at it. 

{Two}
Princess Wand
This was a Target Dollar Spot find. She is obsessed with all things princess right now, I have a feeling this magical wand will be a big hit. 

{Three}
Frozen Play Pack
Another Target Dollar Spot find. Again, she is princess (and Frozen) obsessed right now. 

{Four}
Arts and Crafts. 
Again….Target Dollar Spot for the win! She loves to color so I thought this would be a fun little craft for her to do.  

{Five}
Minnie Mouse Play Camera 
I'm sure we will all be picture crazy when Avery meets Luke for the first time. I thought it would be fun for her to have her own little camera to pretend to take pictures with as well. If she was a bit older, I would totally give her a disposable camera. 

{Six}
Avery absolutely loves these. They are great to take on the road and out to dinner. All they require is a little water and are reusable. They don't make a mess and keep her entertained for a while. This is a new notebook and she loves animals, I think she'll be obsessed. 

{Seven}
Fruit Snacks
One of her favorites that she doesn't have on a regular basis. 
Tried to put "new" things in it that she won't put to the side in three seconds. 

{Eight}
Animal Crackers
when in doubt feed the toddler!

-------------------------------------------------------------------------------------------------------------------------------


One of my most popular posts on this blog is the survival kit I made for hubs before Avery was born.
I didn't want to forget about him this time around either. I decided to put together a little basket of his favorite sweets and treats for the hospital. In this survival kit I included gummy bears, trail mix, Twizzlers, gum, chap stick, protein bars, mints, Kit Kat and Starbursts candy. 


Thursday, October 10, 2013

Easy Pumpkin Centerpiece

I've been in search of the perfect fall centerpiece for our kitchen table.  
I wanted to make something but didn't really know where to start.  
Then a friend texted me a picture of a pumpkin centerpiece she made.  
It looked so simple.  I ran to Hobby Lobby that afternoon picked up supplies. 
I bought everything for under $10, thankfully they had 40% off all of their fall decor.  
The centerpiece took 10 minutes to make.  It's the perfect addition to our kitchen table. 


Materials: 
Craft pumpkin (any size)
Twine
Decorative fillers (floral stems)
Knife 
Marbles (1 small bag) 

Directions: 
Cut the top off the pumpkin (I would cut the circle smaller next time).  
I used a regular kitchen knife, doing a little at a time. 
I poured the marbles into the bottom of the pumpkin.  
I used marbles for the weight and to hold the stems in place.  
After that, I added the floral/ fall stems.  
It took a few minutes to get them arranged the way I wanted.  
I finished off by tying a bow using twine I already had around it.  
Simple as that.


Tuesday, March 19, 2013

Spring Yarn Wreath


Last year, I made this wreath for spring/ summer.  This year I wanted something different.  I wanted something bright and fun.  Something that made people smile when they looked at my front door.  When I was at the store last week, I picked up the perfect yarn that I knew would make a perfect wreath.  

Materials: 
Foam Wreath
Yarn
Fabric Scraps 
Buttons
Hot Glue
Ribbon

Instructions: 
Wrap the wreath with yarn.  I bought multicolored yard in spring colors. 
Once you're finished tie the ends together in a double knot.  


Next, you make the flowers using coordinating colors.  
Here is the tutorial I used to make the flowers.  
I used two different circles to make two different size flowers.
  When they were finished, I just hot glued them to the wreath.  

From here, you can use ribbon to hang it or hang it just the way it is off a hook.  
I did both and decided I liked the look of the ribbon better.  

That's it.  The entire wreath took me less than an hour. 
It brightens up the front of our house, I love it! 


Monday, March 18, 2013

Egg Garland


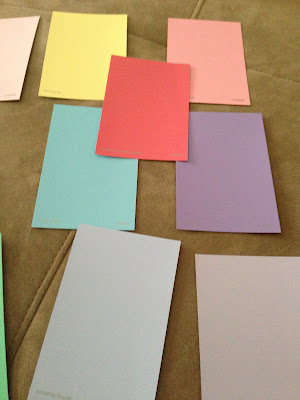
This project was inspired by Pinterest.  I remember pinning it last year but never got around to making it.  This year I made sure to add it to the top of my list and gave myself a good amount of time to get it done.  This entire project took me about 20 minutes and didn't cost a thing since I used items I already had at home.  
Aren't those the best kind of projects?!? 

Materials: 
Paint Chips
Yarn
Hole Punch
White Chalk Marker 
Egg Shaped Tracer

Instructions: 
I started out with paint chips I grabbed at WalMart.  


Next, I used an oval/ egg cookie cutter to trace shapes on all of the paint chips. 
Make sure to trace on the back, not the colored side.  
Then you don't have to worry about cutting it perfect. 


After that, I decorated the eggs with a chalk marker.  
You could use paint but the white for the chalk marker shows up best for me.  


To finish it up, I hole punched the top of the eggs and put yarn through the holes.  
I used a scrapbook hole punch, smaller than the regular paper punches. 
The holes were just big enough for the yarn to fit through.  
That is it.  Now find the perfect place to hang it up! 


Friday, March 15, 2013

Spring Banner


Materials: 
Scrap Paper (I used 3 pieces of polkadot) 
Scissors
Glue
Scrap Letters or Printer Letters 
Yarn


Instructions: 
I started with 8.5 x 11 sheets of paper (they came in a pack)
I used 7 sheets, one for a template and 6 for the banner


Next, I made a template with my extra sheet. 
I would recommend using a scrap sheet of paper instead of wasting a good sheet of paper. 
I folded it down the middle first.  
Then, I cut up from the bottom corners until it met in the middle.  


I used this piece to trace the rest for the banner. 


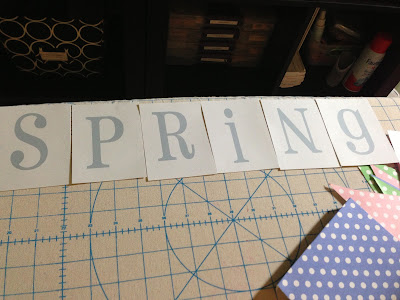
Next, I printed out the word spring on my computer. 
 I created 4x4 squares in Photoshop and my letters were about 3 inches. 
You could easily buy scrap letters or use a Cricut if you have one.  
I find printing it to be the quickest way for me. 


I trimmed the squares to fit on top of each banner piece.  
I made sure all the squares were the same size. 
Then, I took the banner pieces and folded them down about a half inch from the top. 


I glued the letter pieces onto the banner flags. 


To hang it up, I used yarn.  
I measured enough for the entire banner with room at both ends. 
Then, I folded the top of the banner flags over the yarn and hot glued it closed.  
Make sure you are gluing the letters in the correct order.  
I did them backwards the first time!


After you've done this for each flag, you're done. 
Display your work with pride.  


Monday, March 11, 2013

Rolled Sugar Cookies- Party Favors

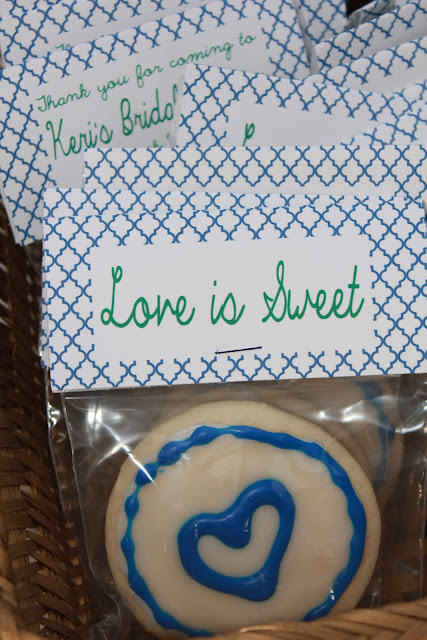
A few months ago I volunteered to make favors for one of my best friend's bridal showers.  I've made lots of favors in the past, but thanks to Pinterest, I have wanted to try something new, rolled sugar cookies.  I've attempted these a few times in the past but have completely failed.  This time I was determined.  First, I searched for a well reviews cookie recipe.  Second, I did the same for an icing recipe.  I found both over at All Recipes.com. 


Results: These cookies were a success! They rolled out easily, kept their shape and were pretty darn tasty.  The icing was the cherry on top!  I will be using this recipe again and again and have a feeling this is just the start these cookie favors! There are a lot of recommended changes to the recipe in the reviews section.  I kept everything the same and it was good, just the way it was.  For the icing, I had to add a little extra milk to thin it out to the consistency that worked for me.  


INGREDIENTS:
3/4 cup butter, softened
1 cup white sugar
2 eggs
1/2 teaspoon vanilla extract
2-1/2 cups all-purpose flour
1 teaspoon baking powder
1/2 teaspoon salt

DIRECTIONS:
You have scaled this recipe's ingredients to yield a new amount (30). The directions below still refer to the original recipe yield (60).
1.In a large bowl, cream together butter and sugar until smooth. Beat in eggs and vanilla. Stir in the flour, baking powder, and salt. Cover, and chill dough for at least one hour (or overnight).
2.Preheat oven to 400 degrees F (200 degrees C). Roll out dough on floured surface 1/4 to 1/2 inch thick. Cut into shapes with any cookie cutter. Place cookies 1 inch apart on ungreased cookie sheets.
3.Bake 6 to 8 minutes in preheated oven. Cool completely.


INGREDIENTS:
1 cup confectioners' sugar
2 teaspoons milk
2 teaspoons light corn syrup
1/4 teaspoon almond extract
assorted food coloring
DIRECTIONS:
1.In a small bowl, stir together confectioners' sugar and milk until smooth. Beat in corn syrup and almond extract until icing is smooth and glossy. If icing is too thick, add more corn syrup.
2.Divide into separate bowls, and add food colorings to each to desired intensity. Dip cookies, or paint them with a brush.

Saturday, February 23, 2013

Simple Skirt

They day Avery's first Valentine's Day play date, I realized she couldn't wear the outfit I had originally made for her because it would be too hot.  I definitely wasn't planning for the weather to be in the 80's in February. I didn't want to buy her something, so I decided I would try my hand at making a skirt.  I knew I could quickly embroider a shirt to match, problem solved.  So, I searched for a skirt tutorials.  I needed something simple and quick.  

I found the perfect tutorial over at Made.  
The tutorial was easy to follow.  
I'm no expert seamstress, I would definitely call myself a beginner. 
With that said, the entire skirt took me a half hour to make. 
Not too bad for my first skirt! 


Of course, my little miss looked adorable for her first Valentine's play date! 

Thank you Dana for a simple and easy to follow tutorial!


Wednesday, February 13, 2013

Date Night In- Jar


2016 updated date night jar 

One of the goals hubs and I set for the year was to have date nights in.  With a baby, getting out of the house for a date is not as easy as it used to be.  So, we decided we would try to do two date nights in a month.  He would plan one and I would plan the other.  For Valentine's Day, I'm giving him this jar filled with ideas for our date nights.  It's easy for me to come up with things to do but not as easy for him.  Now, he'll have a whole bunch of ideas at his fingertips!

All I used for this project was the printables below, a glass jar, ribbon, crinkle paper and card stock in red and white.  

I printed the ideas for date night on white cardstock. 
I made a red tag that was 3 1/2 inches on my Cricut.  


 Then, I printed out the date night in sign.  I made sure it was no bigger than 3 inches. 


I used this handy dandy puncher to round the edges. 


My tag for the jar was complete!


Next, I cut out all the date night ideas.  I included blank ones on the printable and decided to put the blank ones in the jar.  That way hubs can fill in some ideas that he thinks of along the way. 
Once they were all cut out, I put them in the jar on top of some crinkle paper.  
I added the crinkle paper to help fill the jar.  I wanted to use a mason jar but didn't have one in my stash. 
You can use any embellishments or fillers you'd like. 


Last, I used some thin red ribbon to attach the tag.  I made sure it hung on the front of the jar.  
Simple as that.  
Hopefully this will prevent the "what do you want to do?", "I don't know, what do YOU want to do?" conversations! 


Download the Date Night In Ideas Pages Here & Here 

I think the date ideas are pretty self explanatory.  But if you have any questions, don't hesitate to ask! 

Friday, February 8, 2013

Simple Love Banner

When cleaning out my craft room a few weeks ago I found a pack of unused doilies.  I knew just the project that I was going to use them for.  It had been one I had been eyeing on Pinterest for a while now! 


How I Did It:
My supplies were 4 doilies, red card stock, white card stock, white yarn, Cricut machine and tape. 
I laid out 4 doilies. 

I used my Cricut to make 4 4inch hearts. 
I taped the hearts onto the doilies. 


Next, I used my Cricut to make LOVE out of the white card stock paper.  My letters were 2 1/2 inches. 
I glued the letters onto the hearts.  


After that, I cut a large piece of yarn.  I laid it on the floor and placed the doilies on top.  After I checked the placement, I taped the yarn onto the back of the doilies.  

Last but not least, I hung it up.  I taped the banner to the inside of this cabinet.  I'm in love with the end result. I know I'm not going to want to take it down after Valentine's Day!


Blog Design by Get Polished